Light Painting

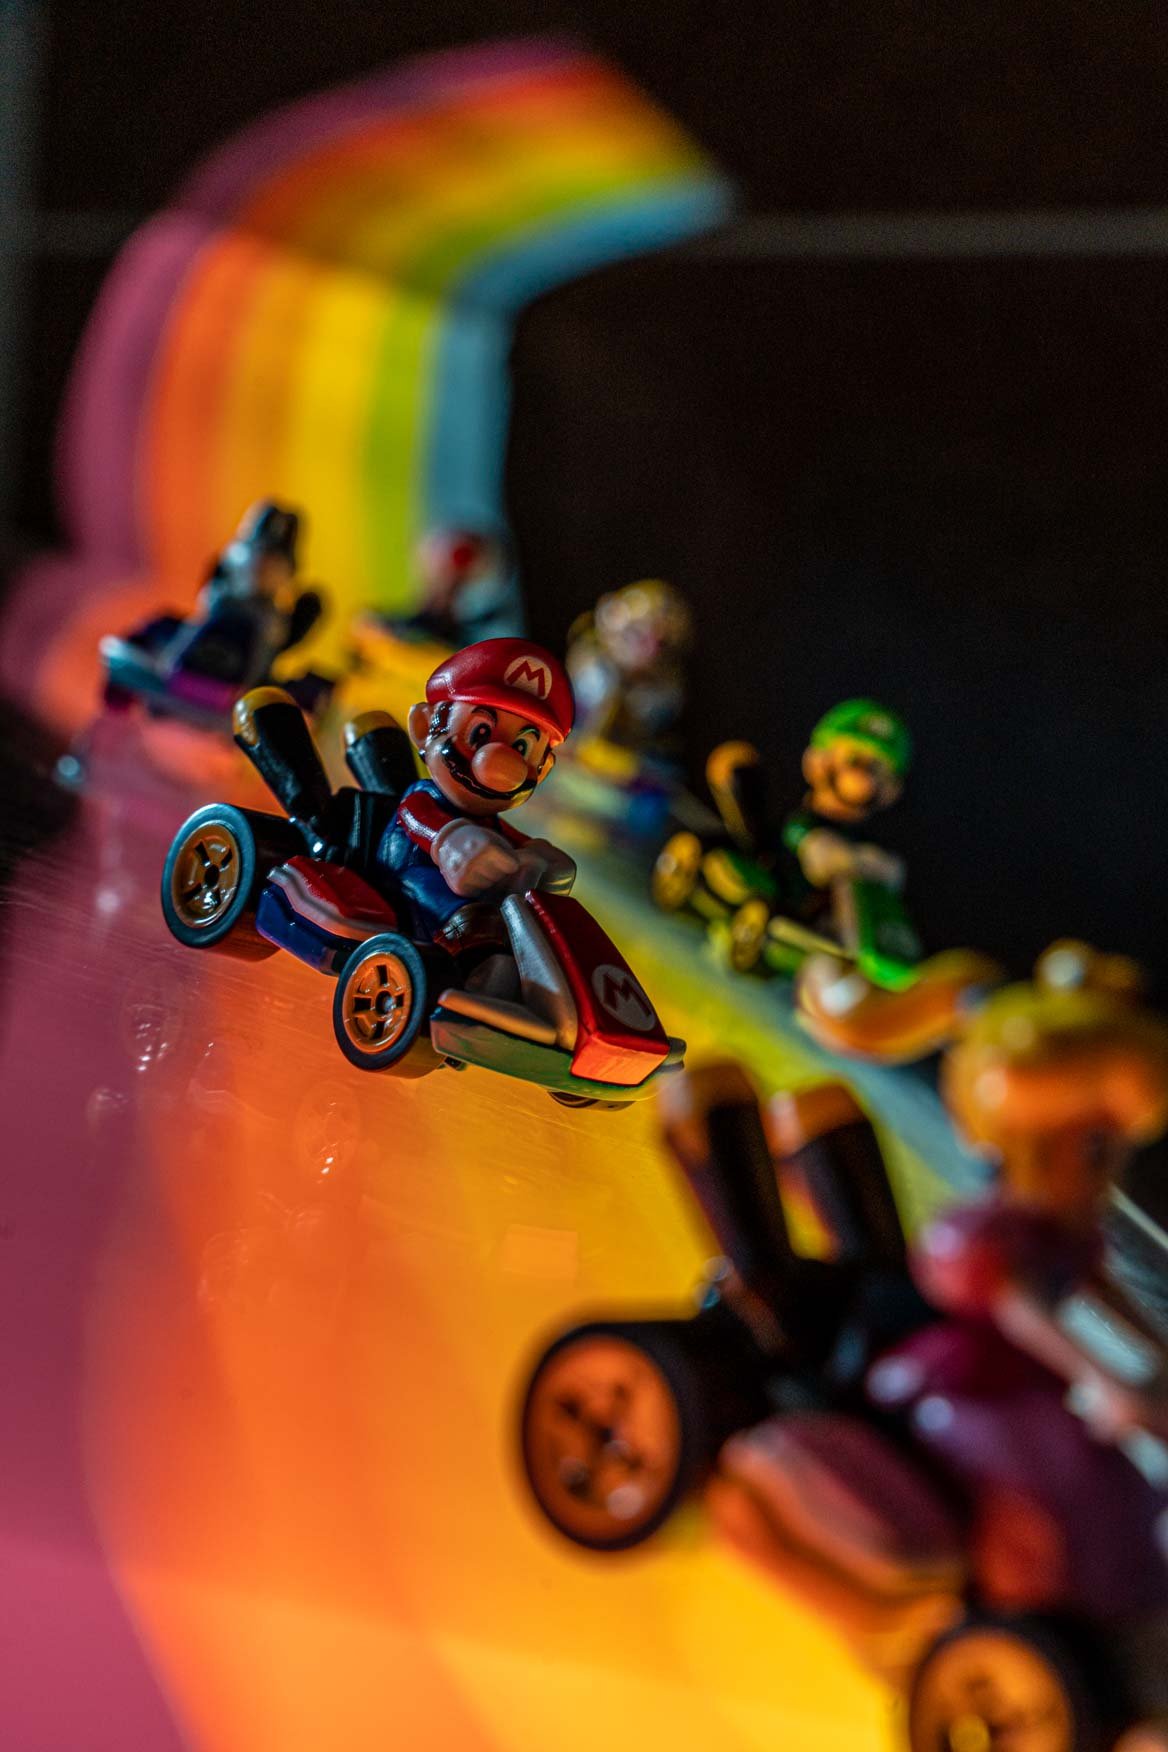
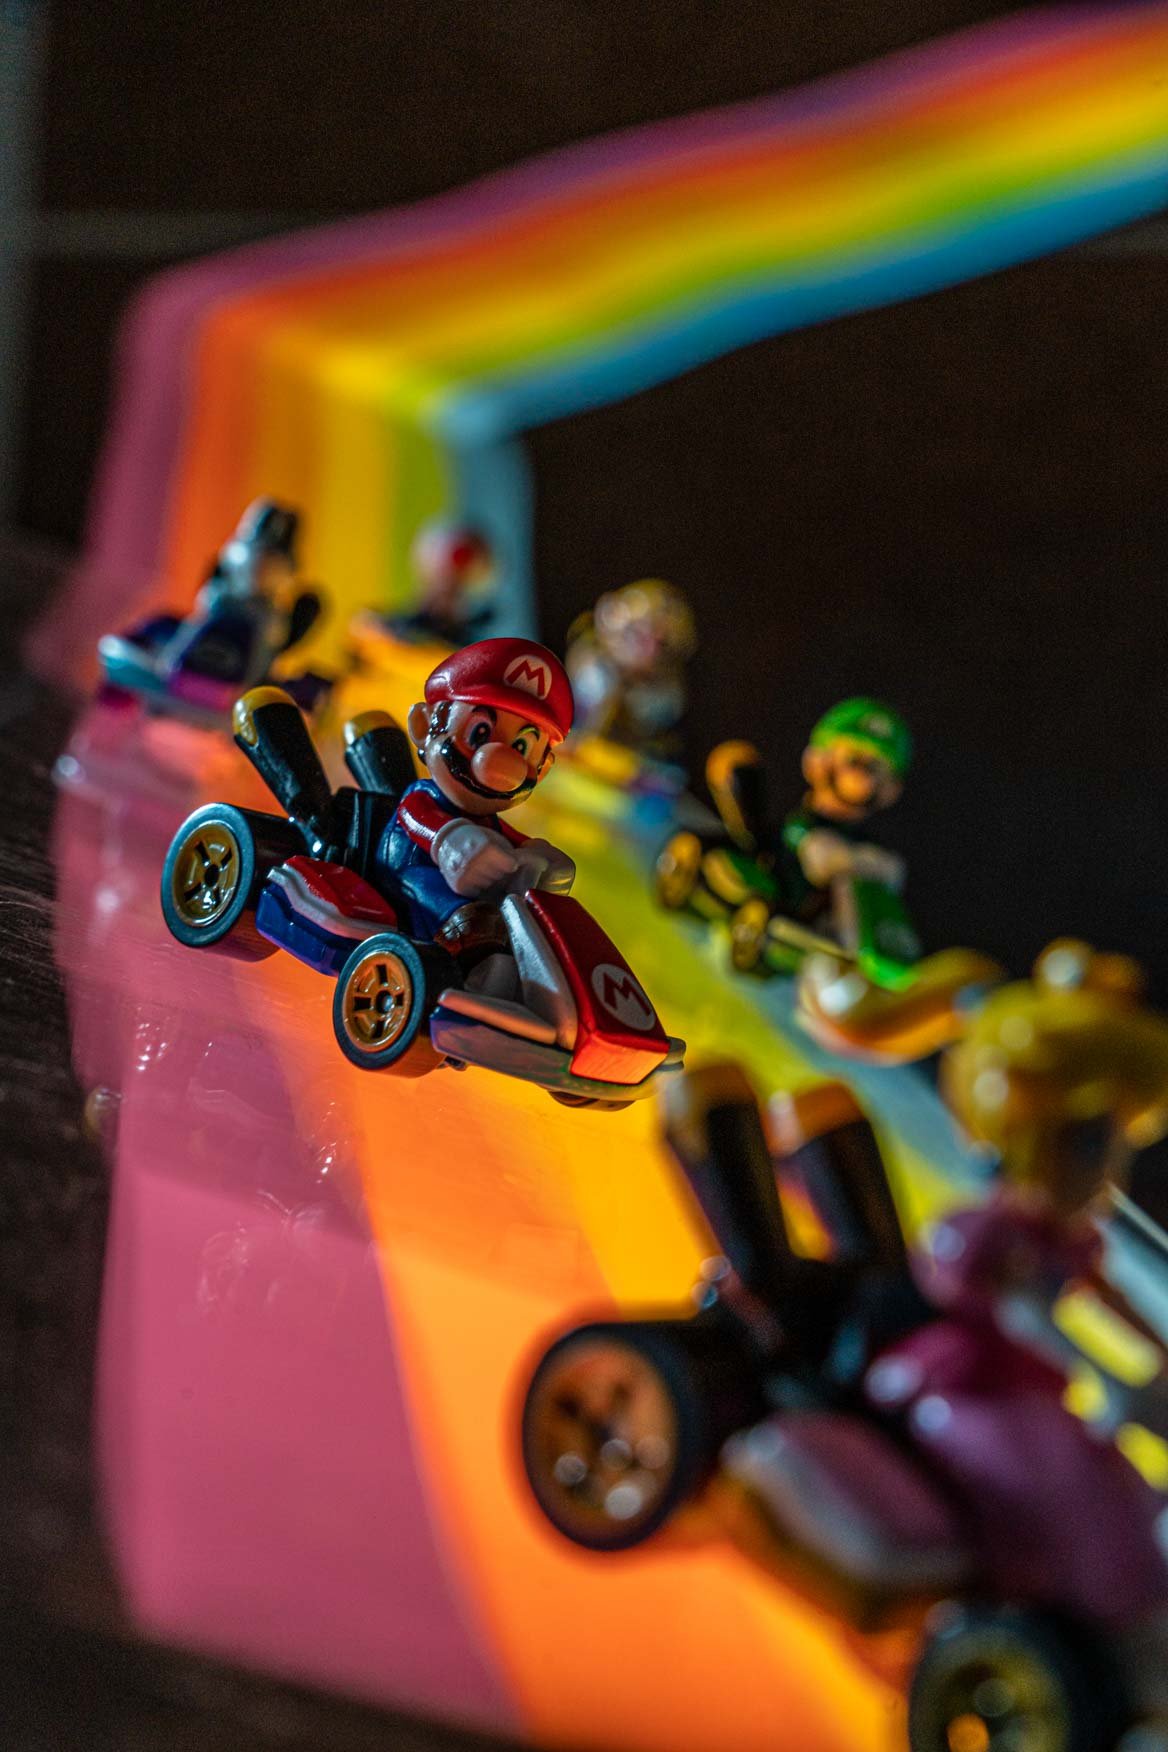
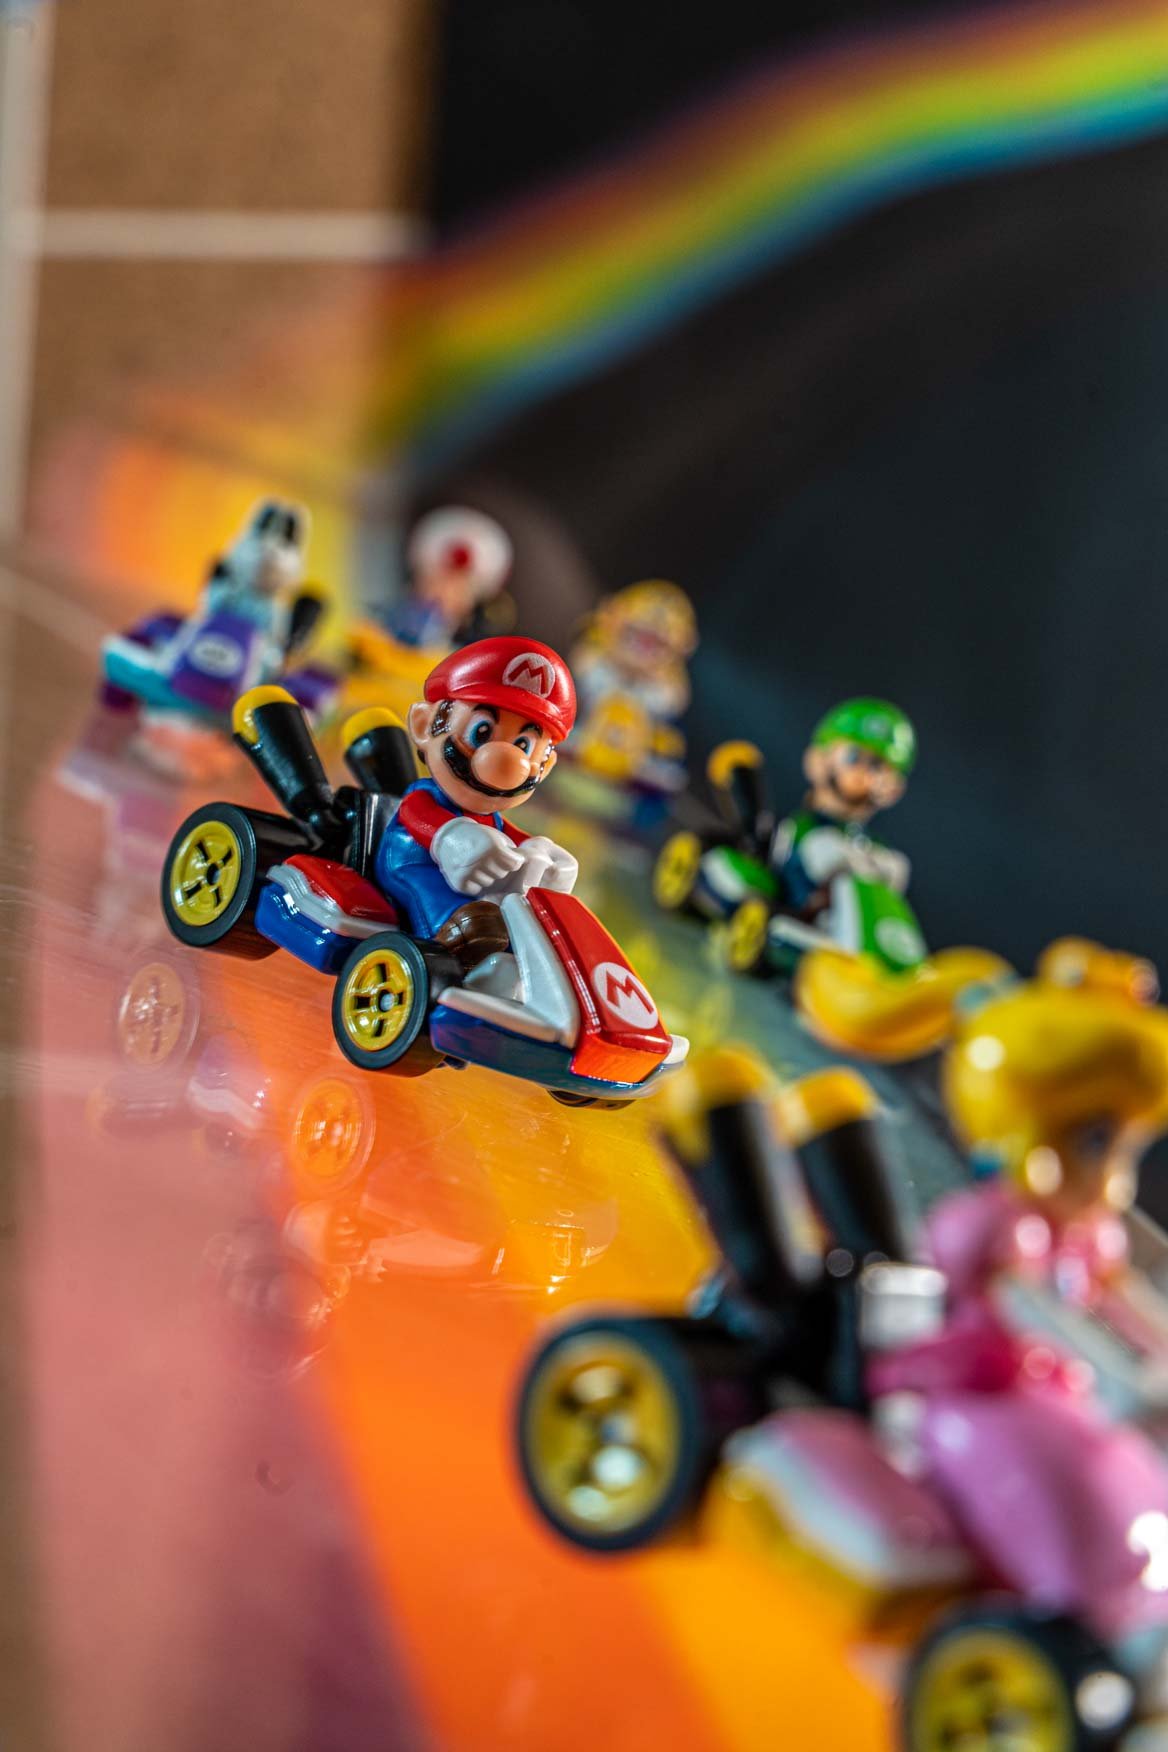
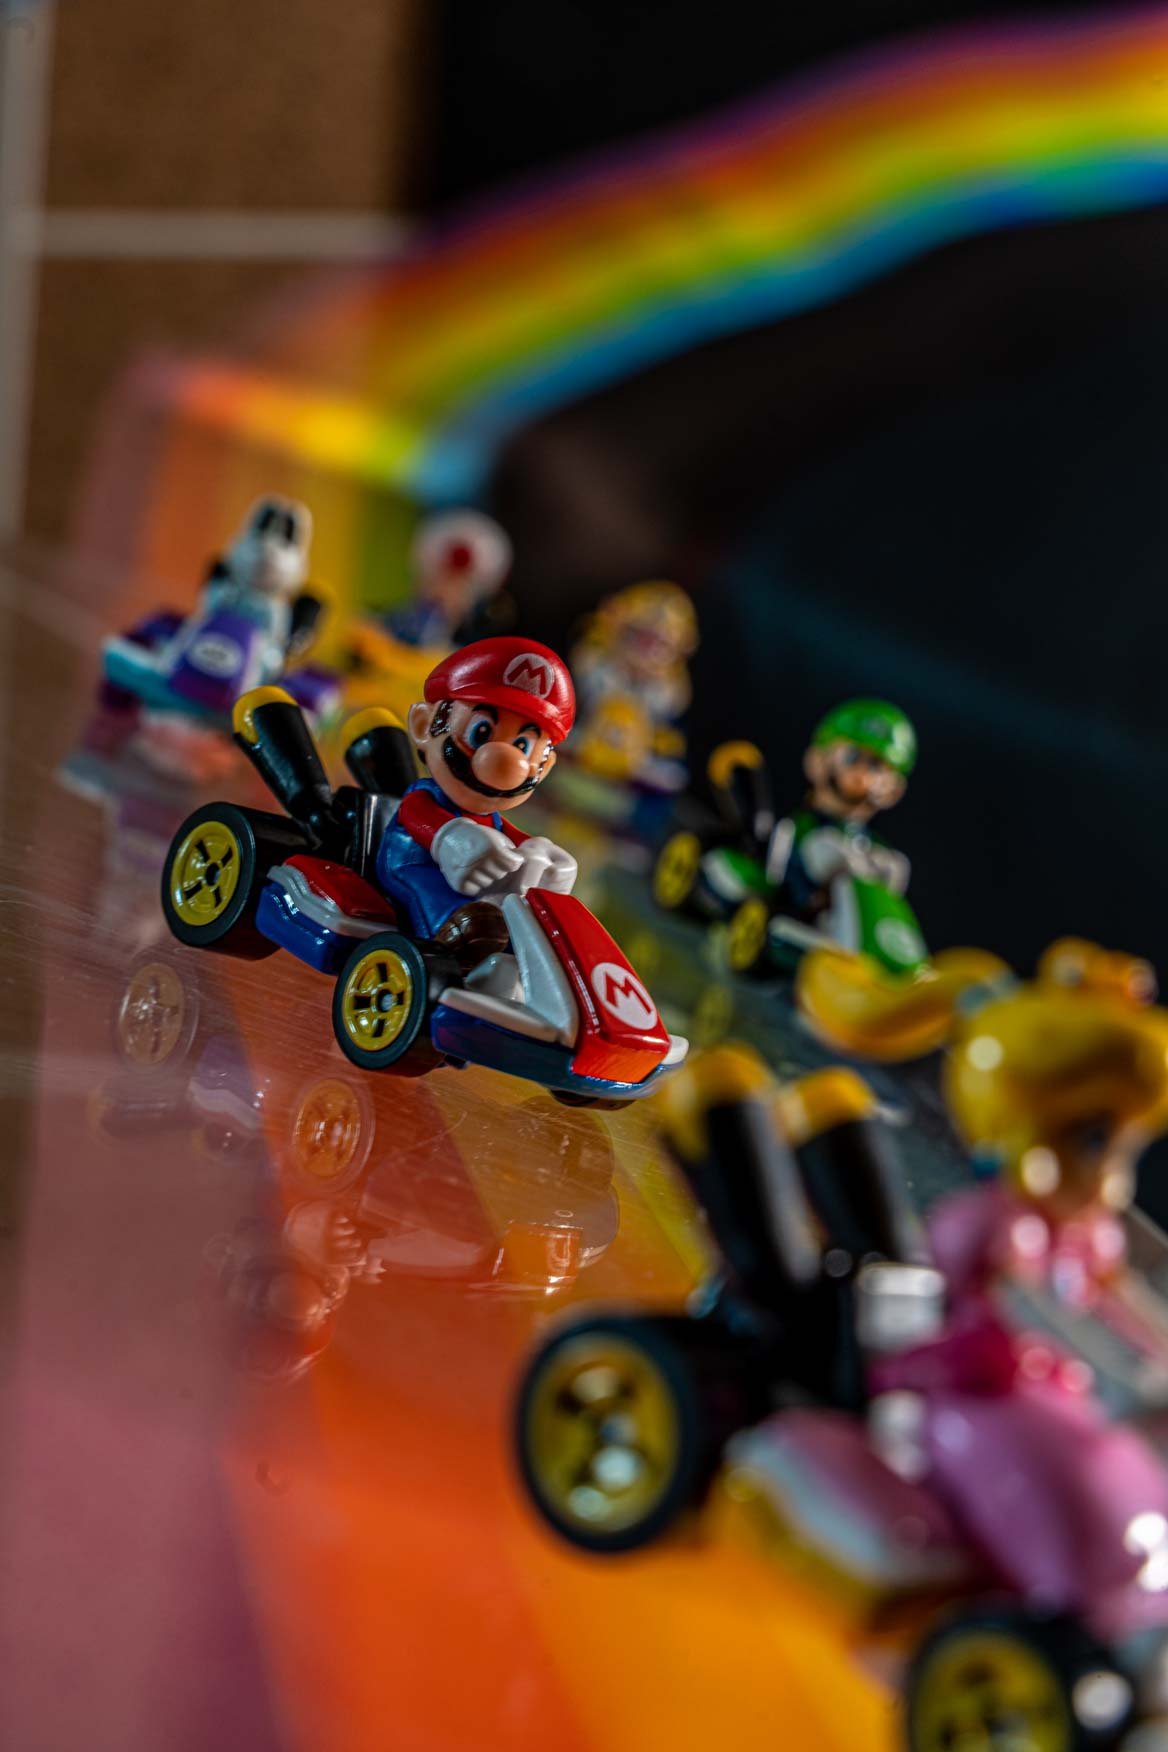
This year I’m exploring various visual effects techniques to implement into my work. To celebrate Mario Day, we'll be using light painting to create an practical, in-camera Rainbow Road for our favorite Mario Kart racers! These @hotwheels karts by @mattel were the perfect toys to bring this concept to life.
PAINTING WITH LIGHT
According to Wikipedia, “Light painting, painting with light, light drawing, or light art performance photography are terms that describe photographic techniques of moving a light source while taking a long-exposure photograph, either to illuminate a subject or space, or to shine light at the camera to 'draw', or by moving the camera itself during exposure of light sources”.
In essence, moving a light source within your camera framing while keeping the shutter open for an extended period of time creates light trails based on the movement of the lights.
HISTORY OF THE TECHNIQUE

LIGHT PAINTING
Prior to researching, I wasn't sure there would be much in the way of attribution towards a particular person. However, I was surprised to find that in 1889, Étienne-Jules Marey and Georges Demeny created the first known photograph to implement light painting called "Pathological Walk From in Front”. The two artists developed many photographic techniques including writing with light.


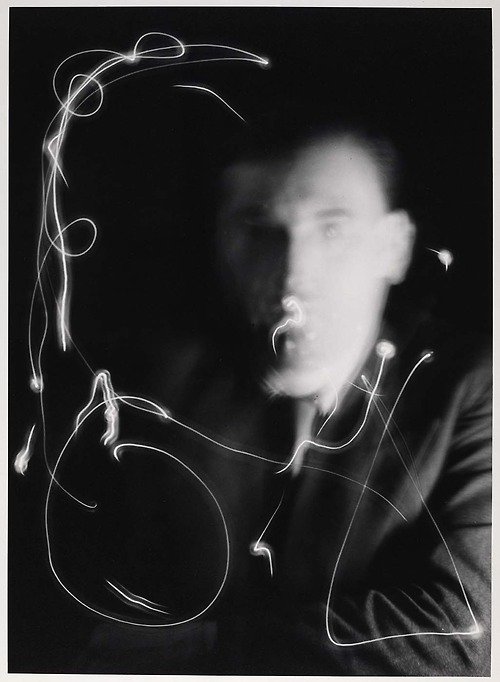
Decades later, Emmanuel Radnitzky more commonly known as Man Ray became the first artist of note to use light painting in his photo titled "Space Writing (Self Portrait)". As a multi-disciplined and influential artist within the Dada and Surrealist movements, Ray's curiosity and experimentation led to several discoveries, one of which was photograms (camera-less photography) which he coined Rayographs.
For further information about this fascinating technique, I highly recommend that you check out Light Painting Photography website, where you’ll find more detailed history along with a huge collection of examples created by various artists.
GETTING TECHNICAL
SETTING UP THE SCENE
Honestly, what I love about achieving this technique is that it doesn't require any special tools, gear, or technical prowess. The fun and challenging part for me was determining how to apply it to a concept. A few years ago, I used the effect to create light trails for a photo of Flash getting punched in the face by Batman. For that shot, I ended up compositing multiple photos which ended up working great and allowed me to adjust the placement of the light trails to get the desired look. However, for this Mario Kart shot, I wanted to push myself to see if I could create it practically in one shot... which made setting up the shot fairly tedious and time-consuming! However, based on the final result, I would argue that it was worth the extra time and effort.

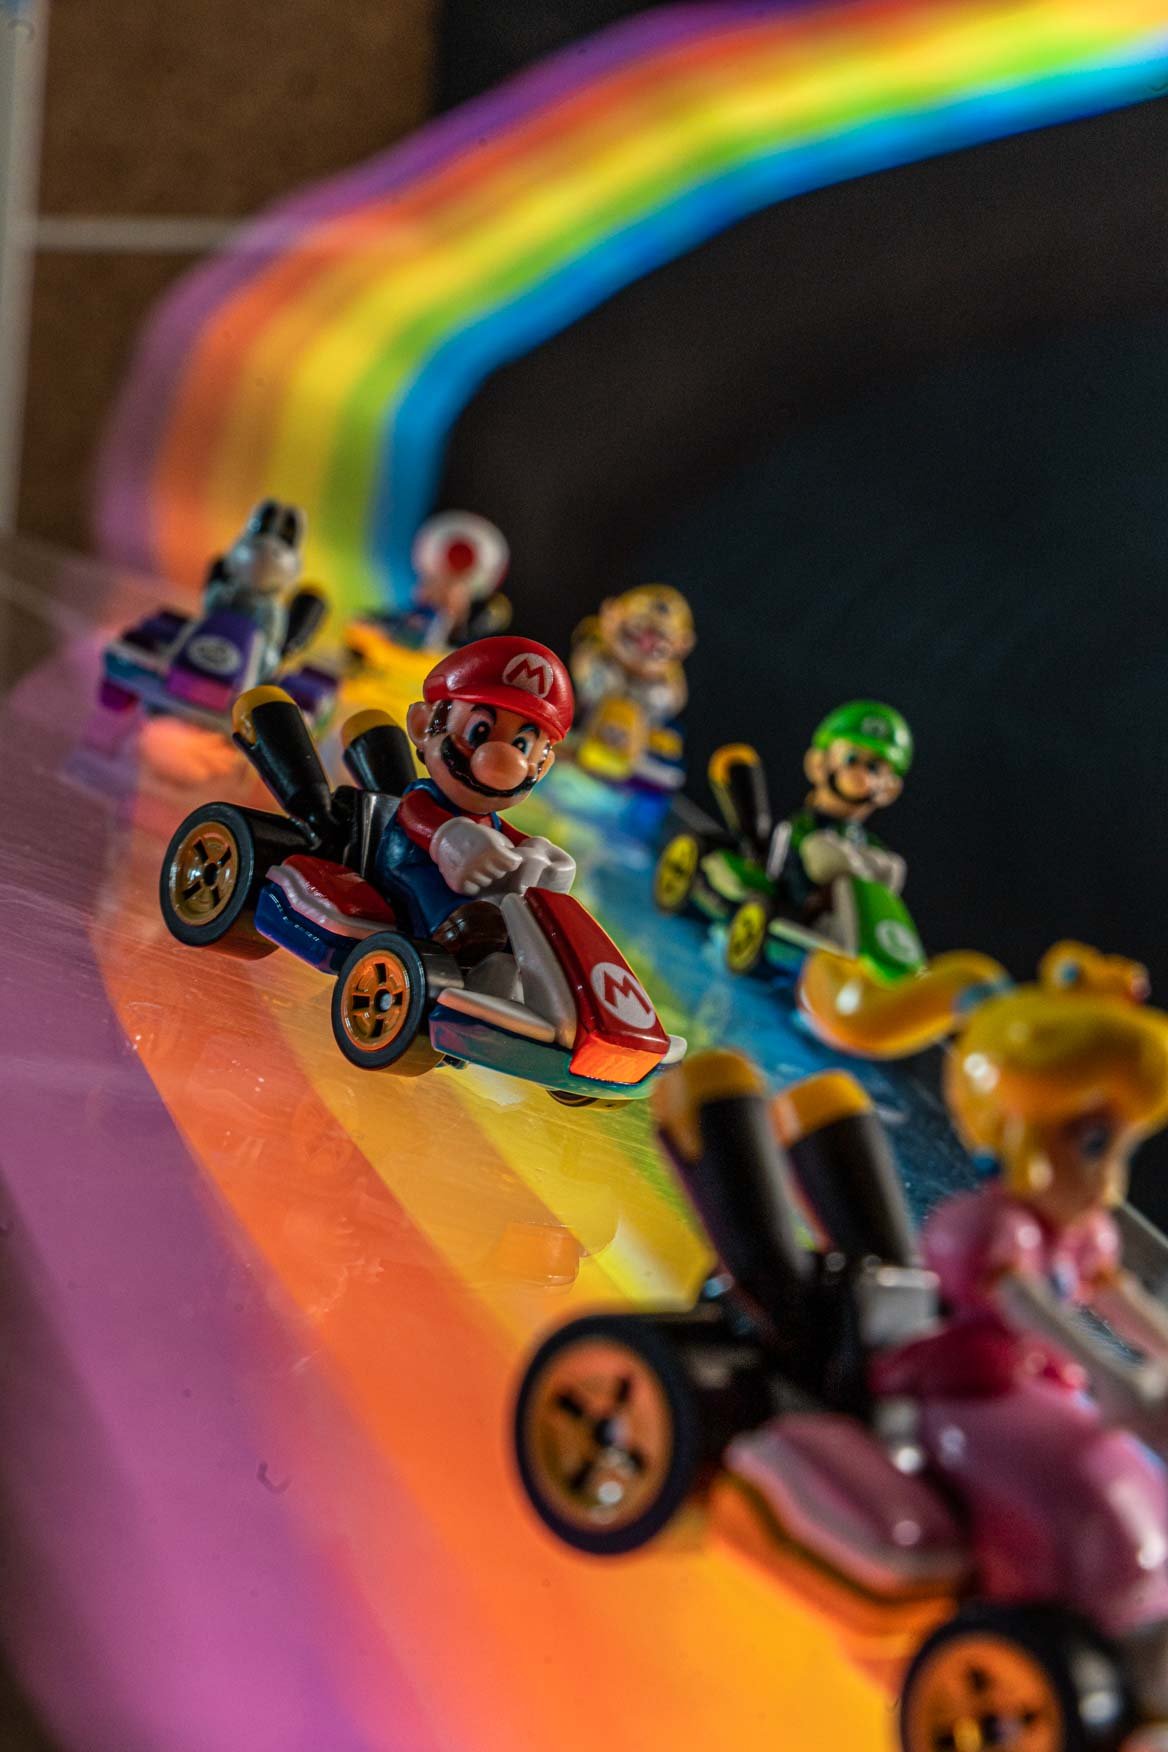
With most long-exposure photography, the key to capturing a sharp image is to use a tripod. In my case, it was absolutely crucial since I wanted all of the Mario Kart racers to be in focus while appearing to be driving on the Rainbow Road course. Those familiar with the game generally have a love/hate relationship with this course, a feeling that hit me halfway through the process of taking this image as well.
In order to have the karts appear to be on a road, the surface had to be transparent so I could drag the light source underneath the cars. Anything opaque surface would not allow for the light to be visible which would defeat the entire purpose. During the time of the long exposure, the light source illuminates the subject(s) giving the shot a natural appearance. If the rainbow and subjects were shot separately and composited together, you would have to fake the light spill onto the subjects. Needless to say, attempting to capture everything in one shot would result in the most realistic image.


In most cases I try to do a few quick tests that in essence are a proof of concept. When I am able to successfully achieve the technical aspect of my ideas quickly, it gives me confidence to move forward with the shot. I used Yoshi and Donkey Kong for my very first shots testing out the light painting using my phone screen. Honestly, I was incredibly pleased with the result as is but I knew it could be better!
I ended up using a clear 1/4" acrylic sheet to place the karts on. The use of 2 c-stands to hold and slightly bend the sheet was crucial for providing a solid foundation. Once the acrylic was in place, I set up the camera on a tripod to figure out the general framing. As I populate the scene, I will always start with the primary subject, which was Mario for this setup. Next, I'll fill out the remaining space with the other subjects or props to lock in the composition. Adding the other racers was a lot of fun! To keep the karts from rolling off the acrylic, I just added a small piece of sticky tack underneath which worked perfectly.


CUSTOM Modifications
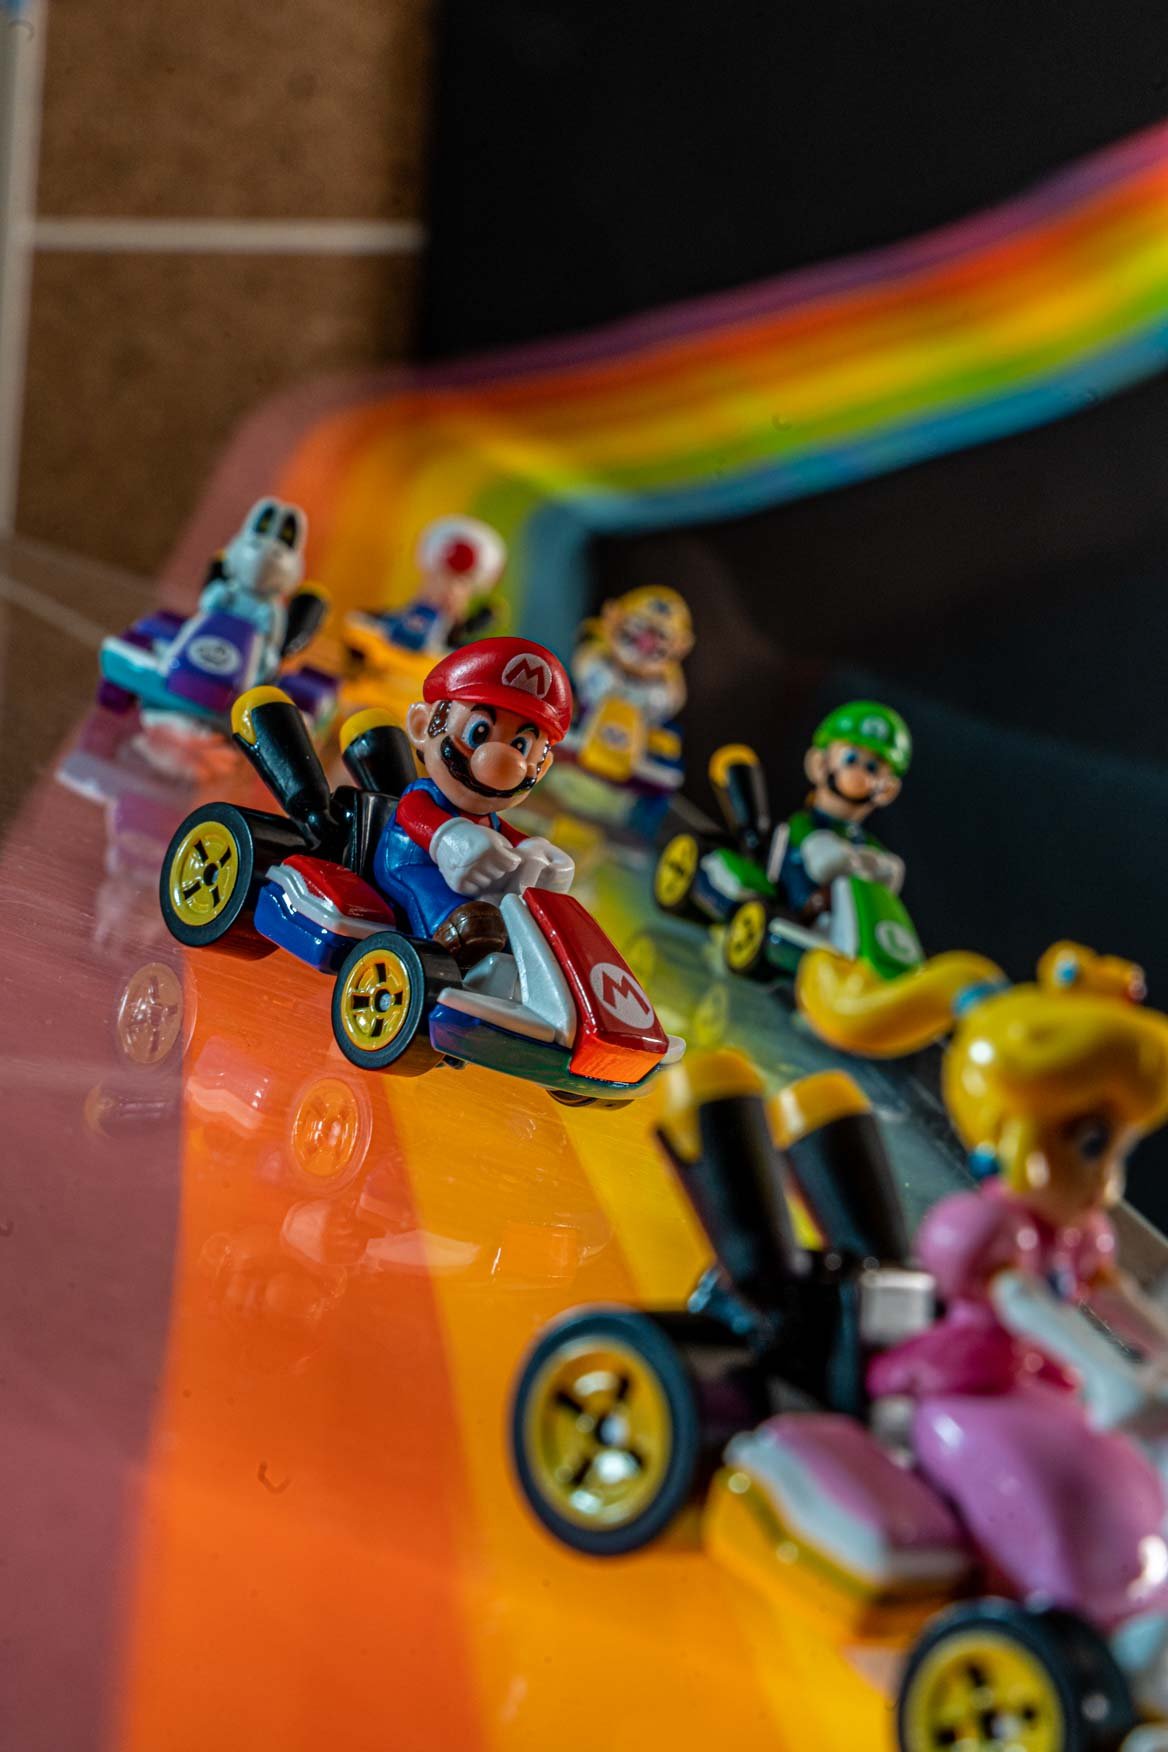
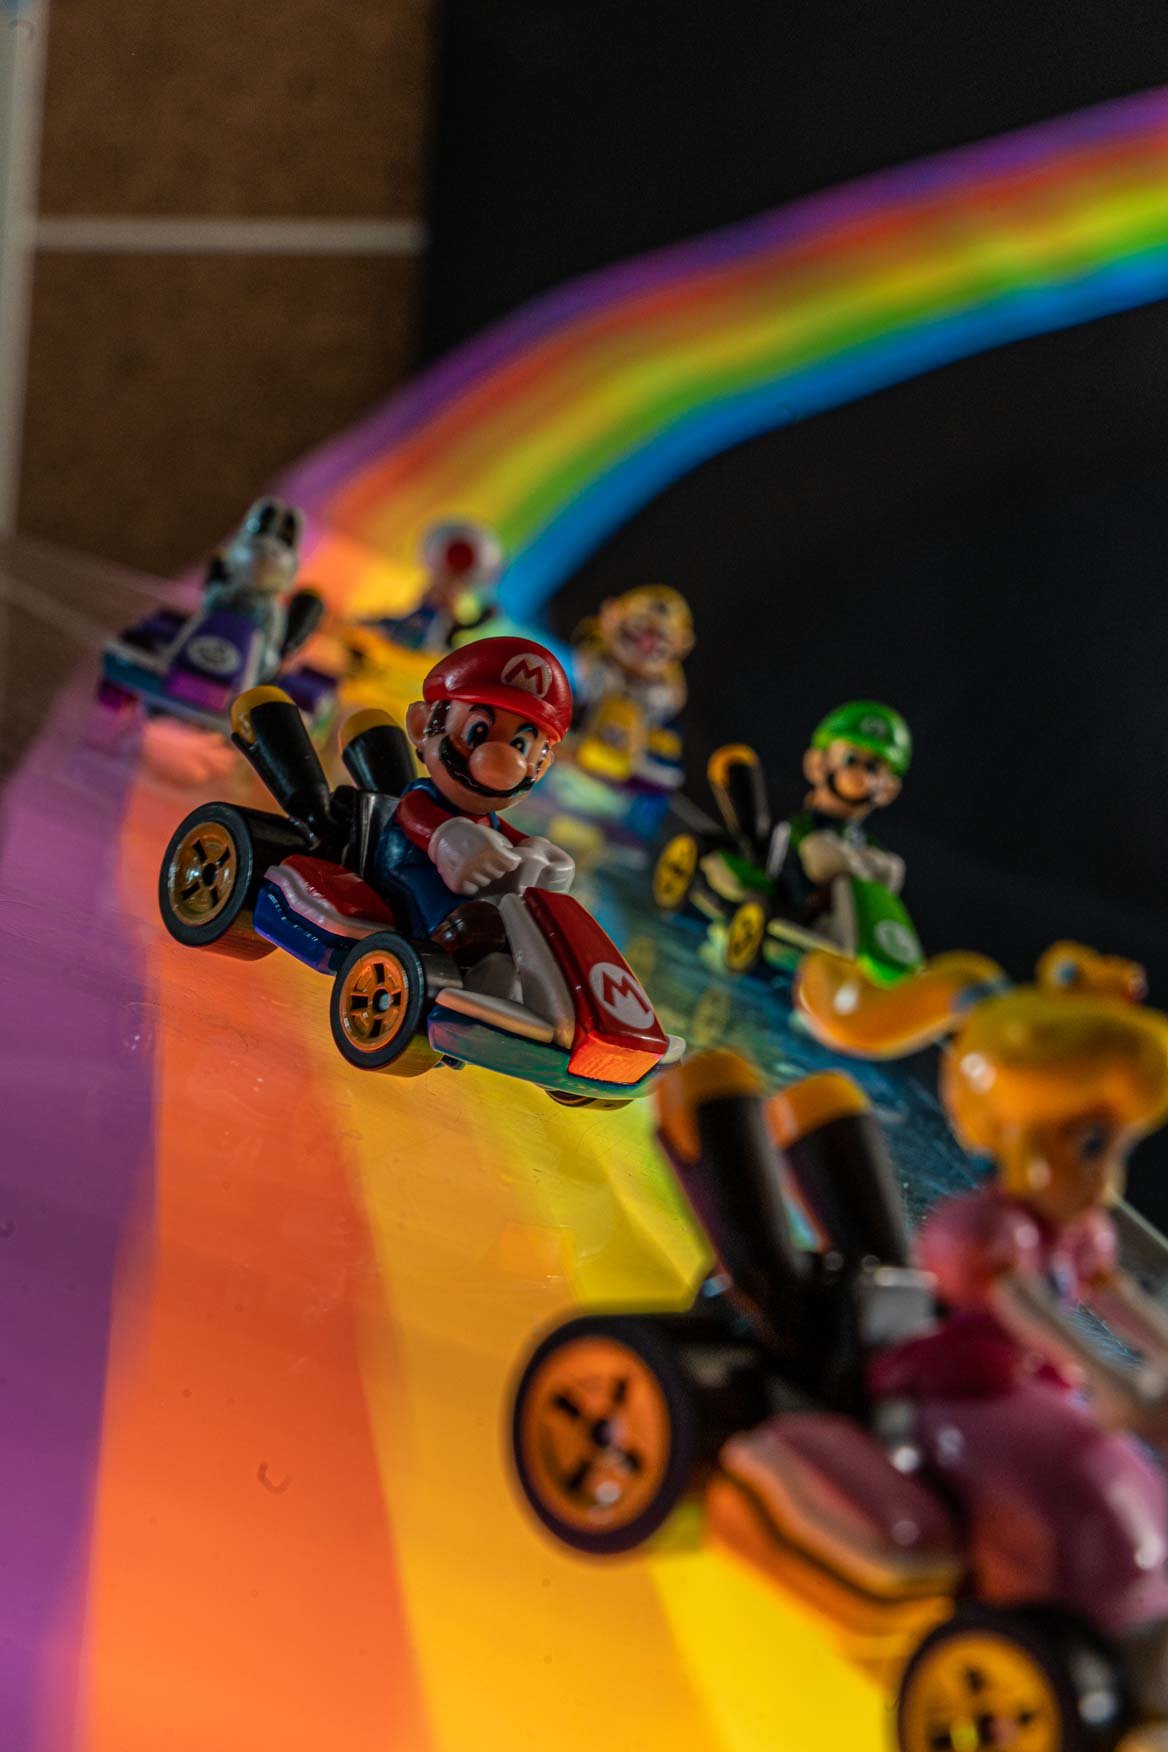
Those with a keen eye will notice that the Mario in my final shot is in a fairly dynamic pose, unlike what you actually get with this figure off the shelf. Since Mario was the star of this shot, I thought it was worth taking him apart and completely reposing not only Mario, but also turning the front wheels to mimic a power drift! So I did...carefully...
As you can see, the kart and figure had some screws and natural seams which made the disassembly fairly clean. There were several parts around the neck and back of the head that I carved away to help with posing. While I was at it, I decided to replace the steering column with a long piece of heavy gauge wire, and also paint the steering wheel black to add more contrast between it and Mario's hands. In the end, those modifications helped to elevate the photo in my opinion and were worth the extra hours.


BEFORE & AFTER SIDE BY SIDE COMPARISON


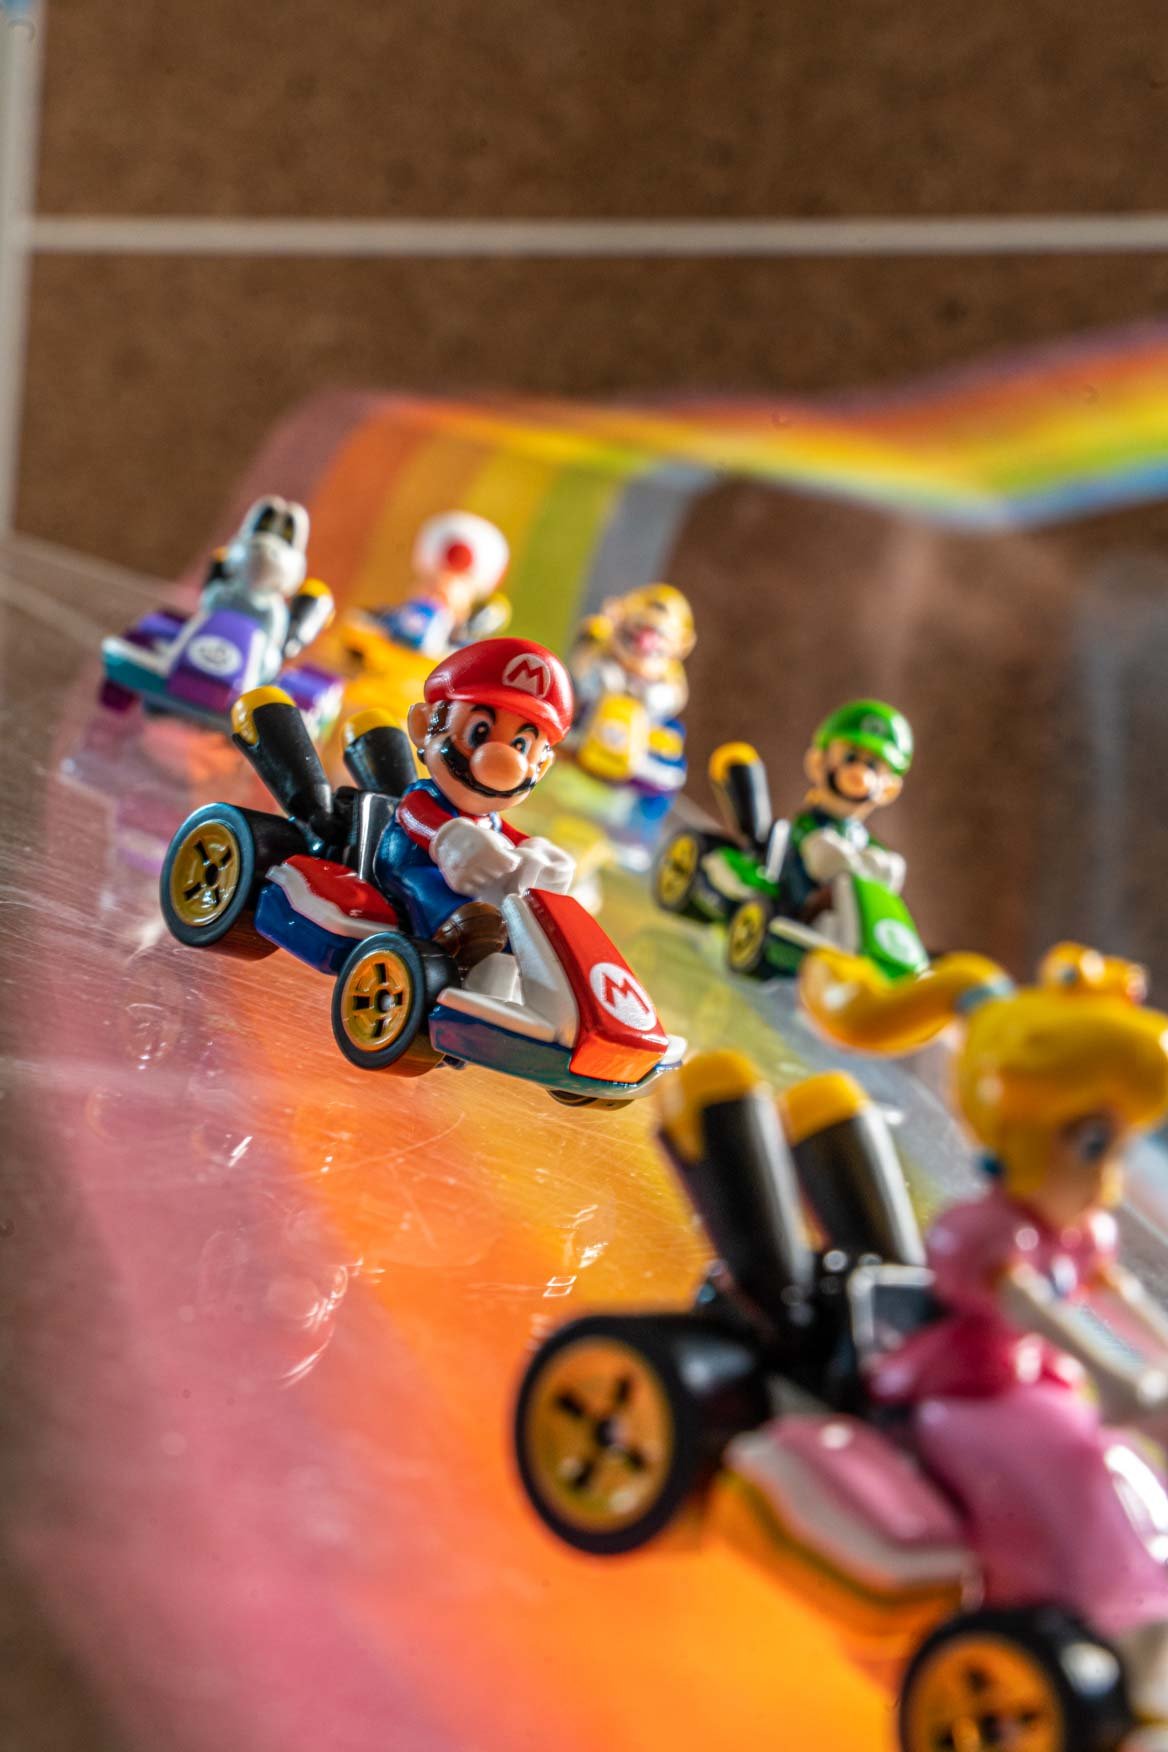
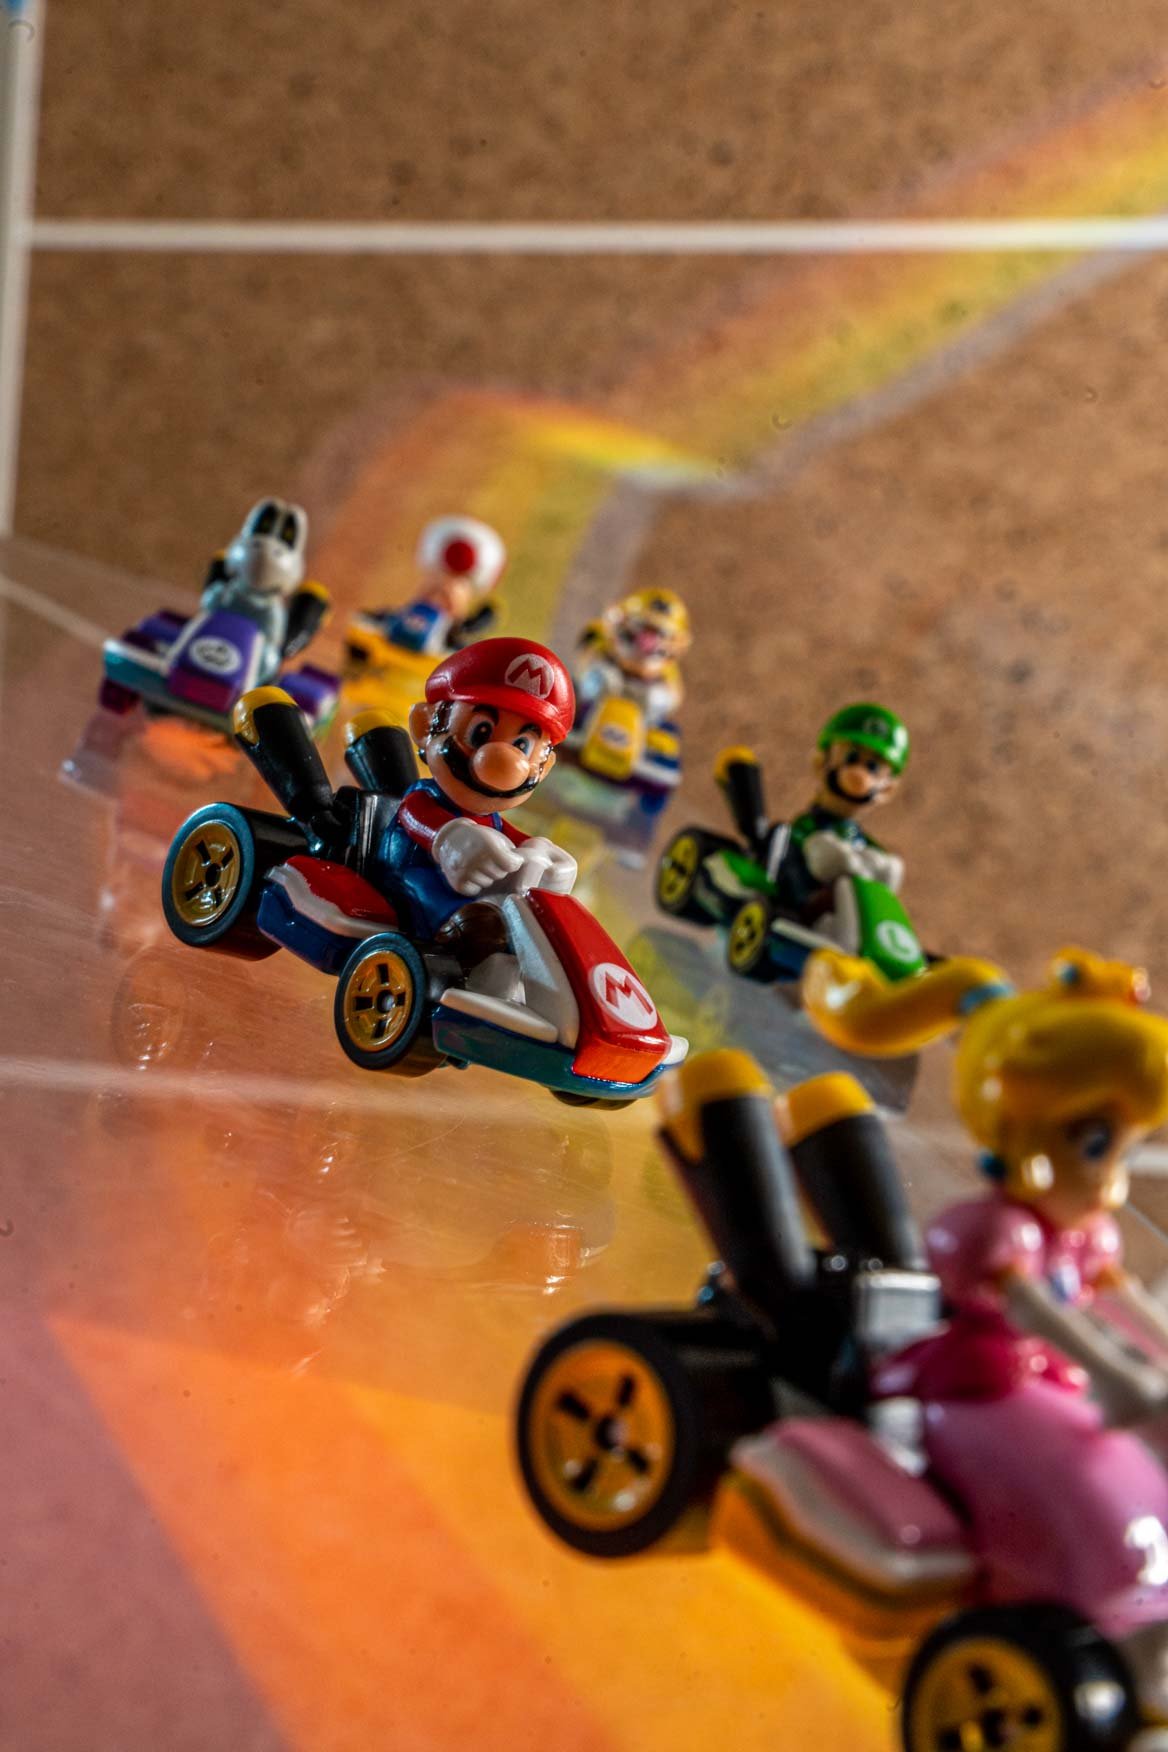
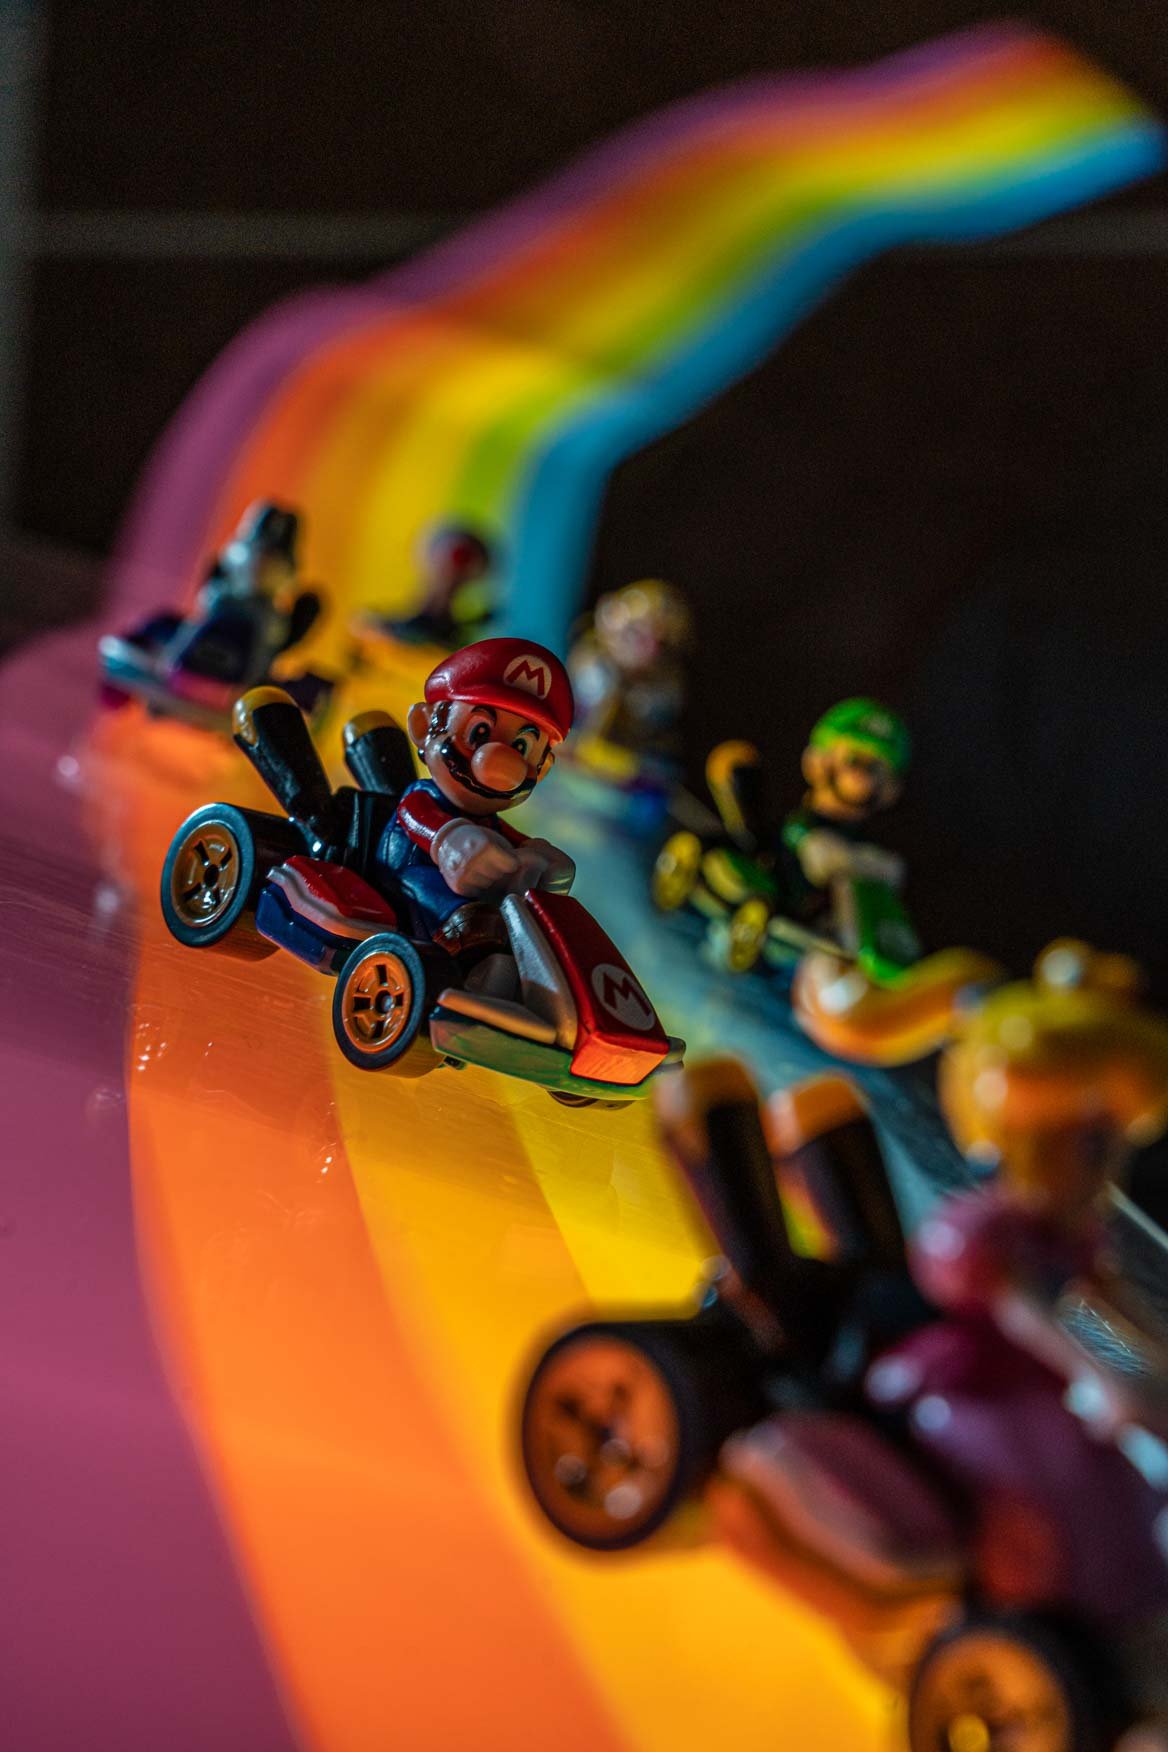
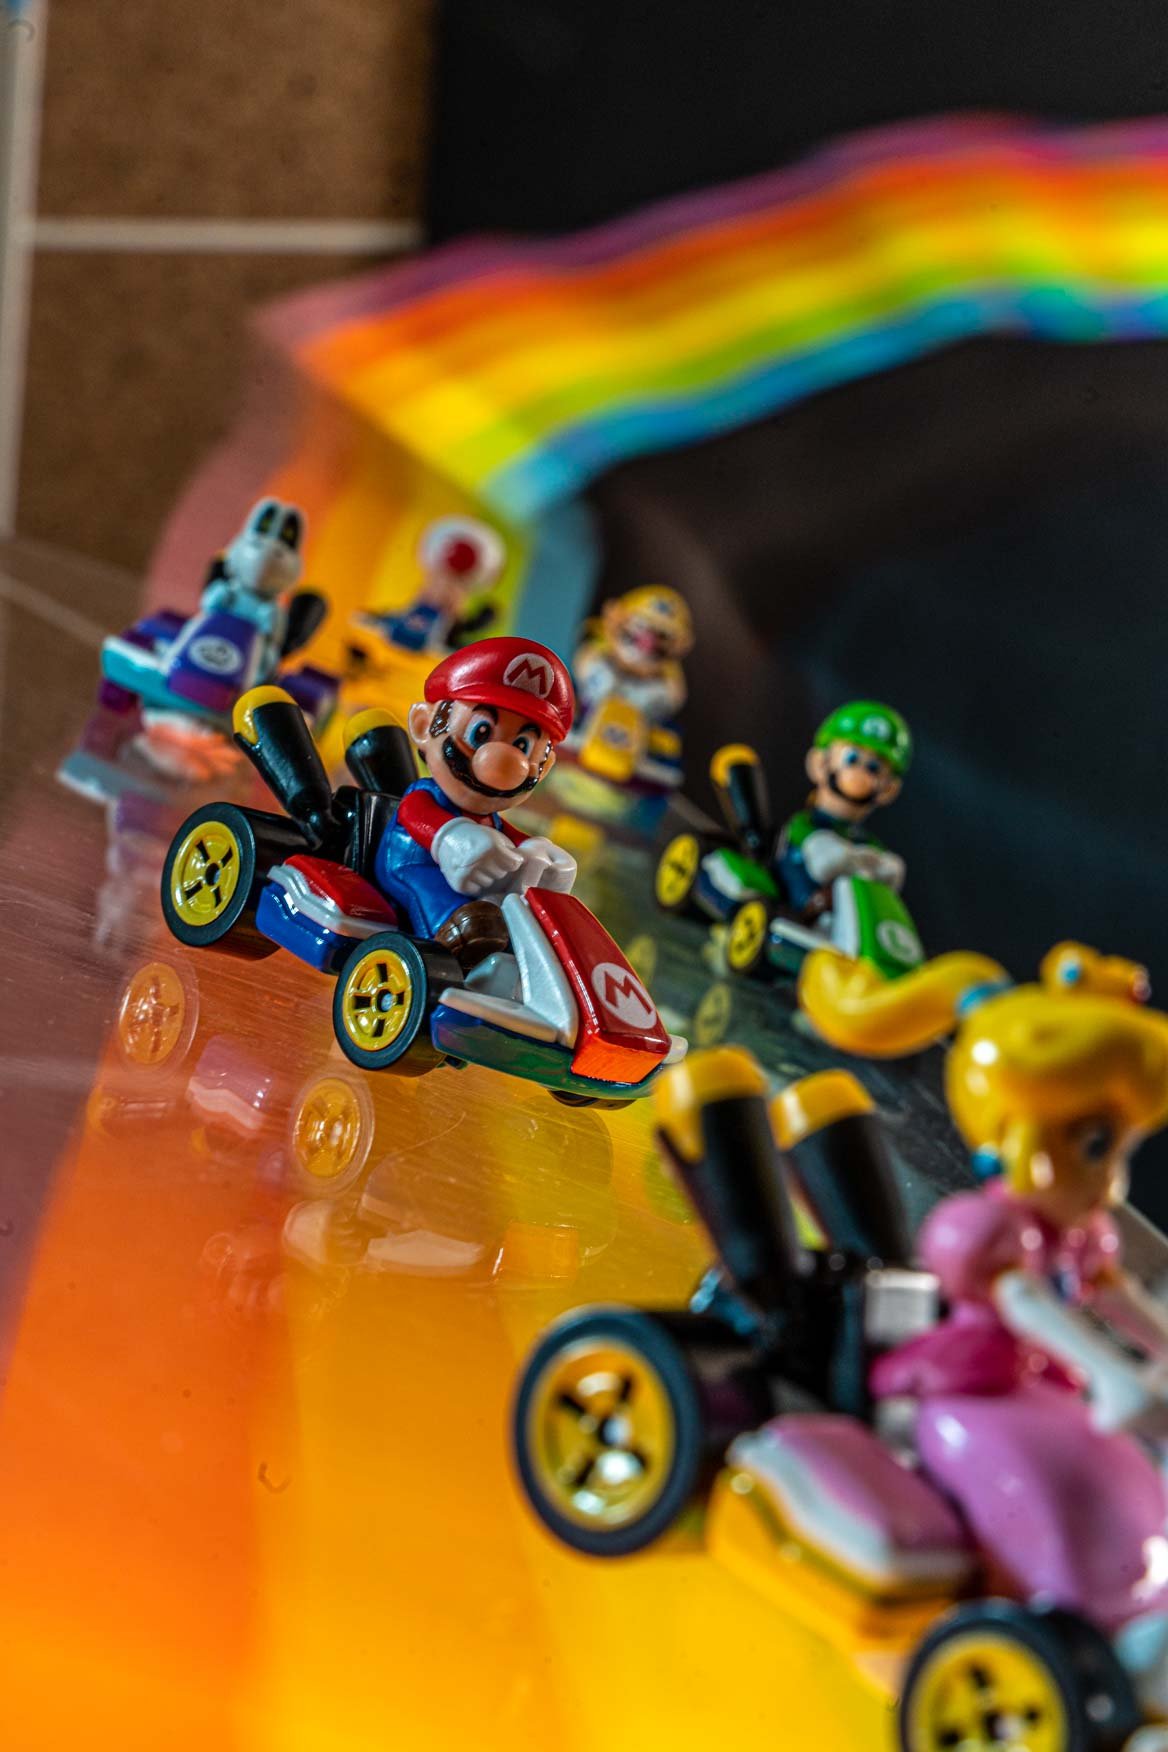
Creating THE Rainbow Road
It starts with a light source. While a lot of other photographers use laser pointers, LEDs, tubes, etc., I required something a bit more specific. The most efficient way was to put an image on my phone and use that as my light source. As you can see this part of the process was extremely basic and straightforward. The real magic happens when the phone is in motion during the camera exposure! Note that all setups will be unique depending on the subject, location, and how much light is available, if you try it out for yourself.
INITIAL TEST SHOTS
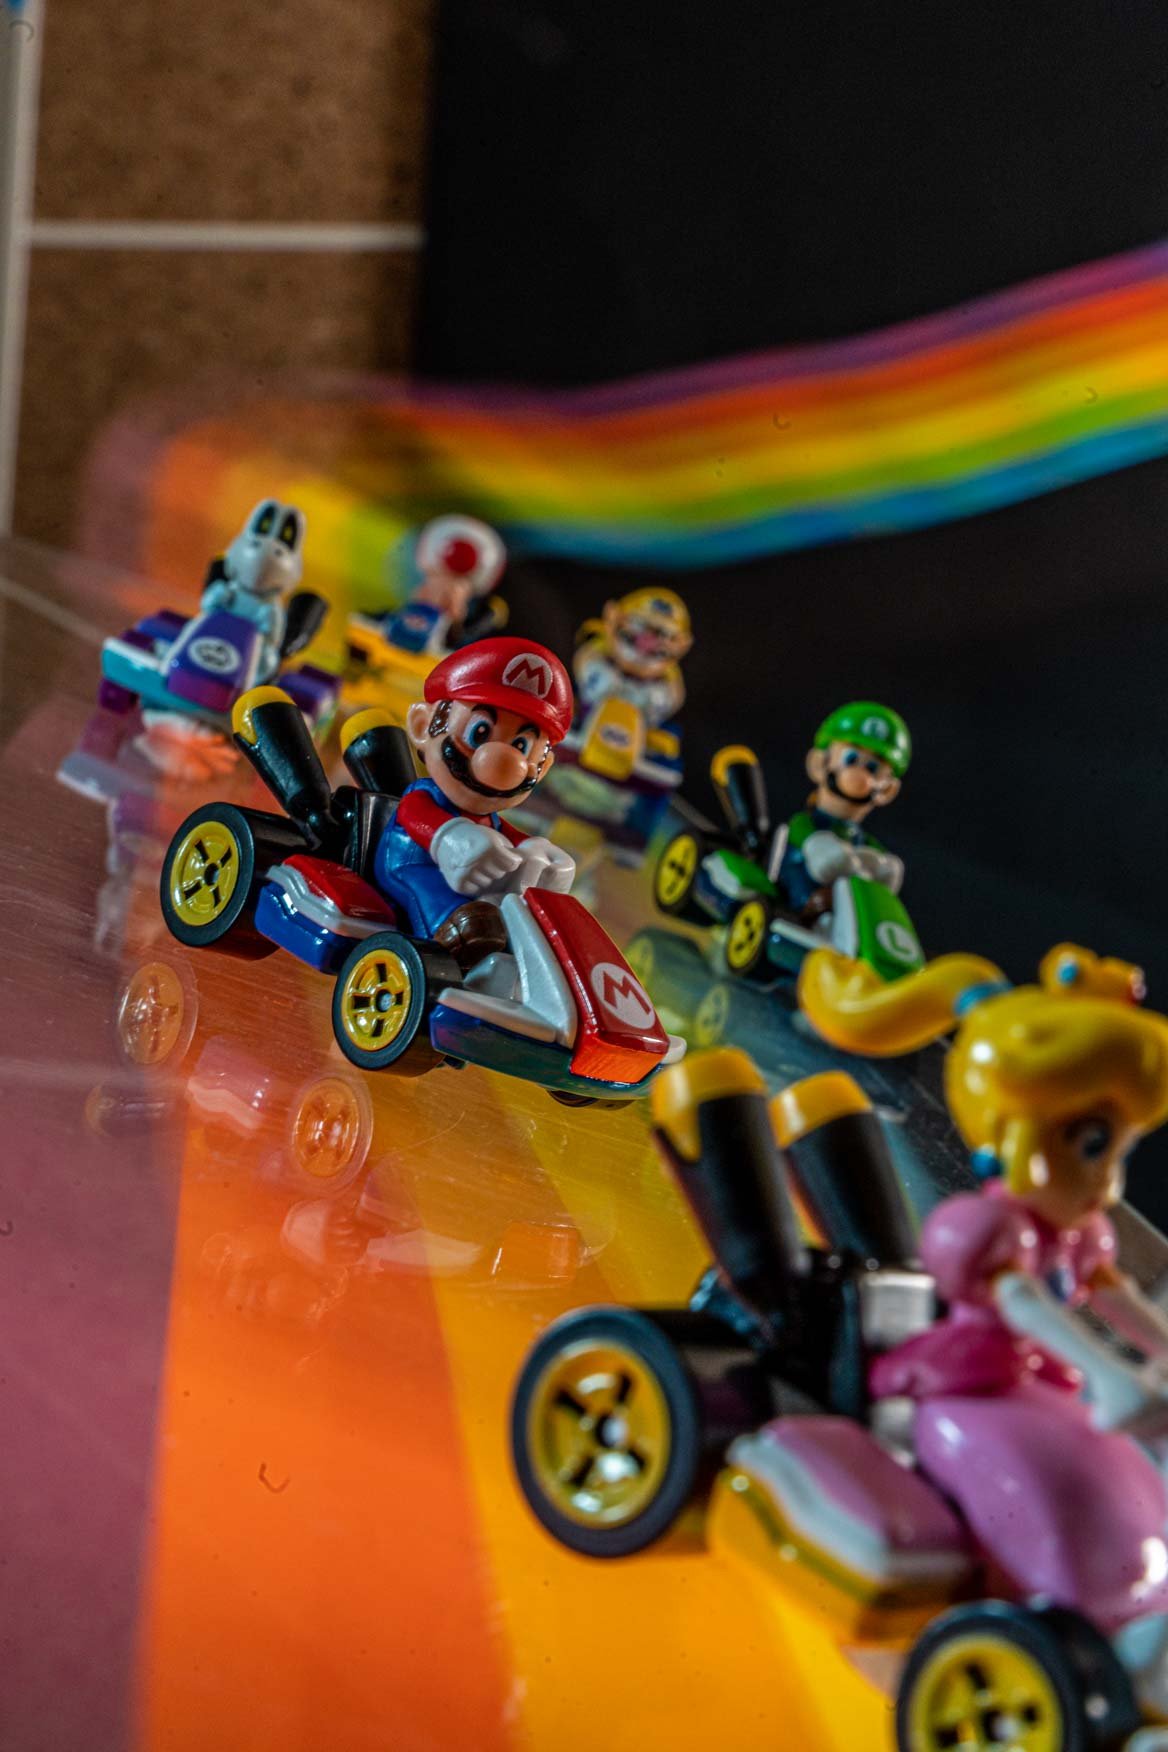
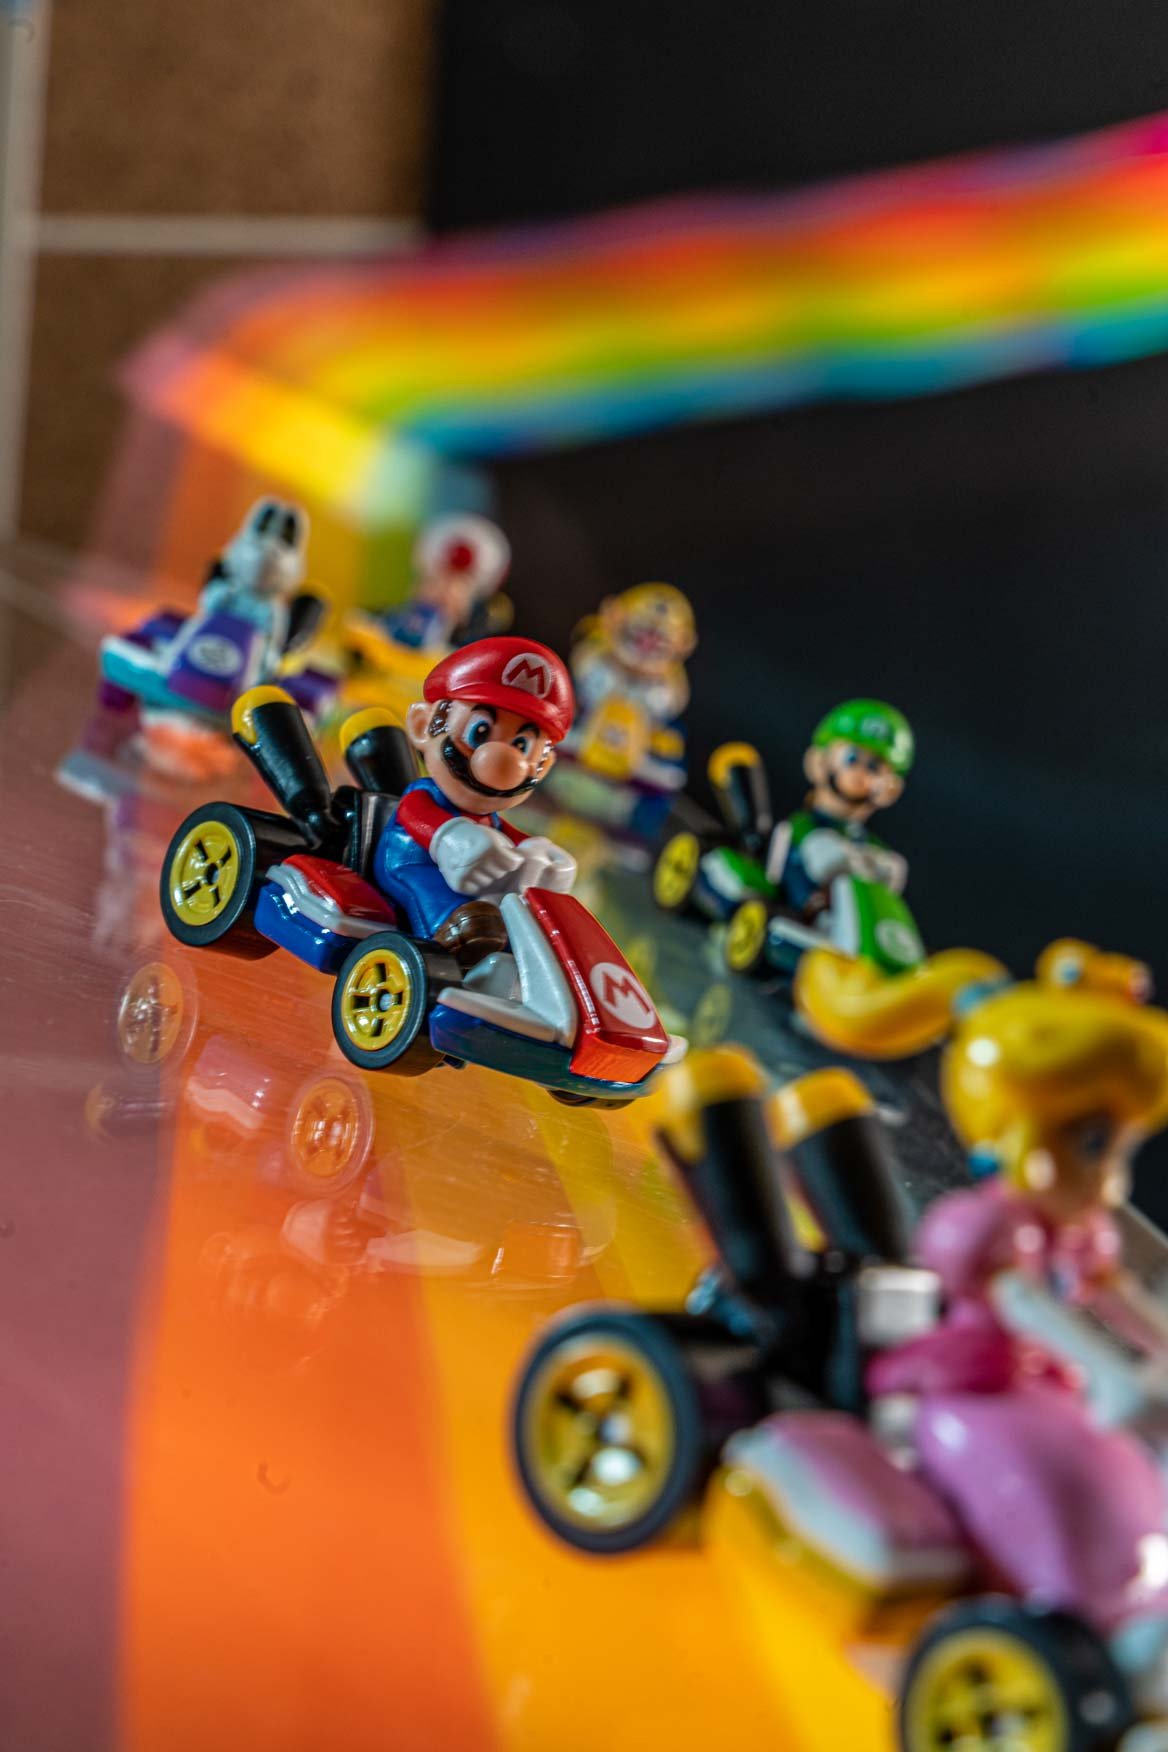
When it was time to put the "pedal to the metal" and actually start light painting, I quickly came to the realization that capturing the perfect rainbow road was going to require a lot of trial and error - and that it did. In the end, I think I took nearly 100 shots! The selected photos that I included in this slideshow should give you a much better sense of how the light trail affects the composition.
The goal was to get the entire shot in one take, so timing and smooth motion was crucial to making it work. It was only through repetition and testing that led to the final result. The majority of my test shots were either 15 or 20 second exposures, which meant I had to count in my head to know how fast and where the position of the phone needed to be for achieving the desired light trail.

In an effort to do everything practical, I created a star field background to complete the scene. Adding elements like stars is very simple to do in a post-processing photo app like Photoshop, but it is still hard to beat practical in many cases. Since I was already planning to use the sheets of paper to black out the background anyway, poking some holes in it wasn’t a huge ordeal. Using aluminum foil behind the black paper helped reflect the light, making the stars appear brighter.


CAPTURING THE SHOT
After dialing the camera settings based on my initial test shots and getting the scene finalized and locked in, it was time to capture the shot. Below you can see a demonstration of how the process looks with the lights on. Once I remotely click the camera shutter, I begin moving the screen from the starting position and finish at the ending position at 15 seconds. I focus capturing the straight portion of the Rainbow Road for the first 10 seconds under the plexiglass, and begin the curve for the last 5 seconds. As I mentioned, getting the timing down during my test runs was extremely helpful throughout the shoot.


LIGHT PAINTING in action
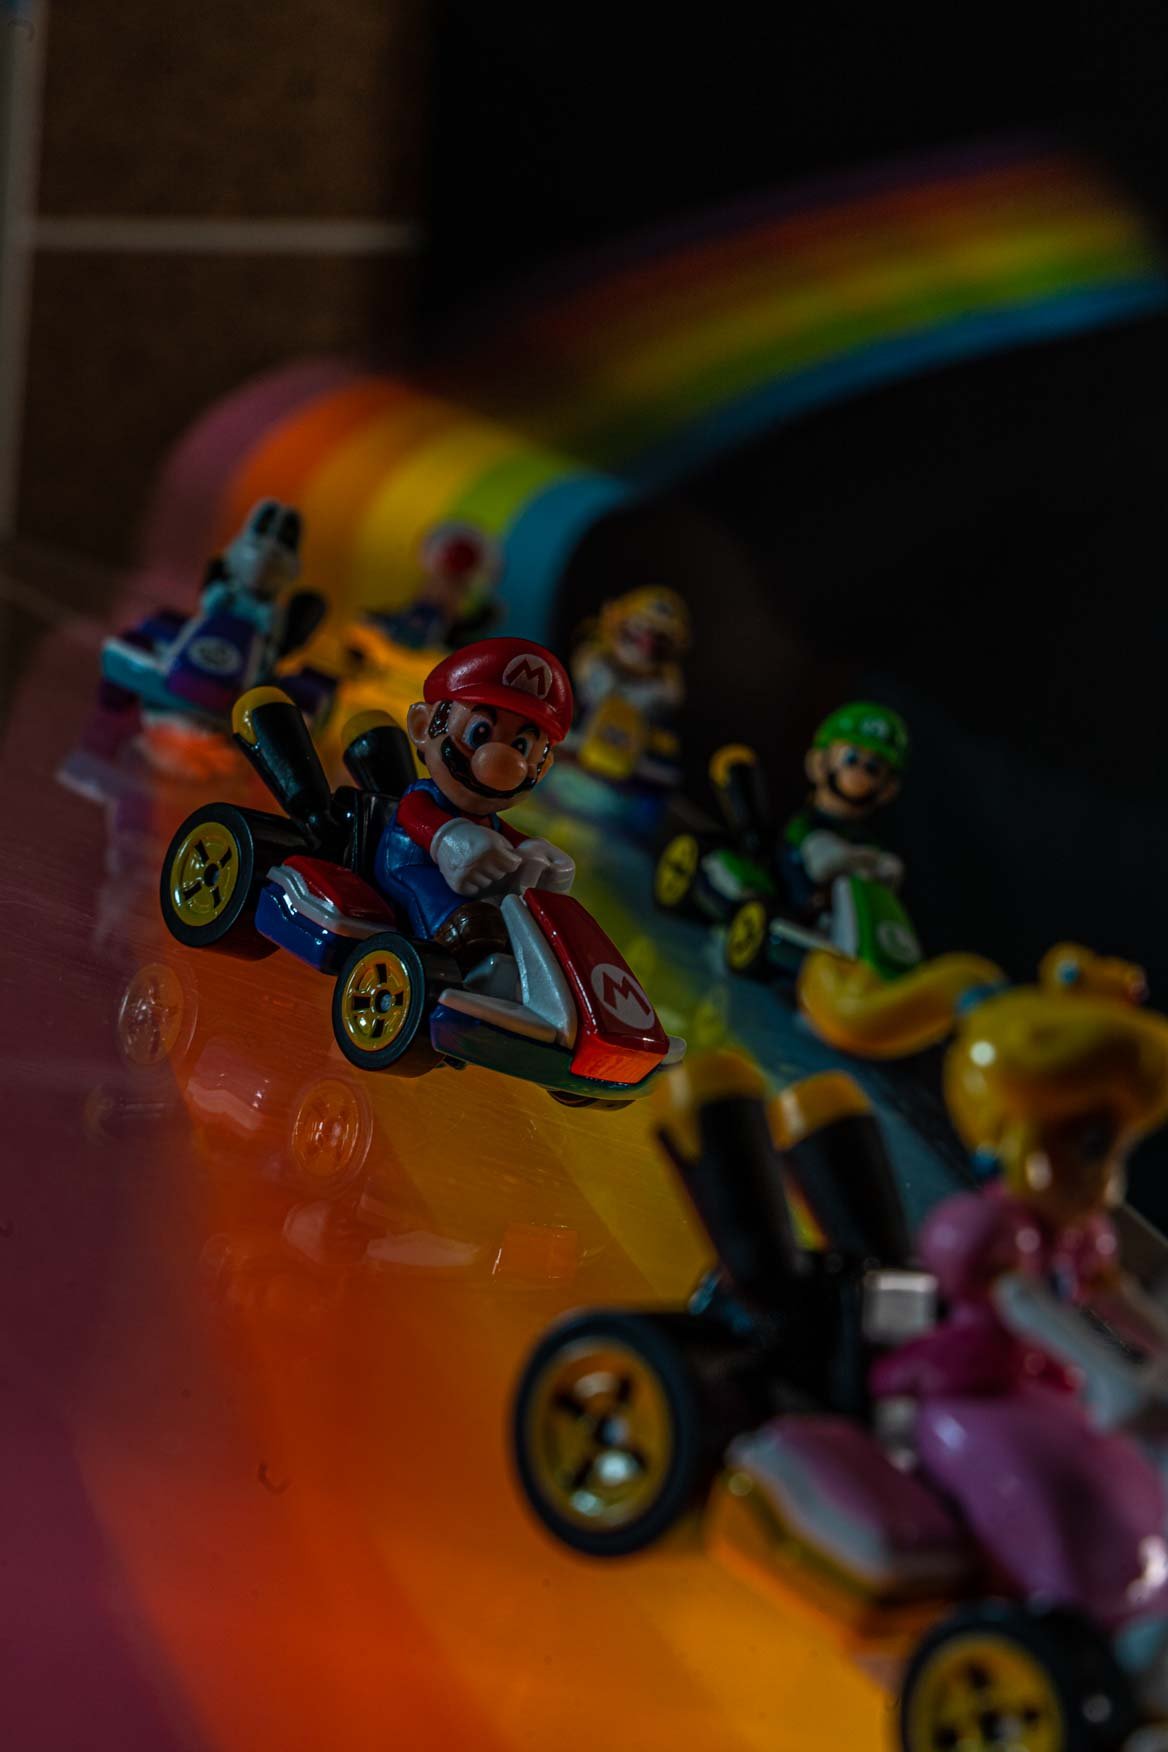
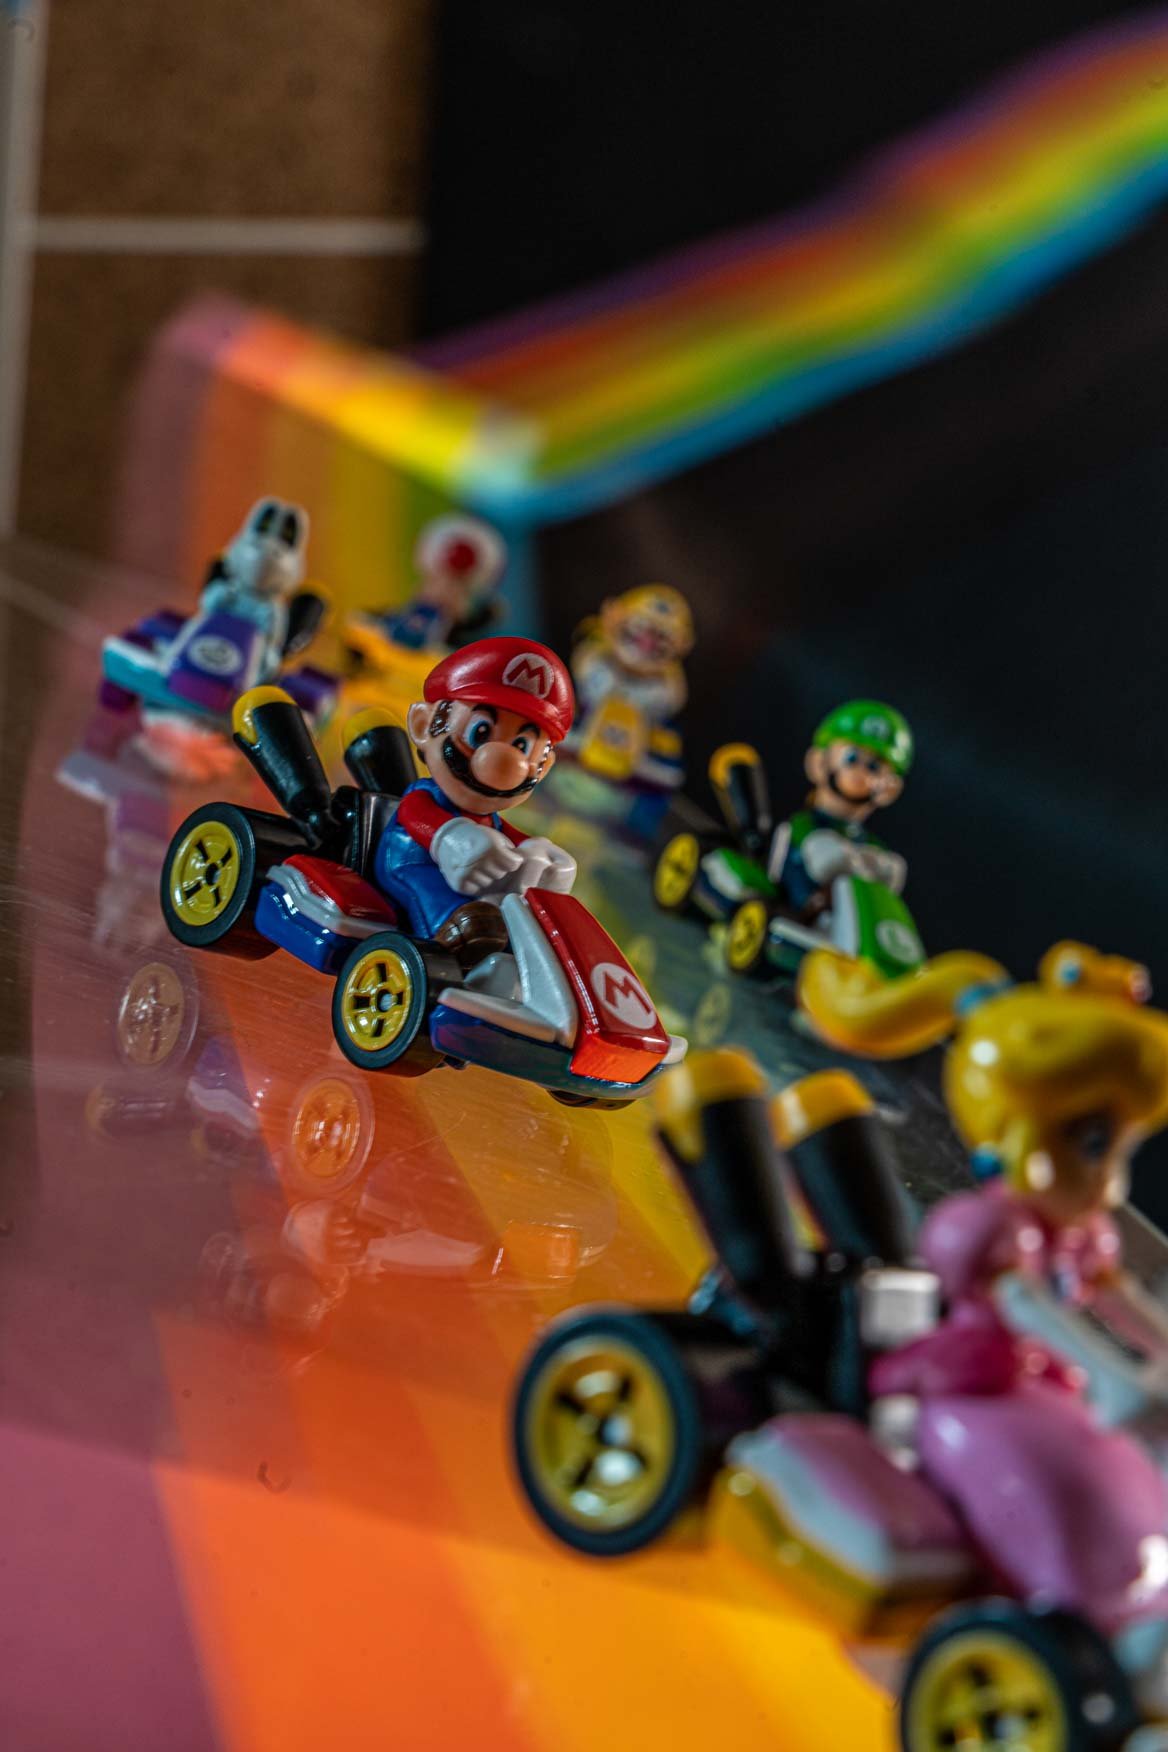
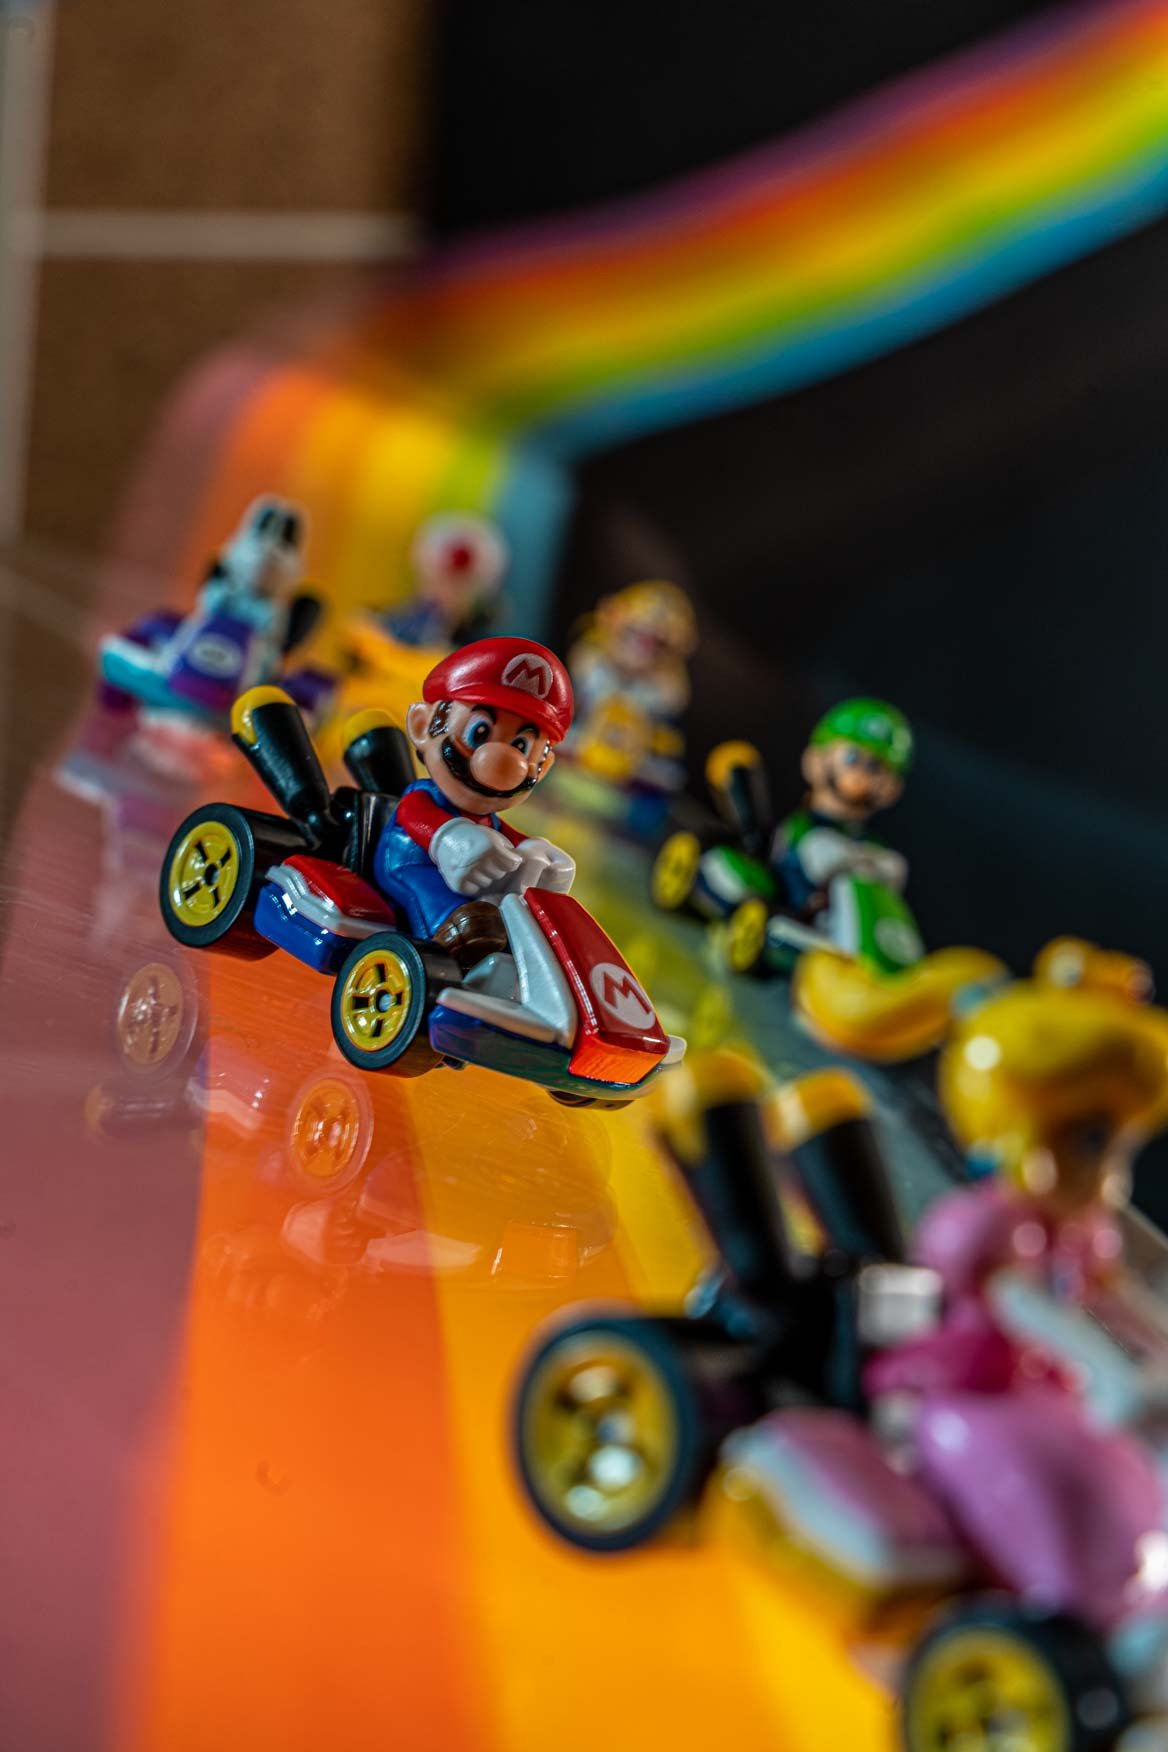
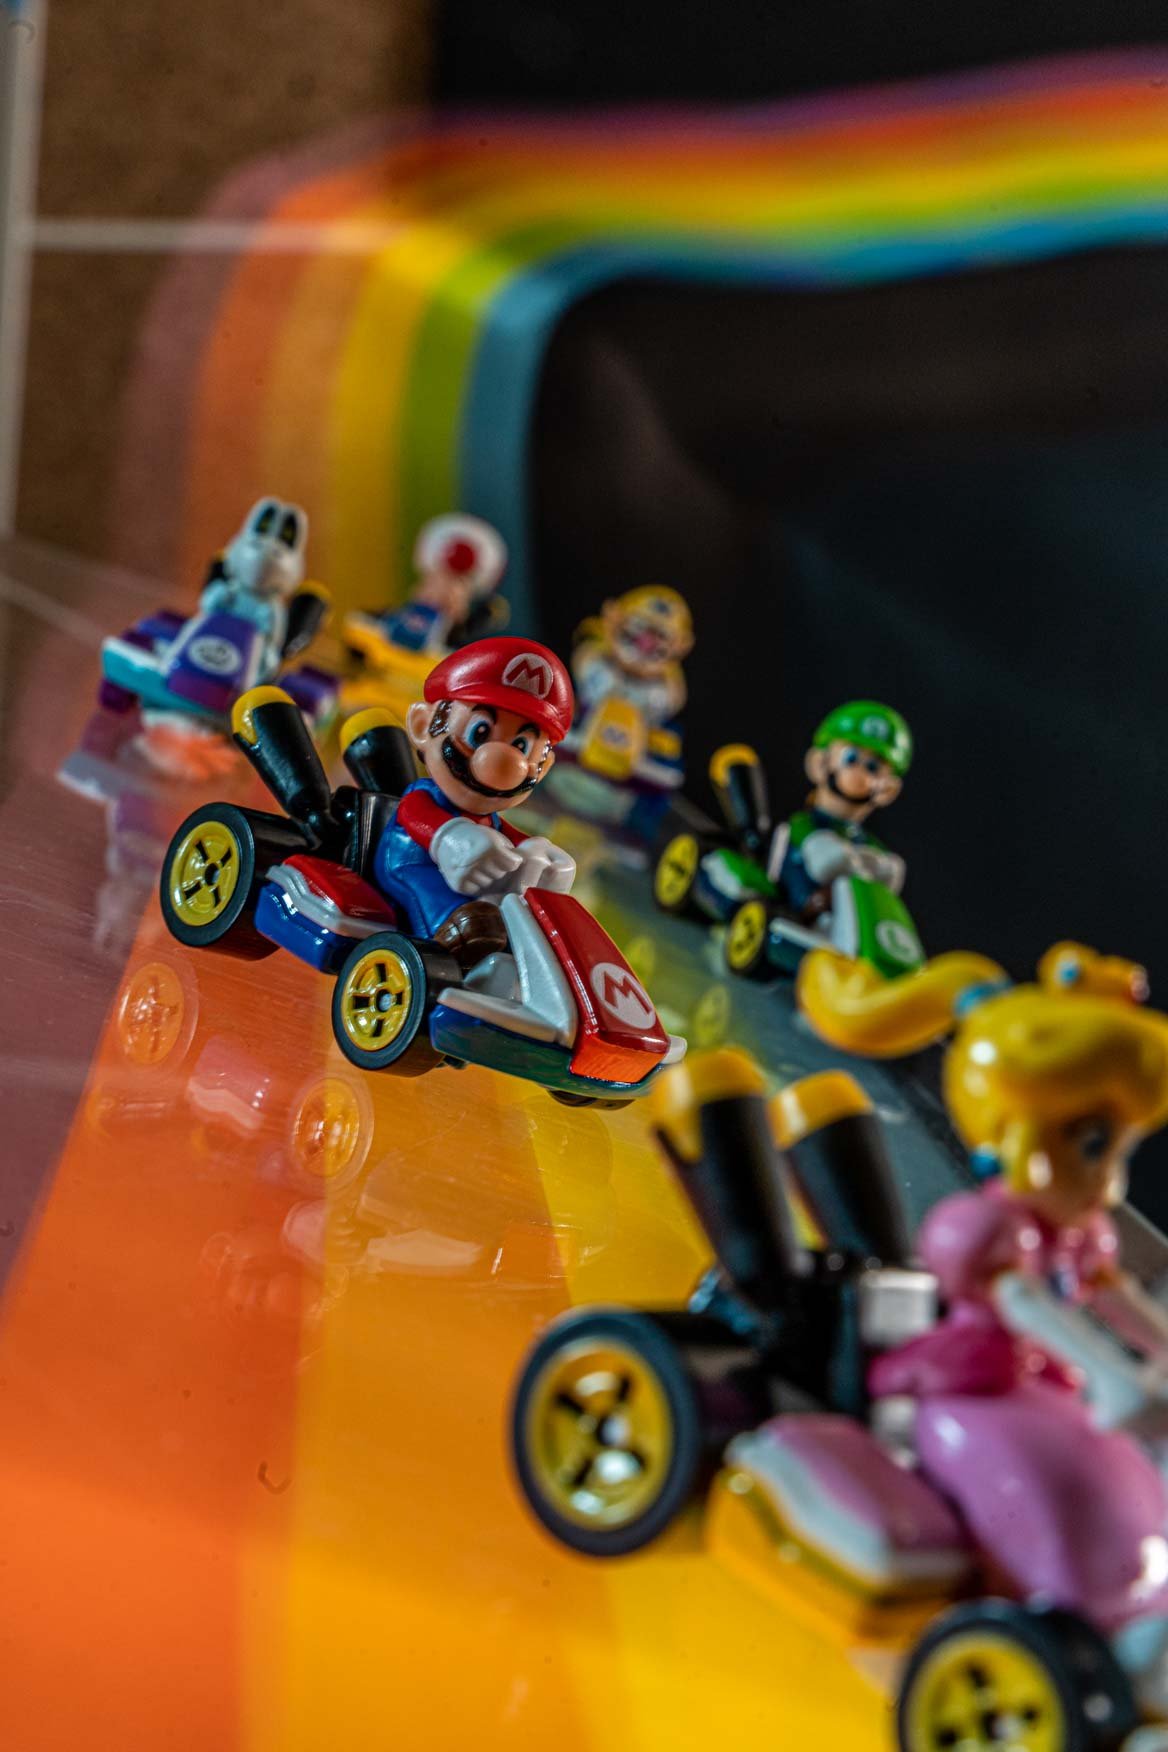
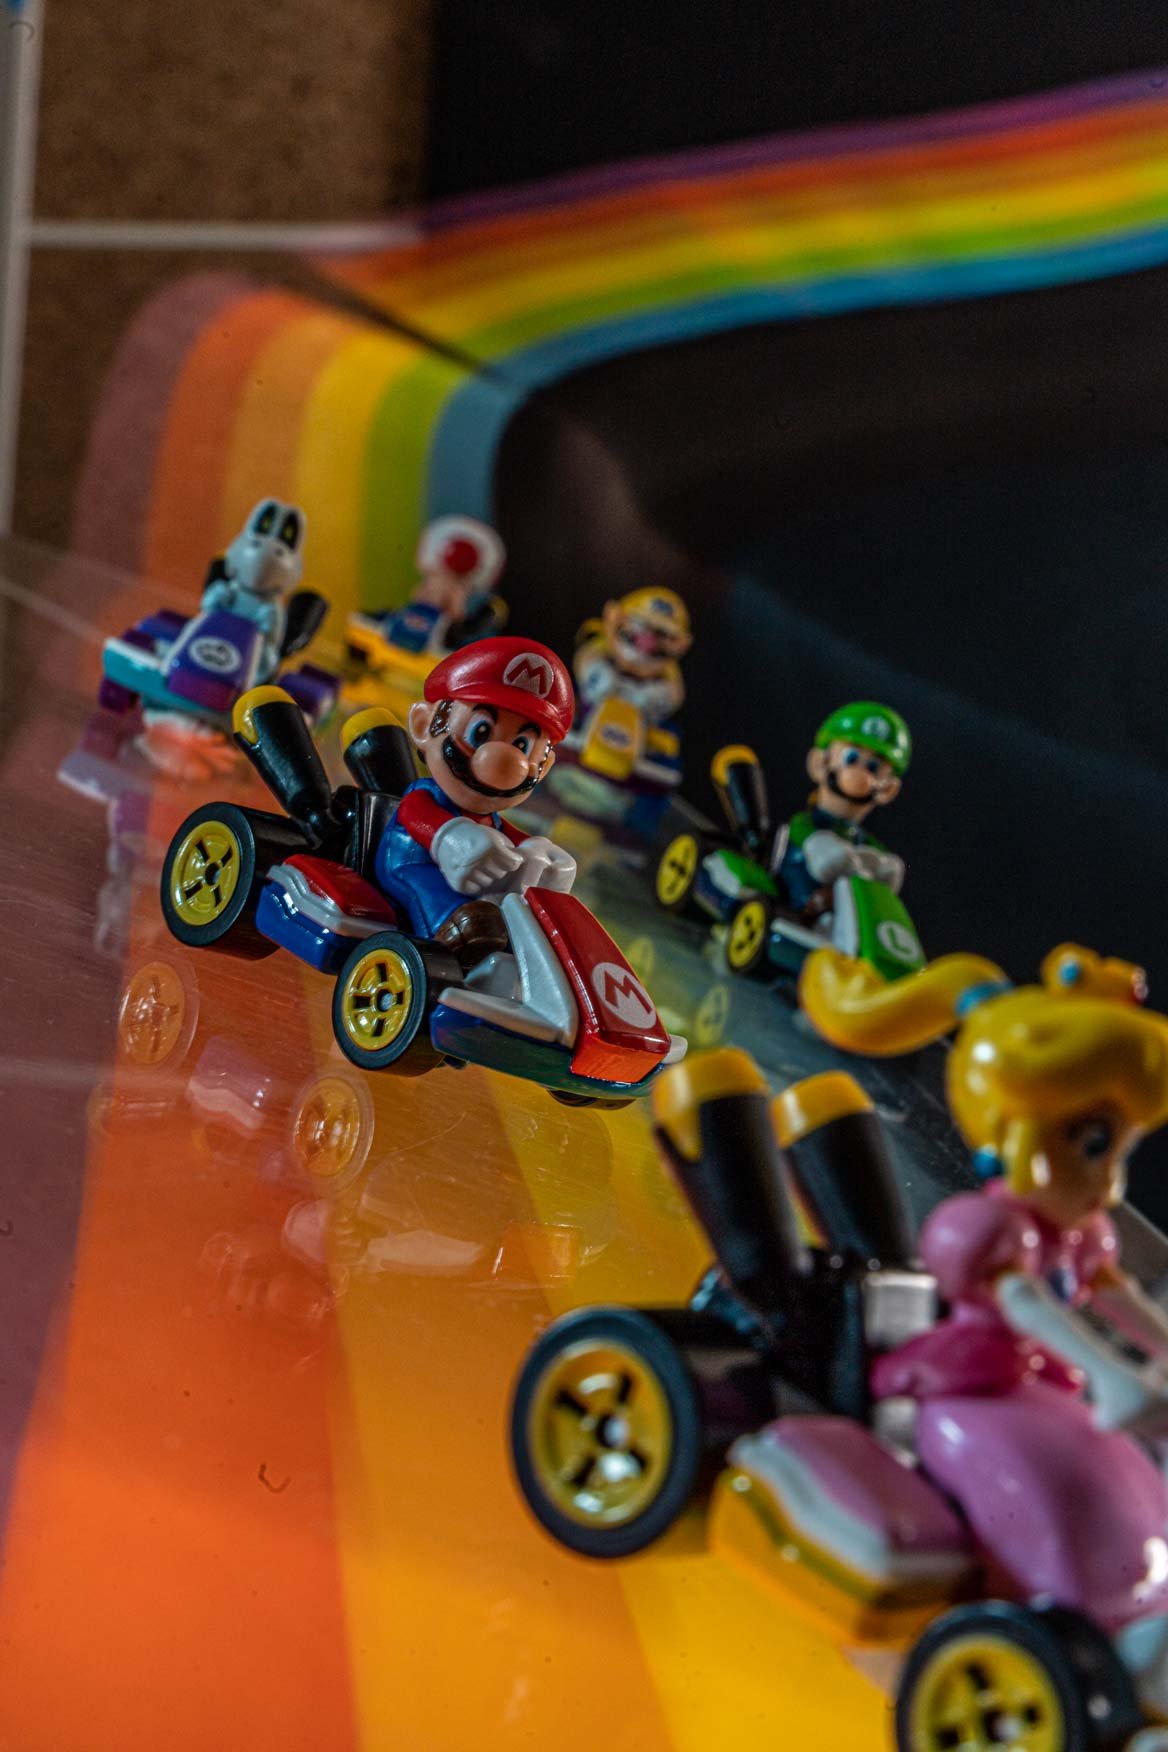
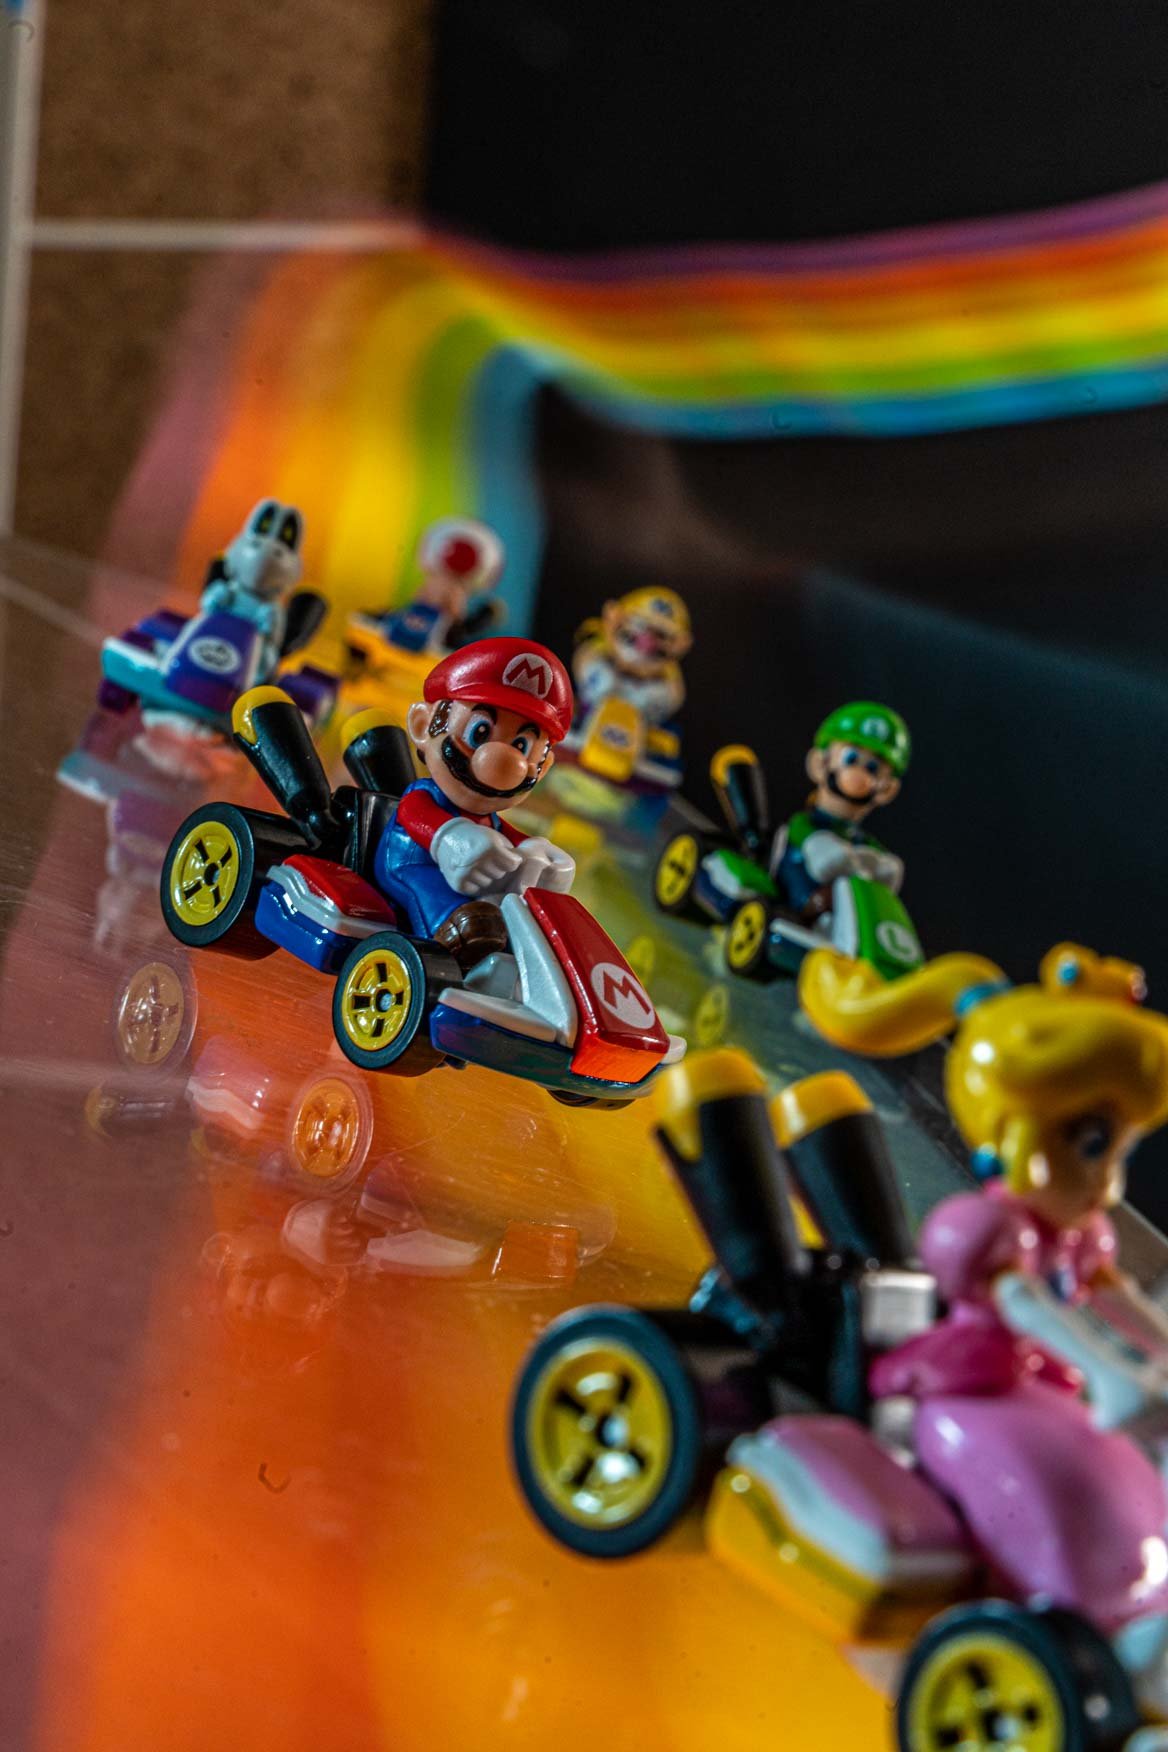
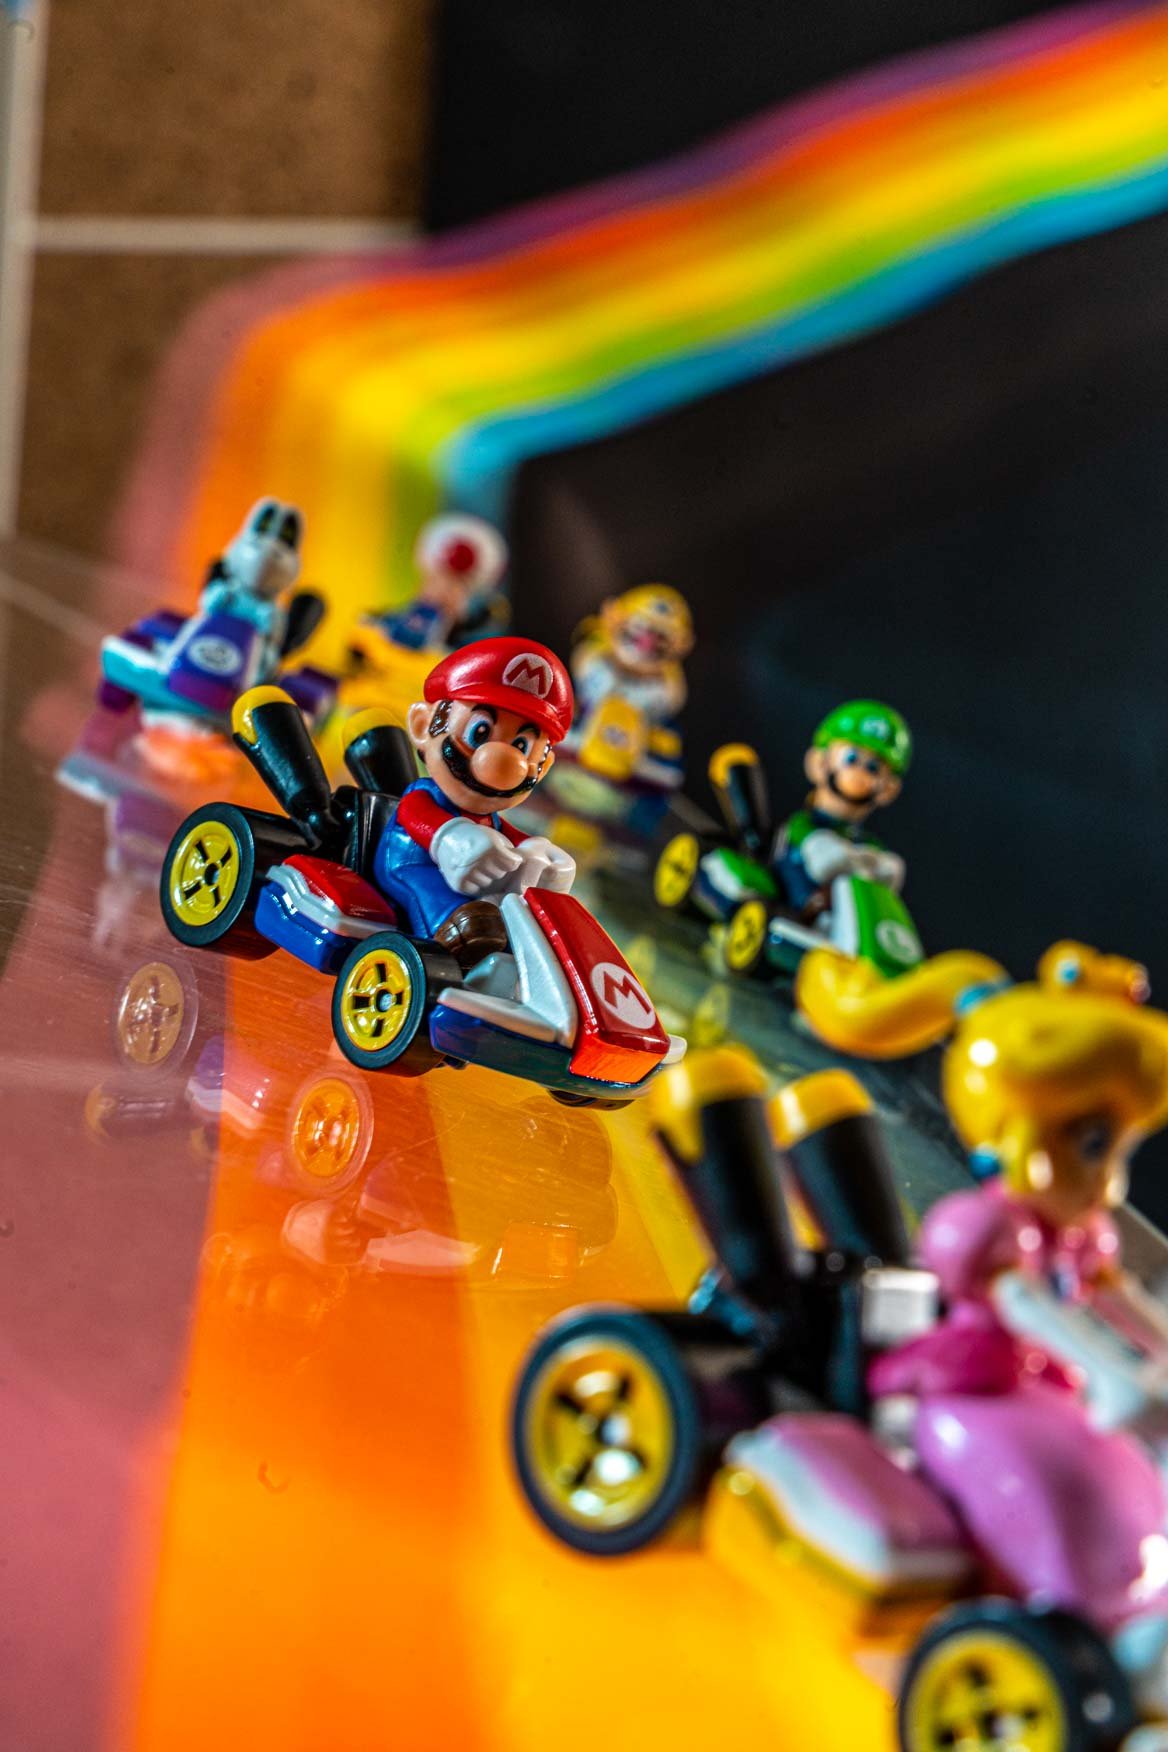
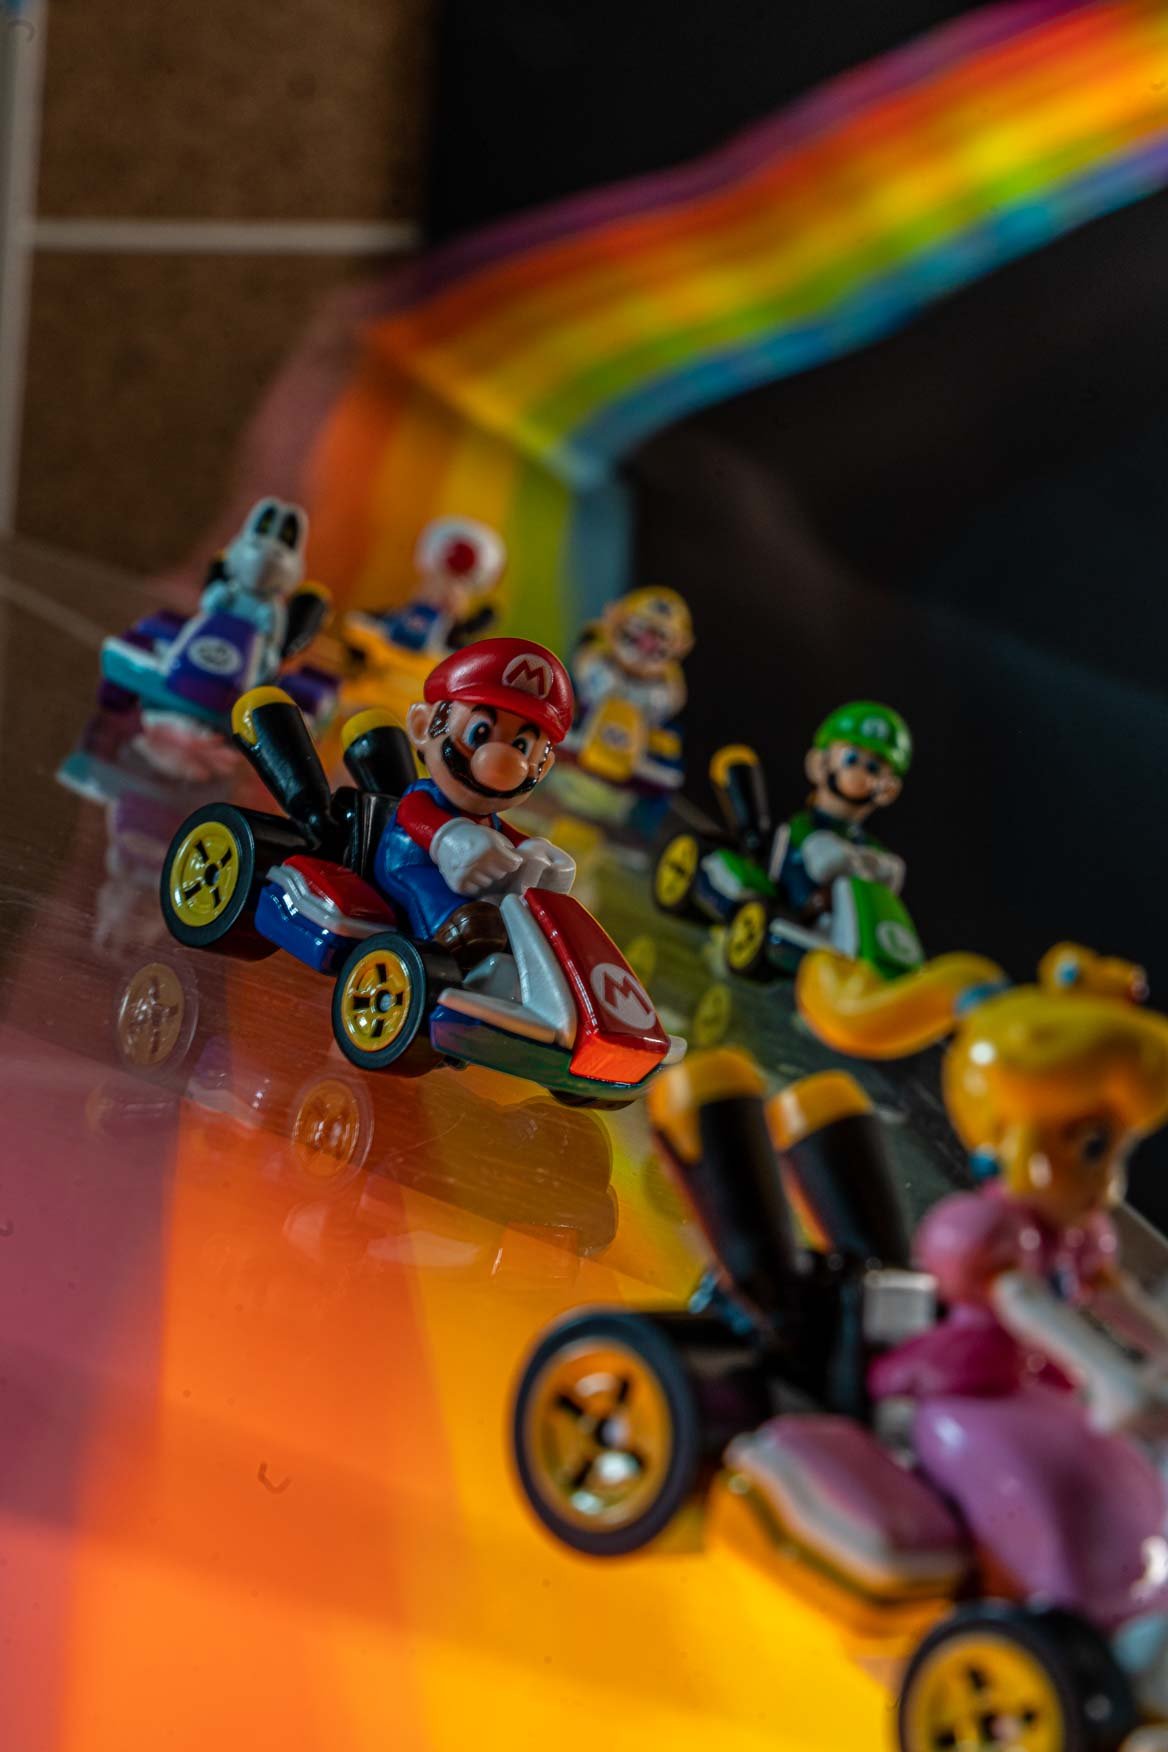
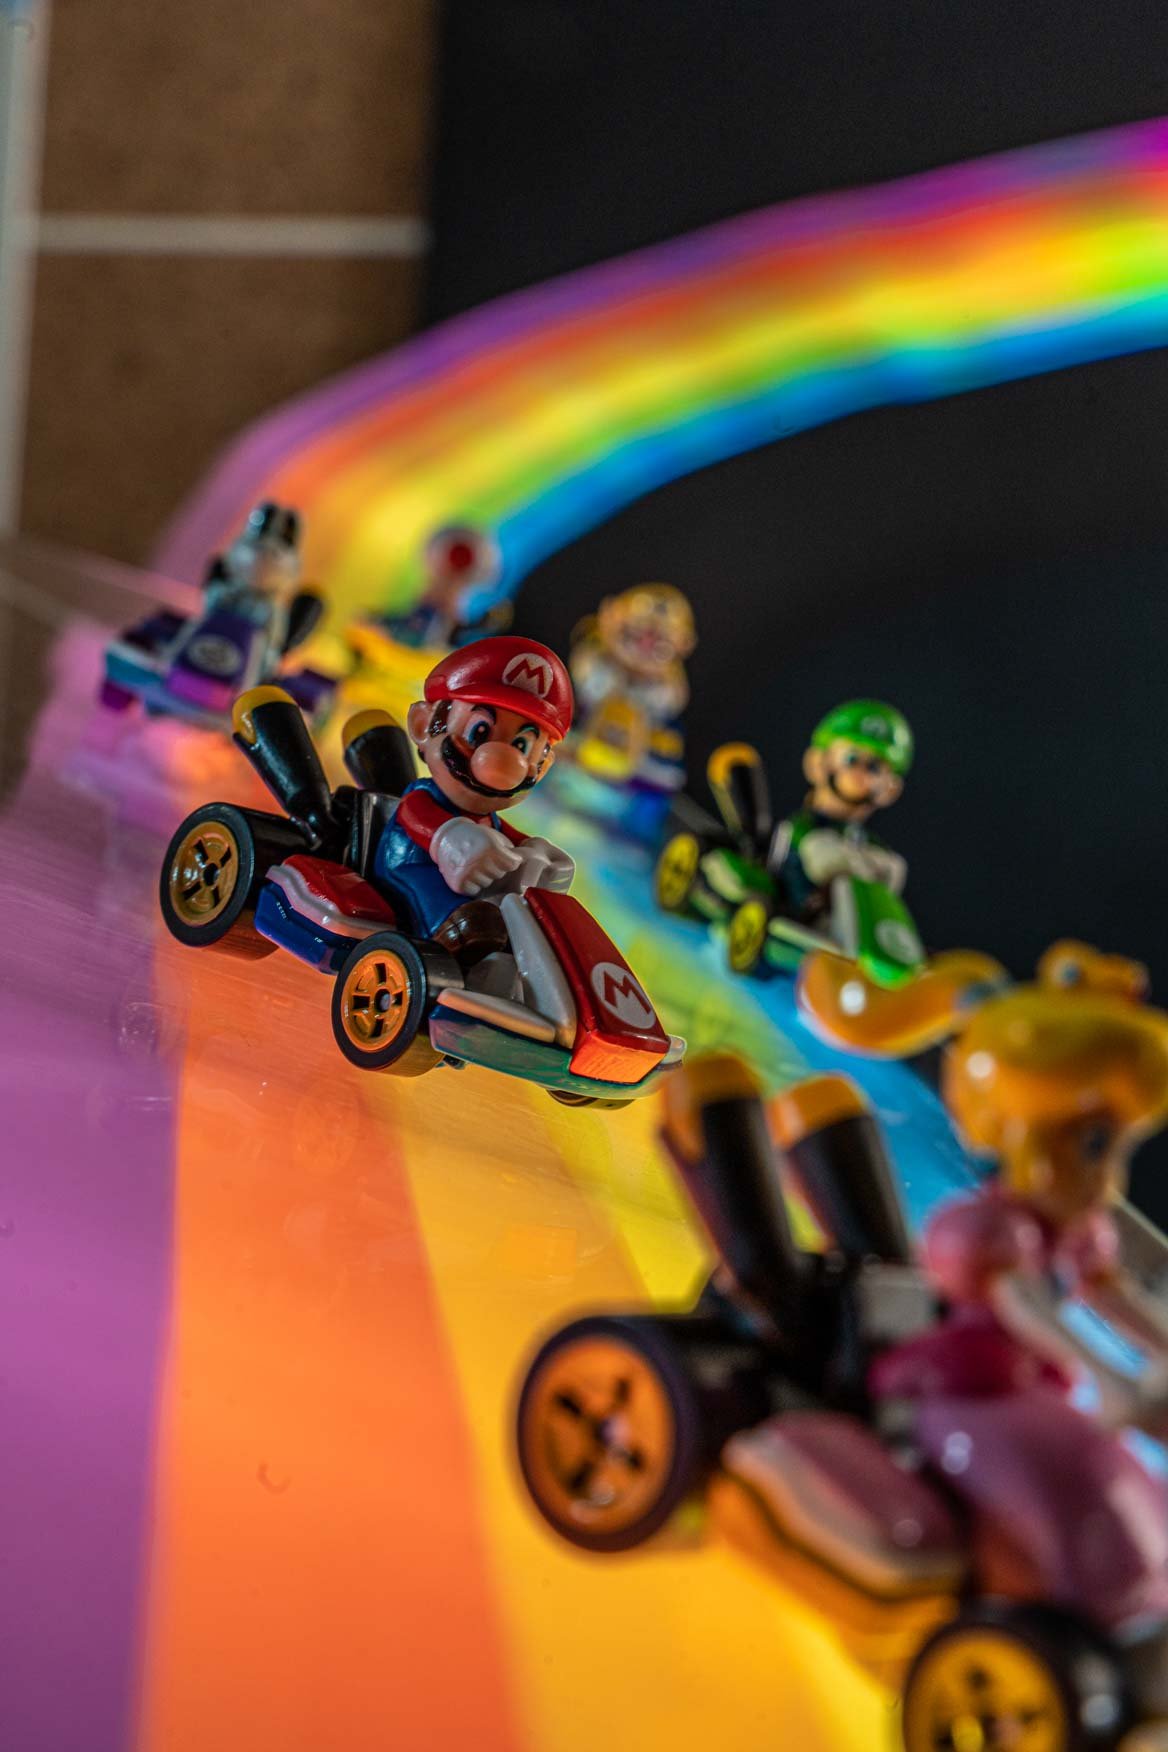
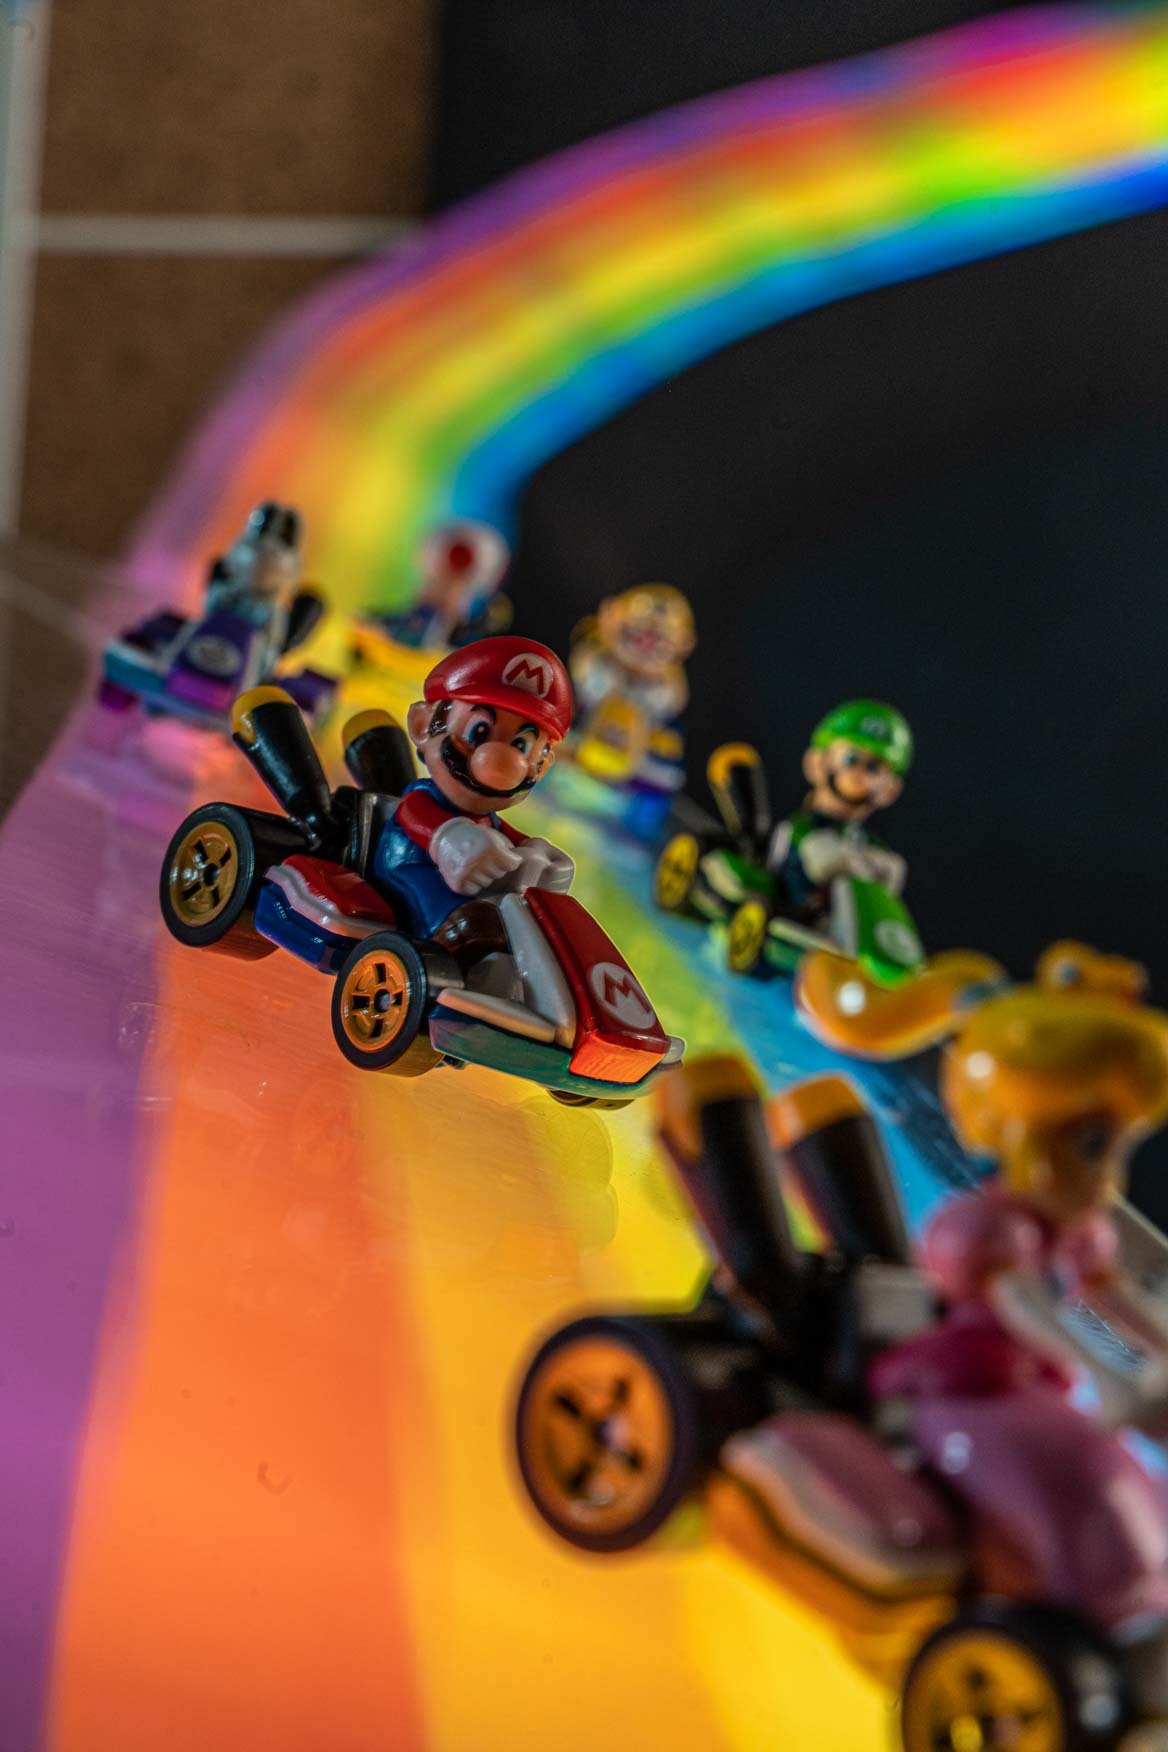
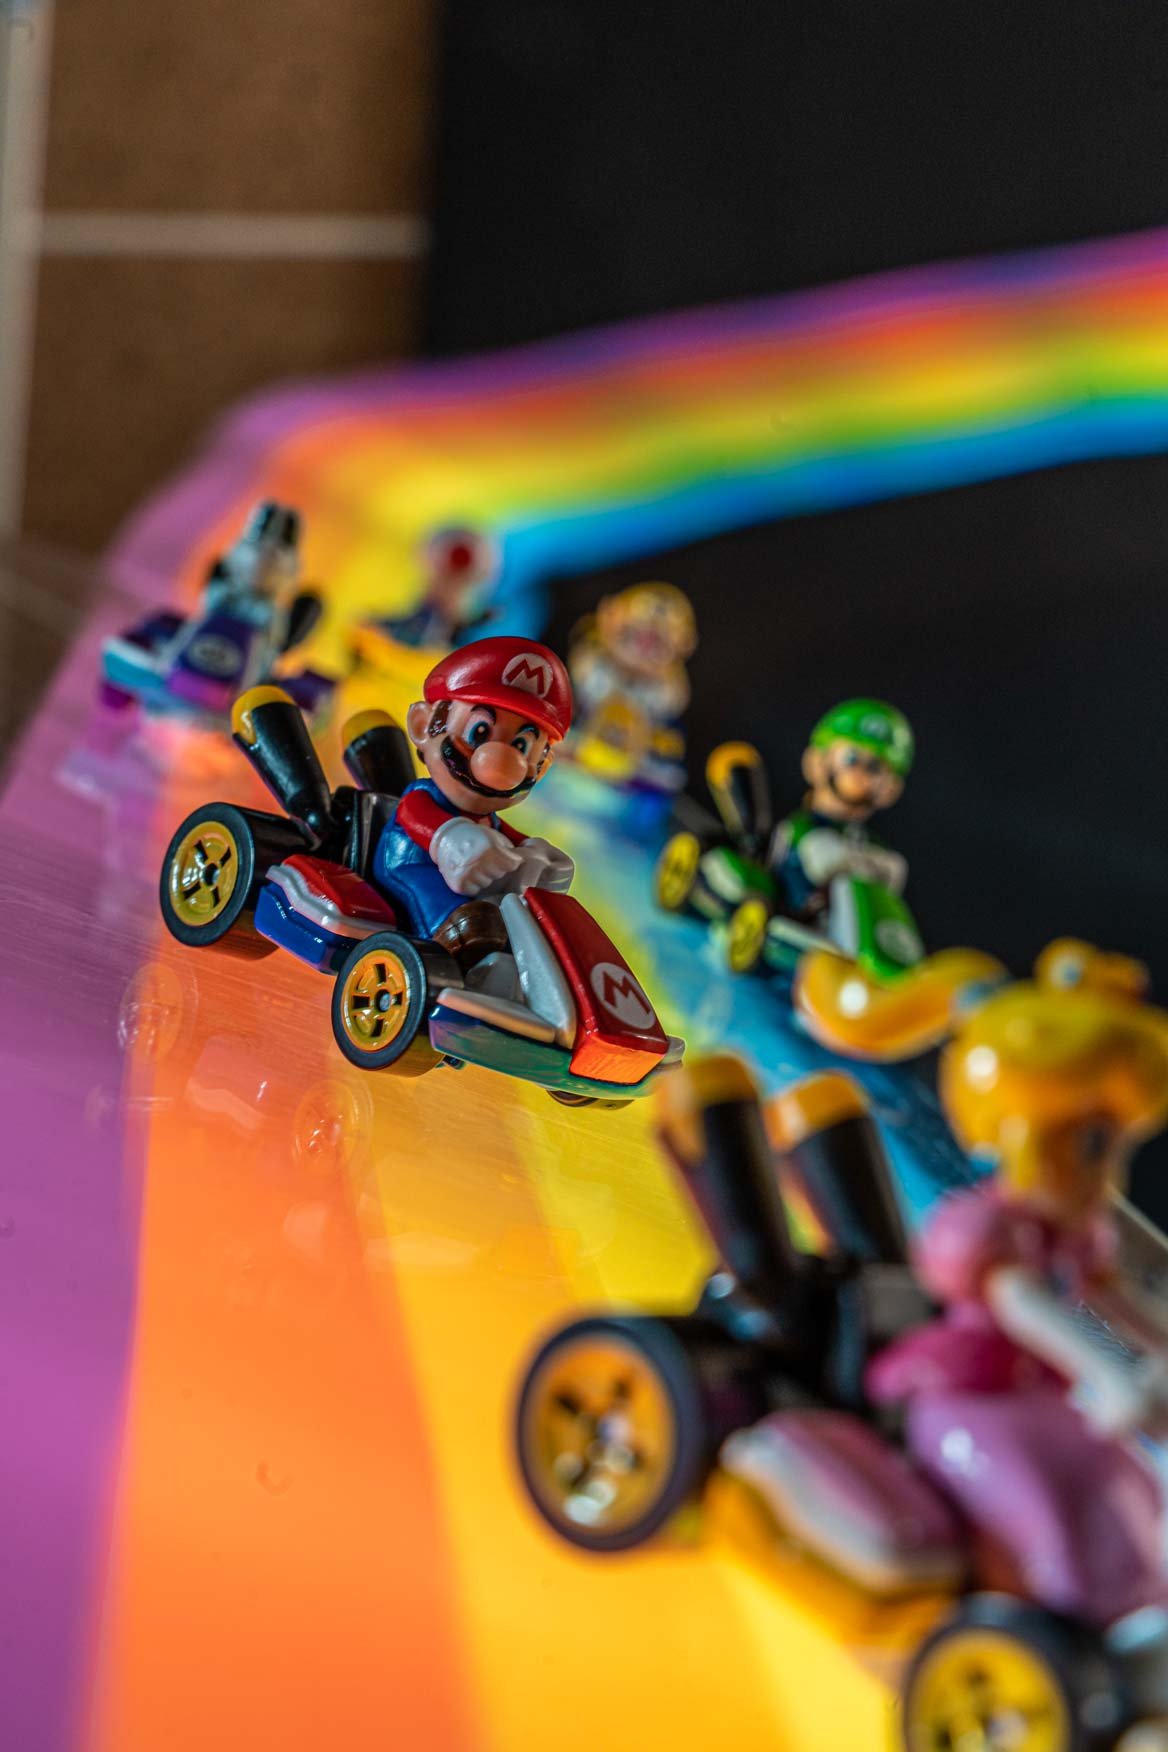
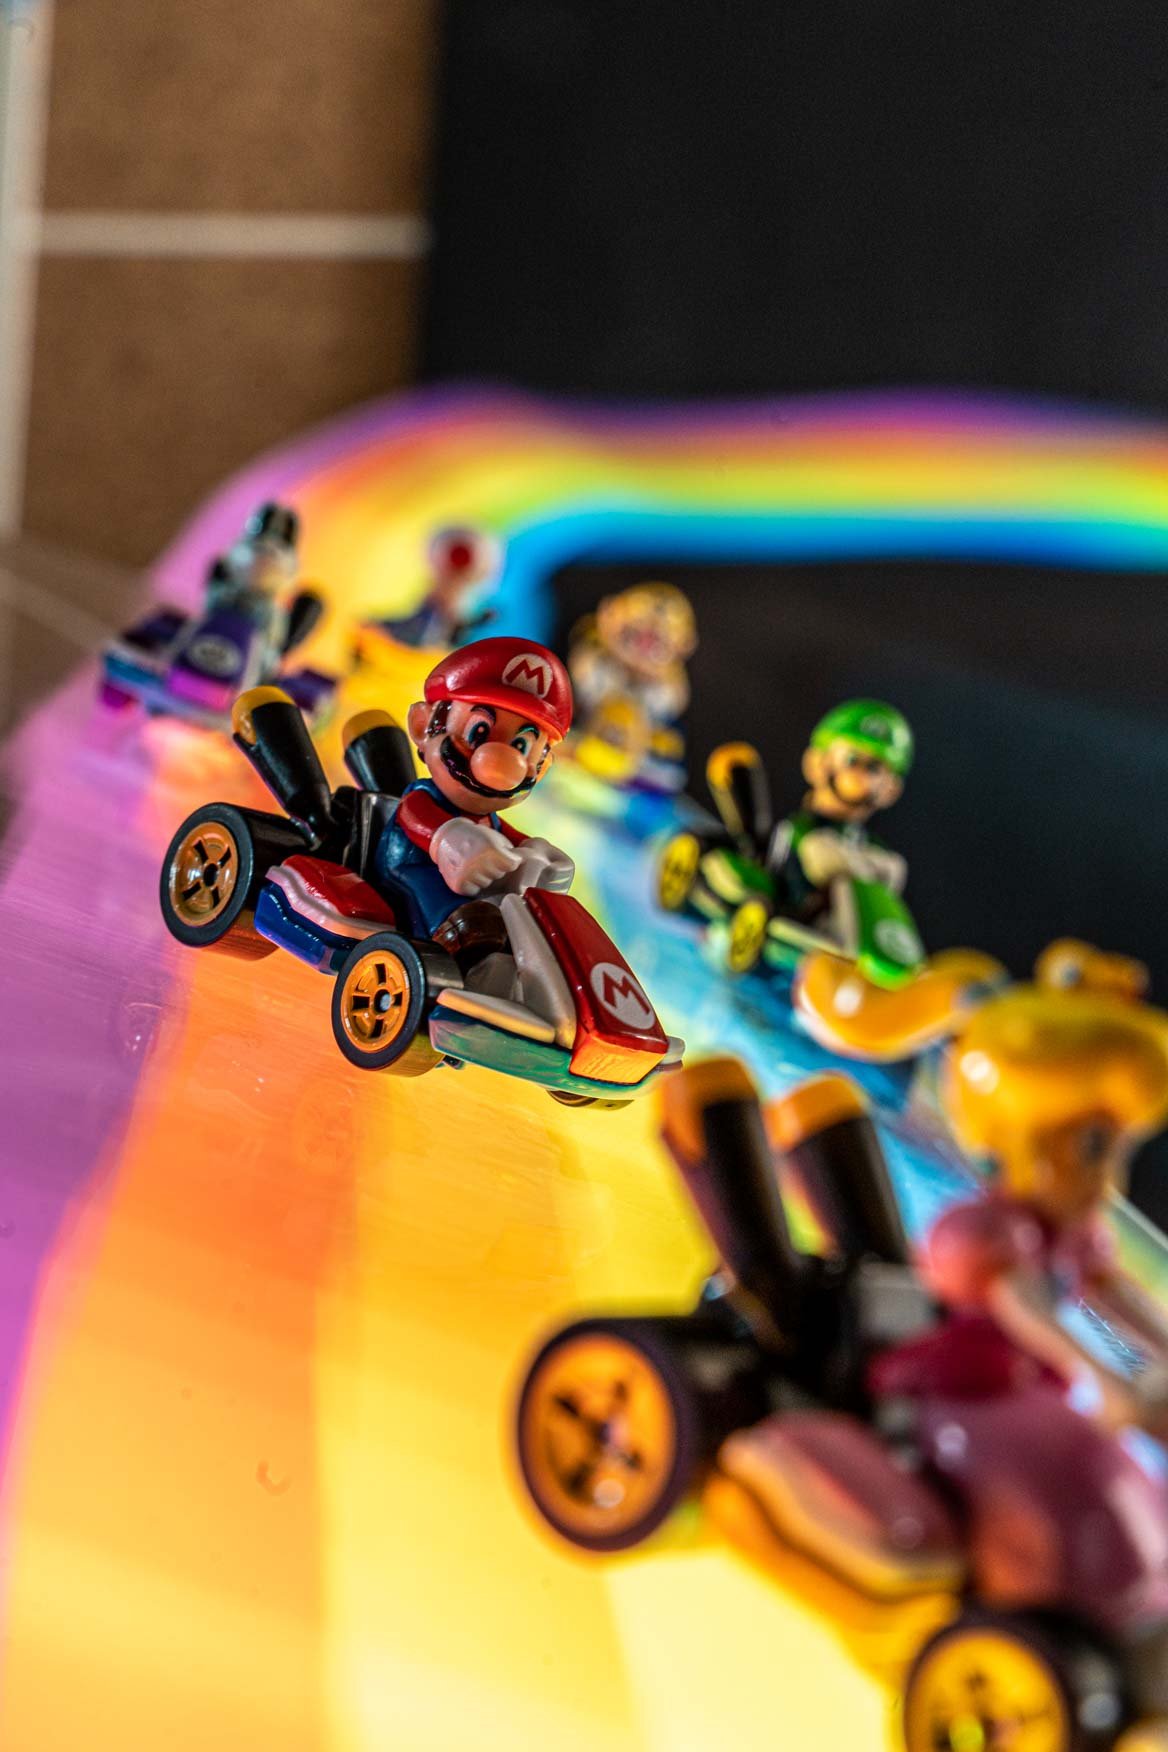
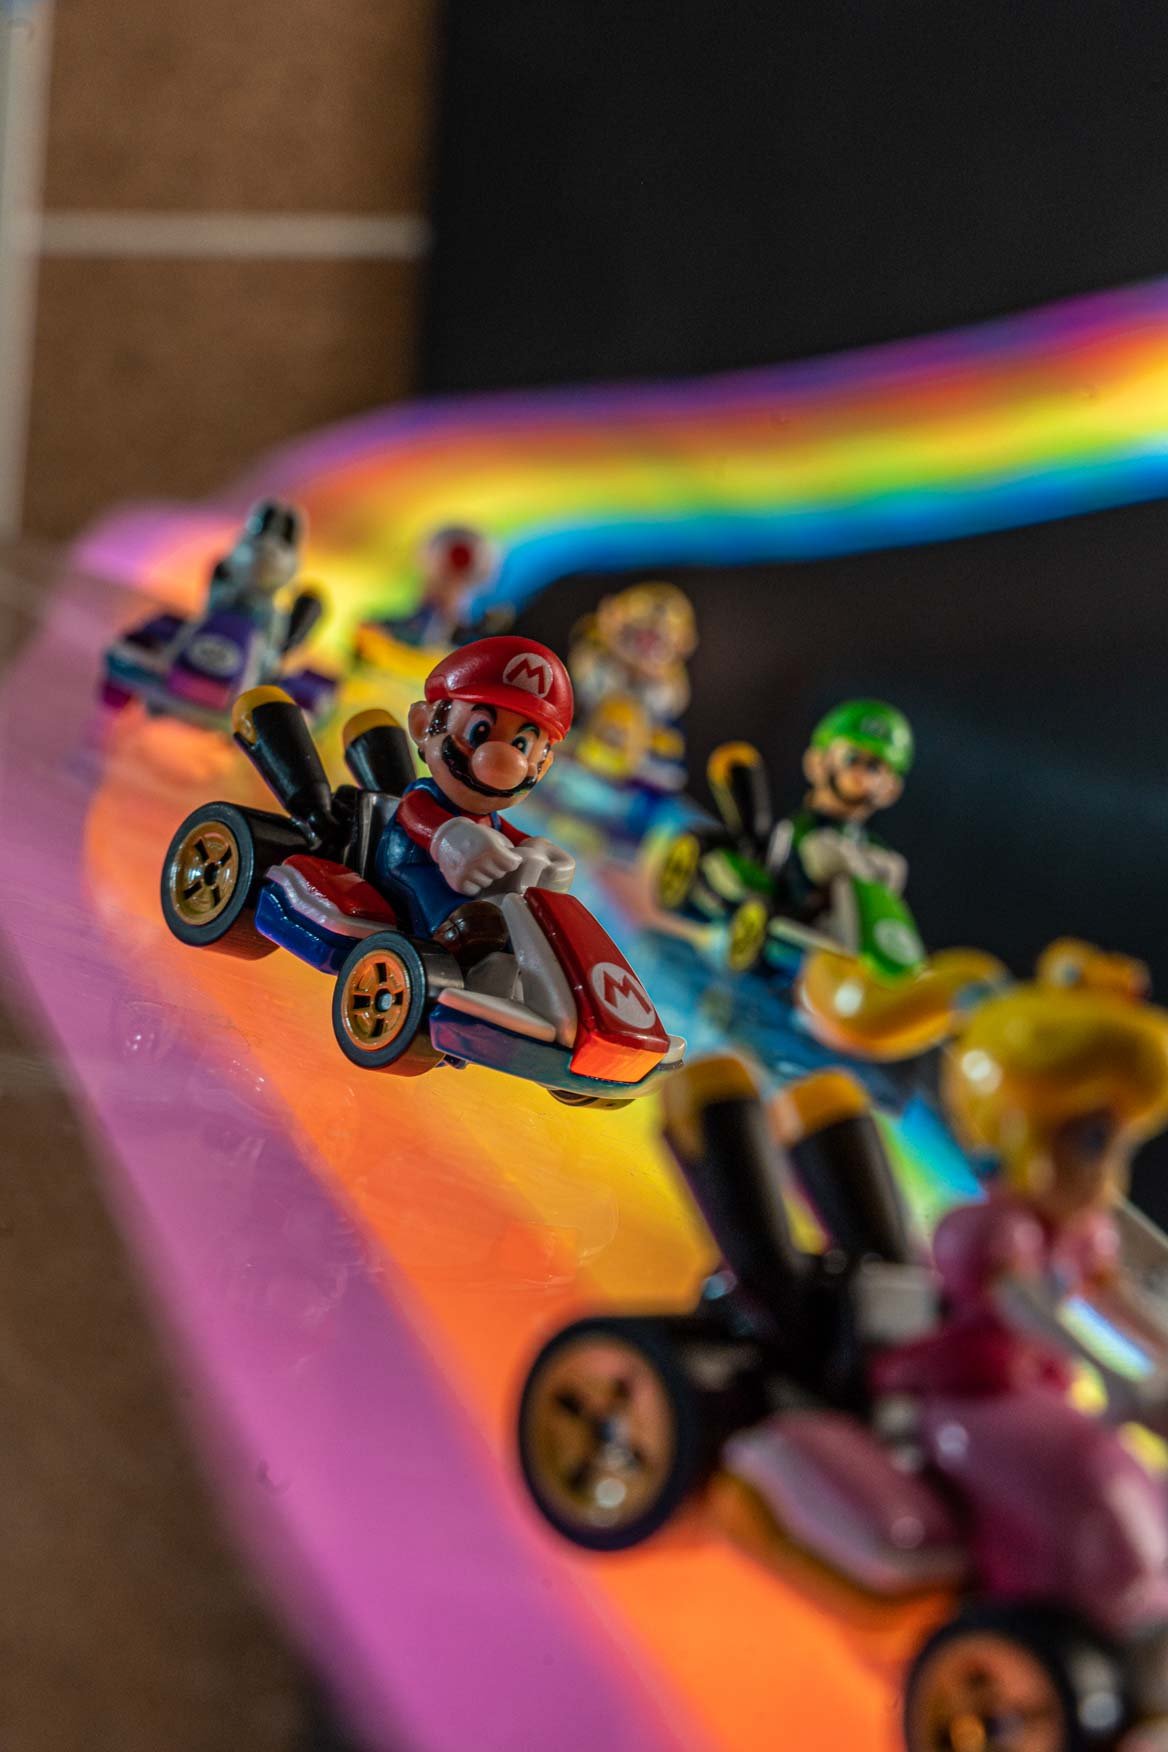
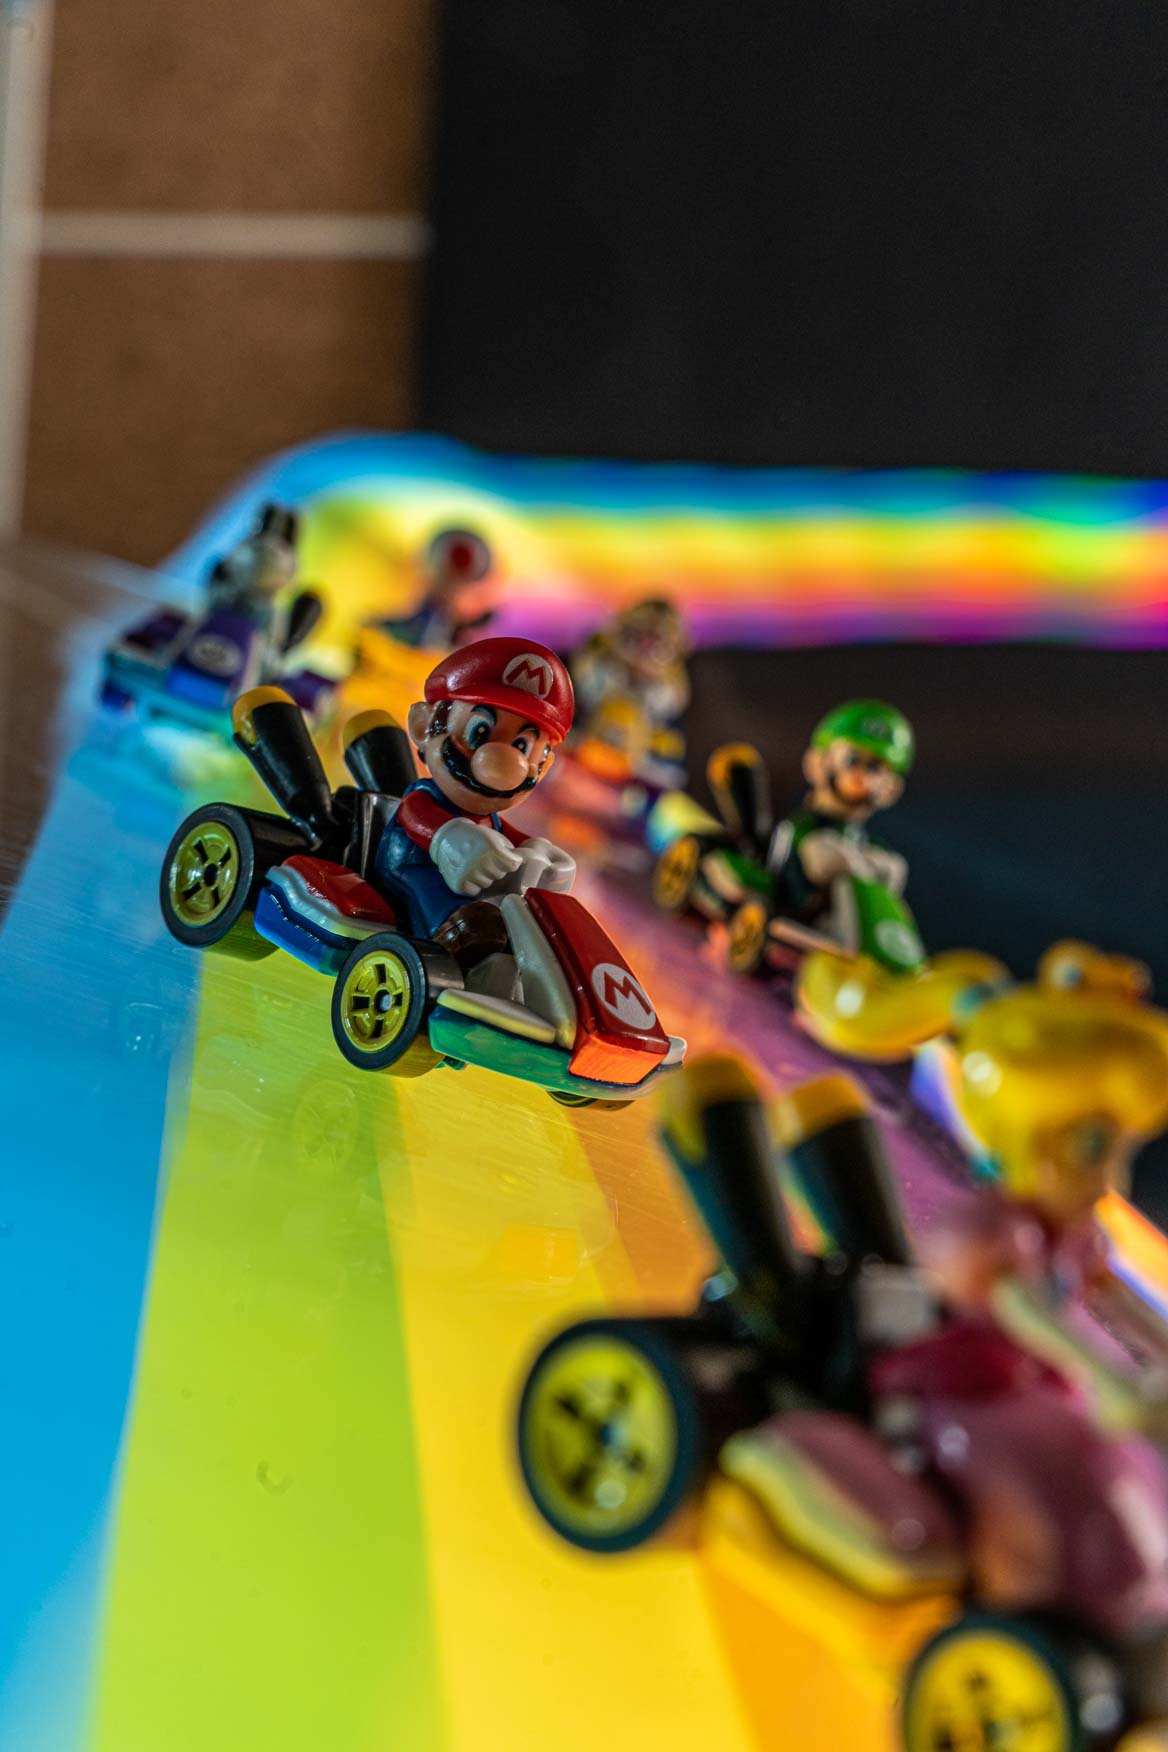
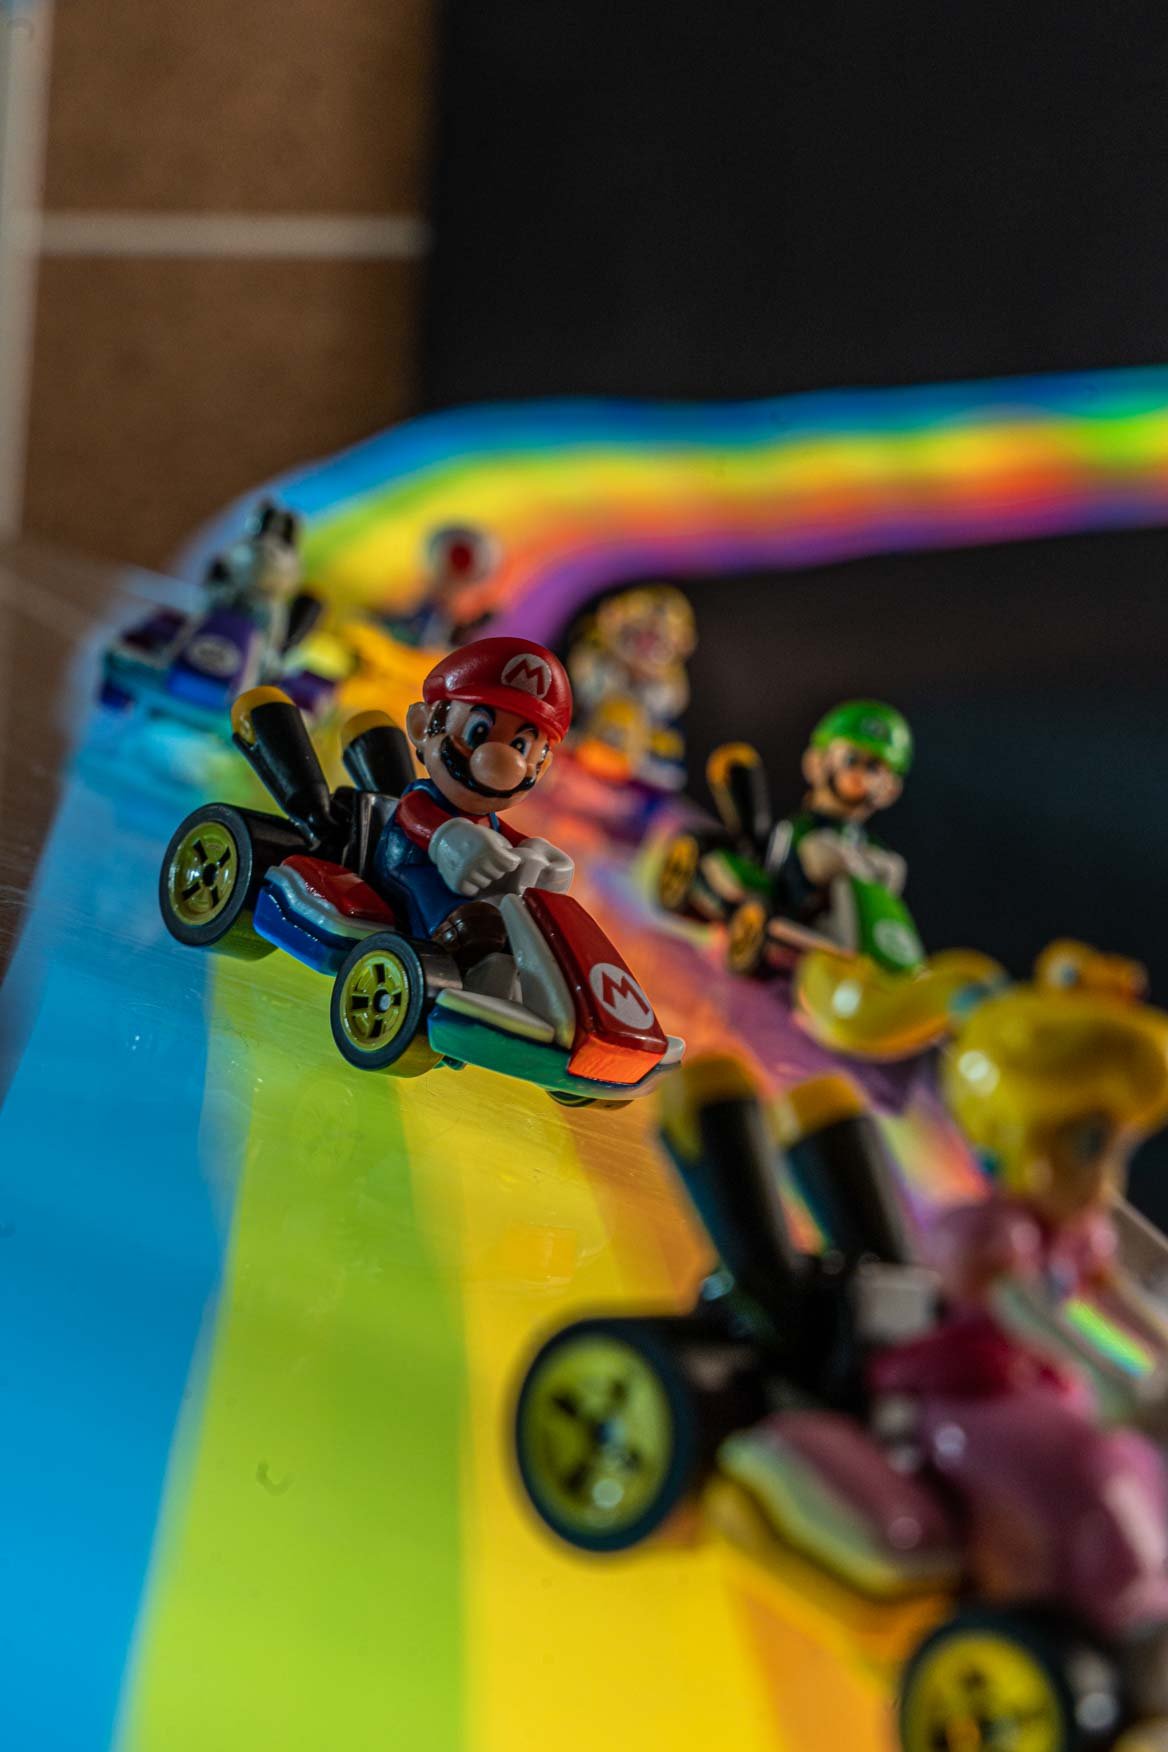
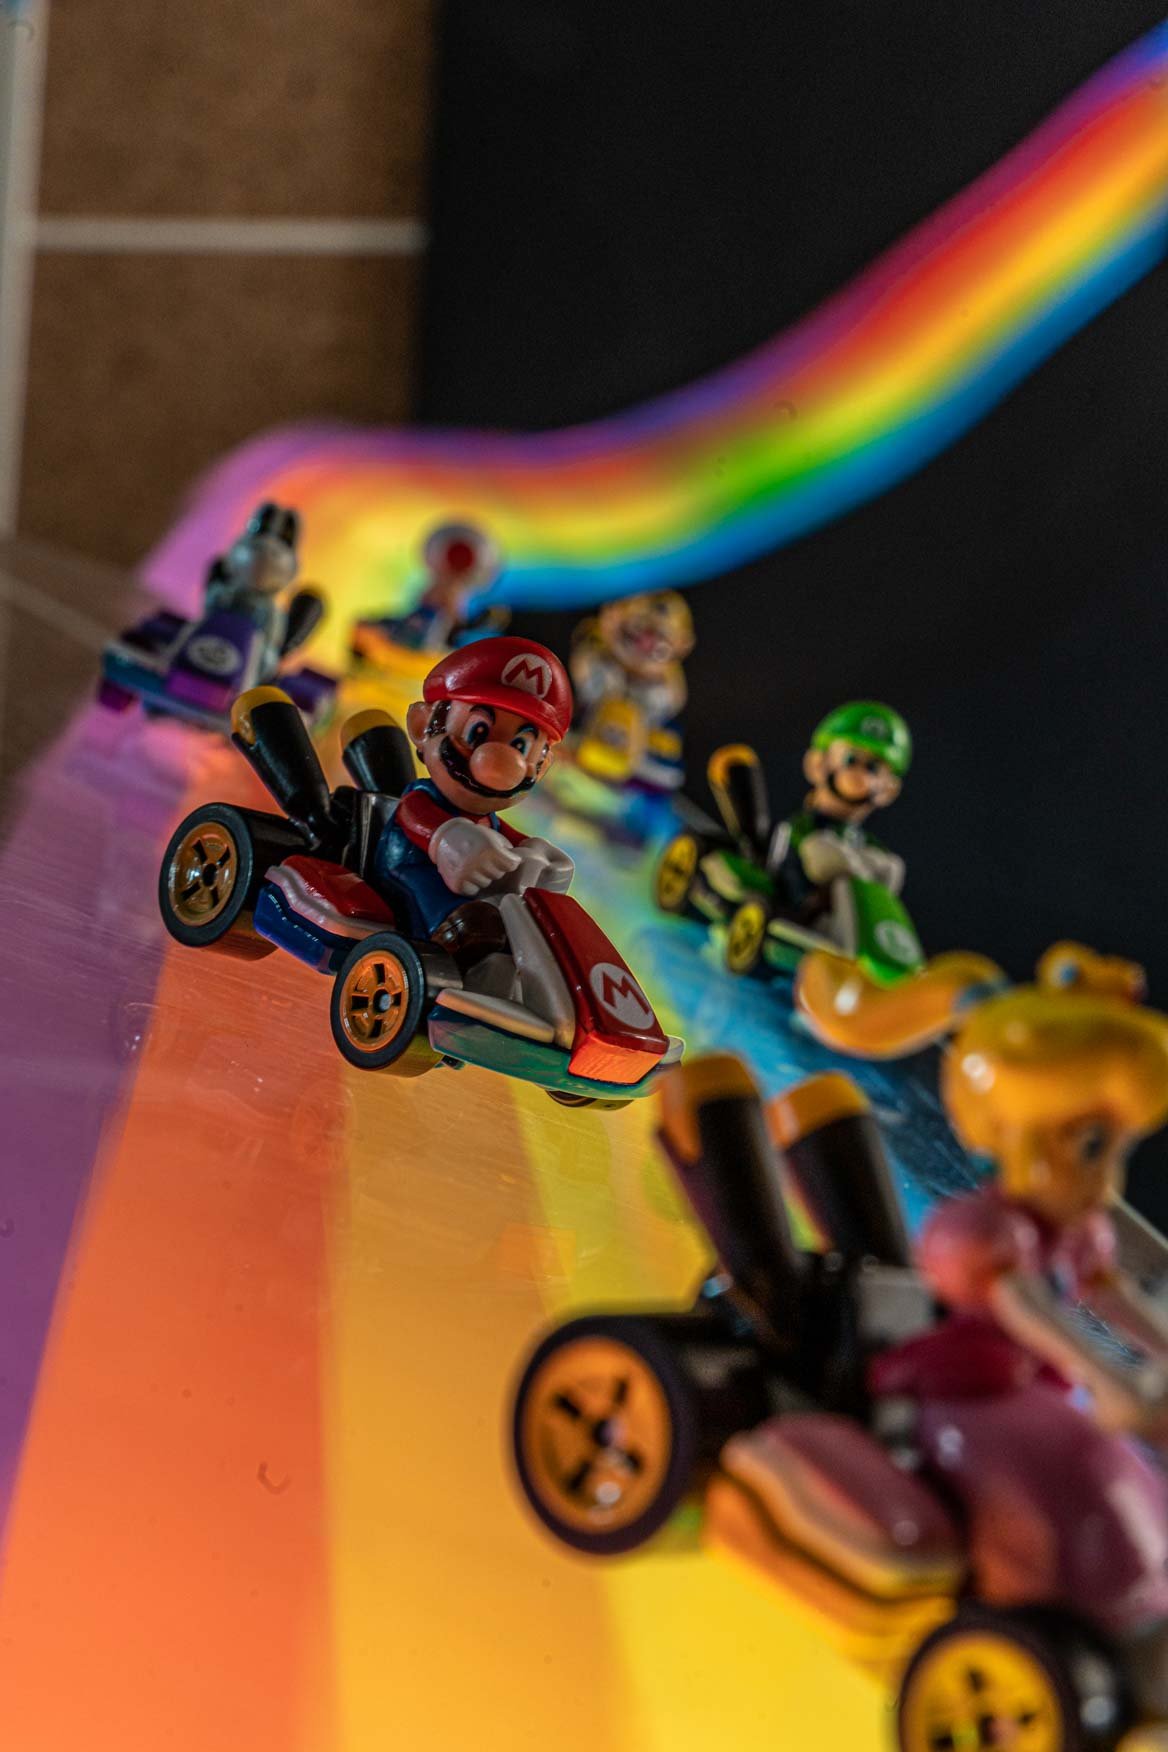
THE FINAL RESULT
Have you attempted light painting before? Is this an entirely new discovery? Either way, I encourage you to try it the next time you want to add some practical magic to your next photo. My mind is already racing (pun intended) with new ideas that would be perfect with this trick.
If you have tried this technique in any of your work, tag me in your posts on instagram use the hashtag #wmollightpainting in your caption. I would love to see your take on using light painting in your shots! Since this is an ongoing series, what other techniques should I explore?
Thanks for learning with me and hopefully this inspires you to get creative with your next project.

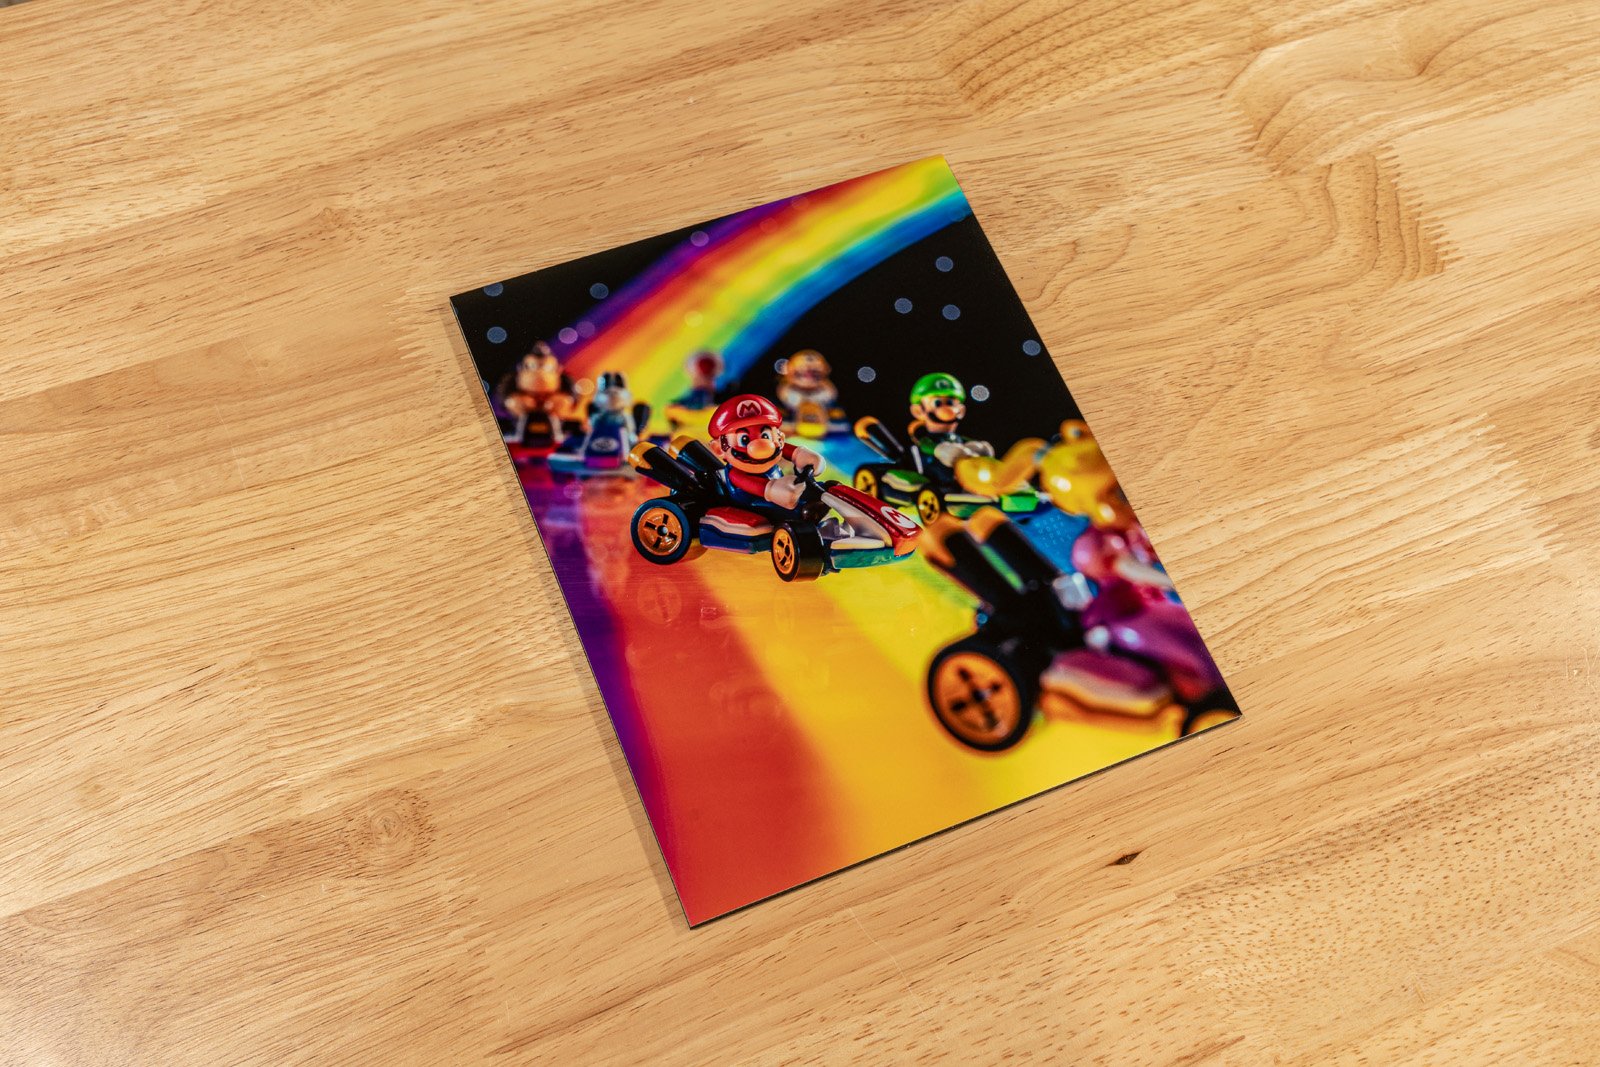
THE PRINT
As part of my series that explores techniques of visual effects, my exercise in light painting resulted in this concept called “Rainbow Road”.
“Rainbow Road” is an archival-grade print on Fuji Crystal luster photo paper and mounted on black styrene board for long-lasting durability. Please allow up to 2 weeks before your order arrives.
Currently available for US and Canada orders only. Please email info@invisibleelement.com if you would like a custom quote for shipping or have additional inquiries.


As part of my series that explores techniques of visual effects, my exploration of light painting resulted in this concept called “Rainbow Road”.
“Rainbow Road” is an archival-grade print on Fuji Crystal luster photo paper and mounted on black styrene board for long-lasting durability Please allow up to 2 weeks before your order arrives. Shipping included!
Currently available for US and Canada orders only. Please email info@invisibleelement.com if you would like a custom quote for shipping or have additional inquiries.