Custom Bokeh

Have you ever seen a visual effect in video or photography and wonder how it was made? For me, that curiosity was the catalyst that led me into a full-time career in design, animation, photography, and all things creative! This ongoing series explores illusions, special effects and other creative techniques that are magical and truly fascinating. Let’s turn our attention to a technique known as Custom Bokeh!

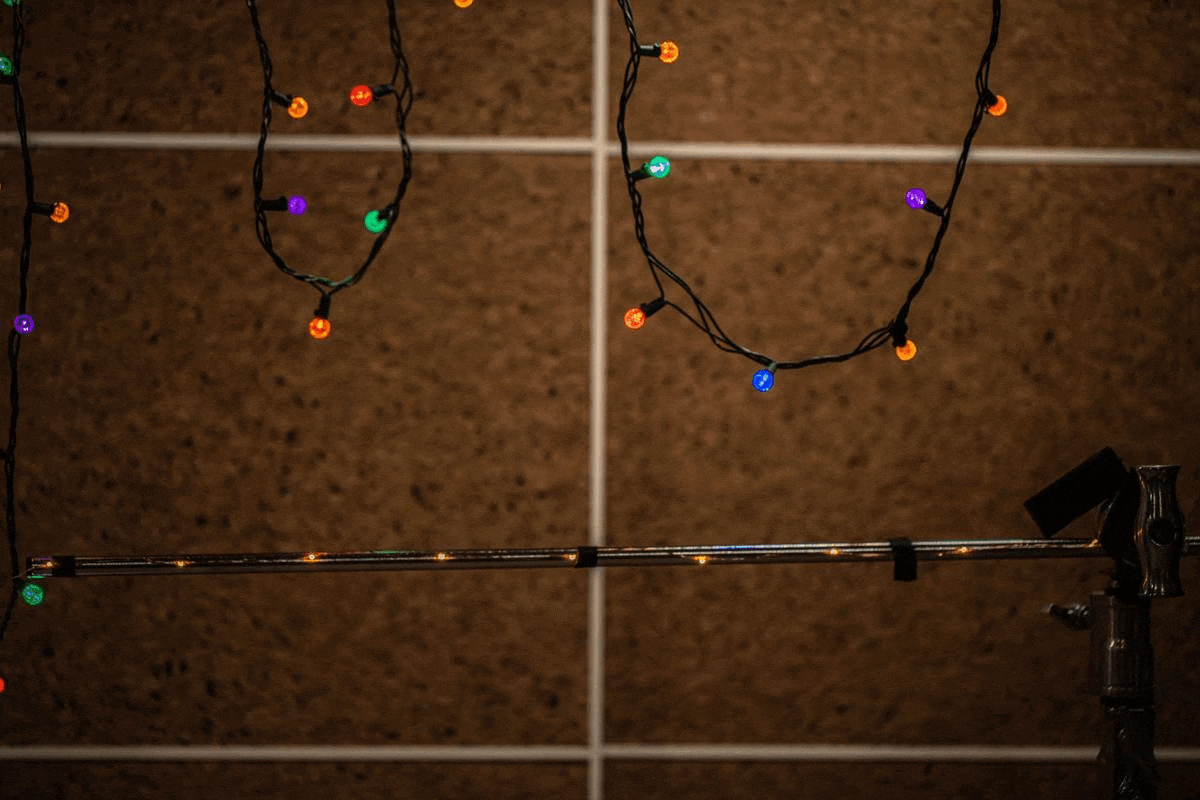
Street Lights by Kelly L. via Flickr © 2007.

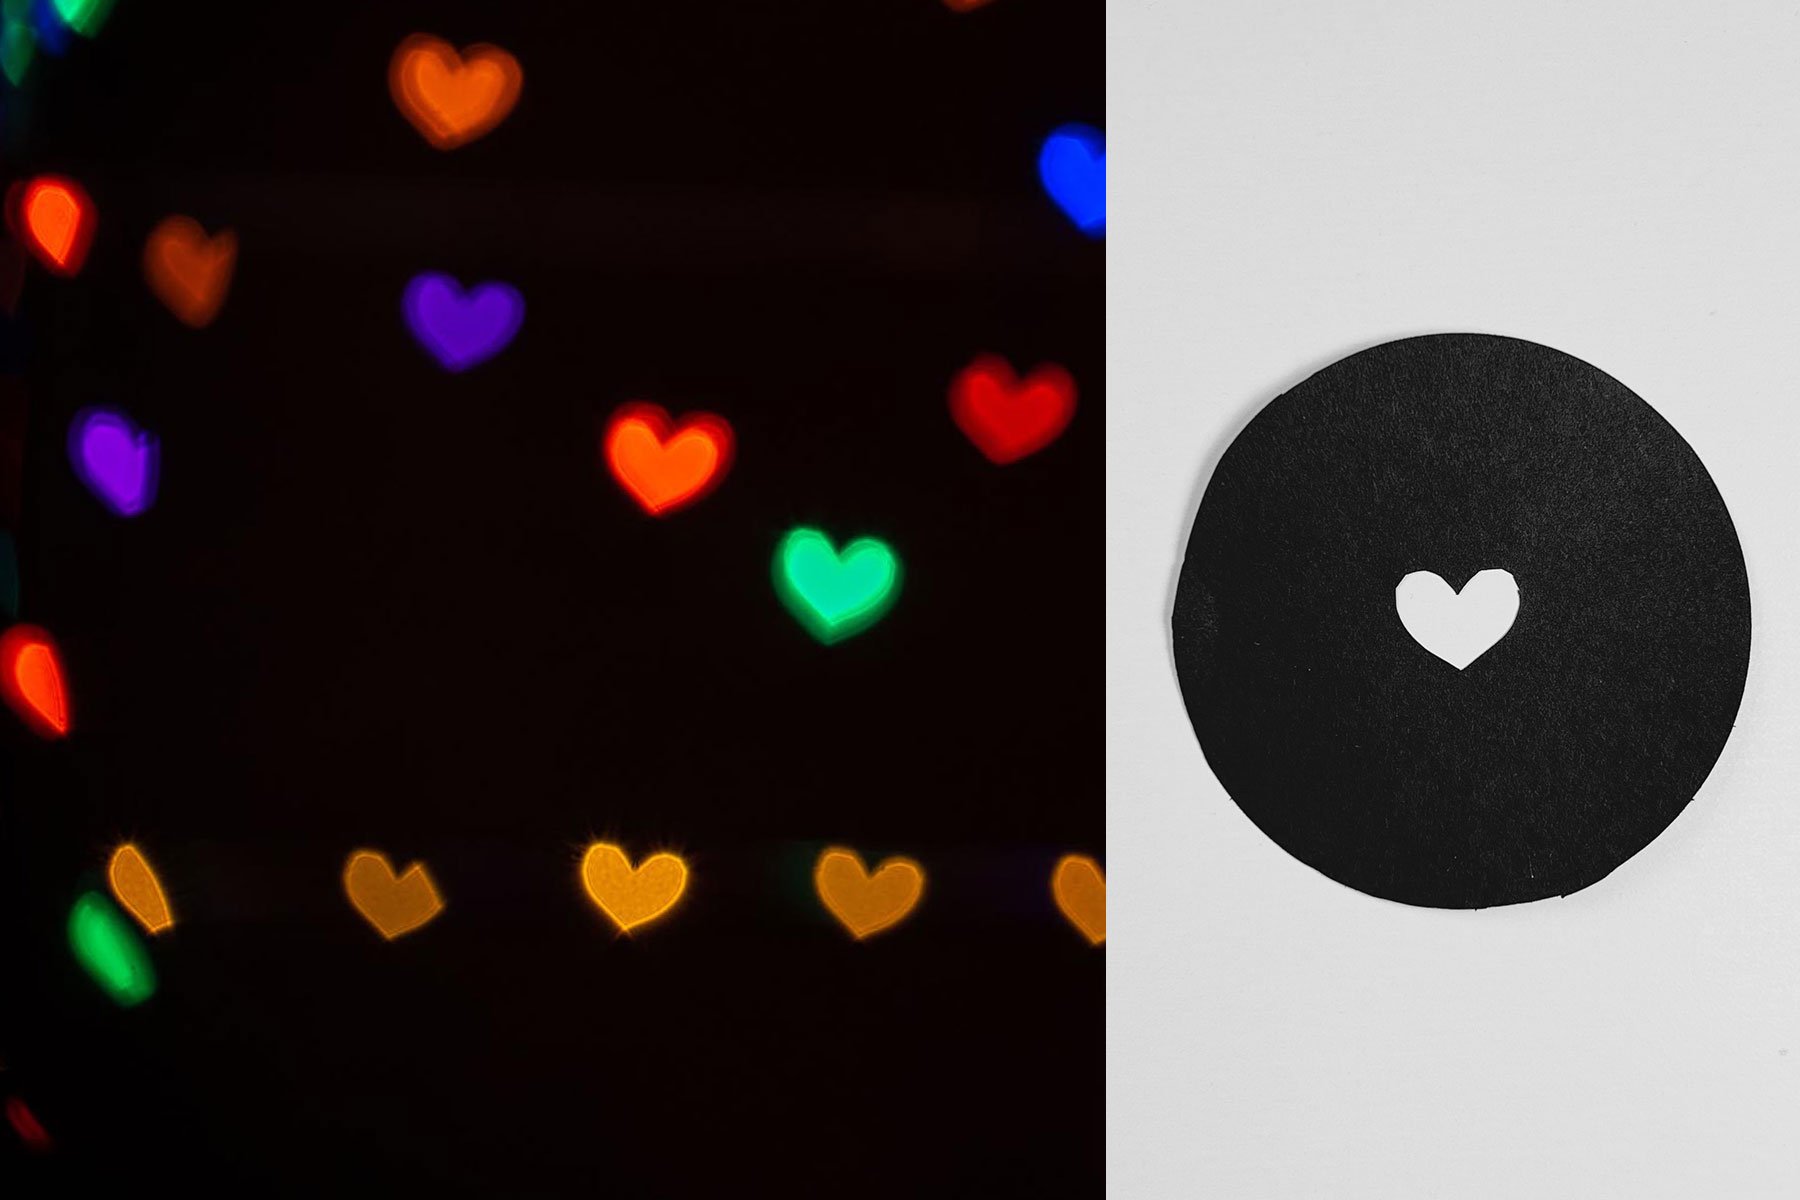
I *heart* Christmas by Pete via Flickr © 2007.
As an artist, I find that learning new skills and tools helps to inspire my creativity. Years ago, before I could honestly call myself a photographer, I stumbled upon this photography hack that had me scratching my head. The blurred lights in the background that typically end up being circular in form were actually in the shape of hearts! I thought that it surely was an effect created in photoshop, however, upon further research I learned it was in-camera effect - and also a technique that is not difficult to achieve!
THE TECHNIQUE
Custom Bokeh
What the heck is bokeh? Bokeh is the visual quality of the out-of-focus areas of a photograph, and is created by the way a camera lens renders light sources that are not in focus. Custom shaped bokeh in photography refers to the manipulation of the shape of the bokeh in the out-of-focus areas of an image. By creating a custom shaped bokeh, a photographer can control the appearance of these out-of-focus areas and add a unique touch to their images.

Wikipedia simply describes bokeh as the "aesthetic quality of the blur produced in out-of-focus parts of an image", and the term comes from the Japanese word boke (暈け/ボケ), which means "blur" or "haze", resulting in boke-aji (ボケ味), the "blur quality". Photos shot with a low aperture, also referred to as f-stop (f1.4 - f5.6, for example), create a narrow focus plane, causing the area outside of that focus plane to appear blurred in the photo. Objects within that blurred range appear blurry which results in the appearance of bokeh.
How To Make Custom Bokeh Shapes
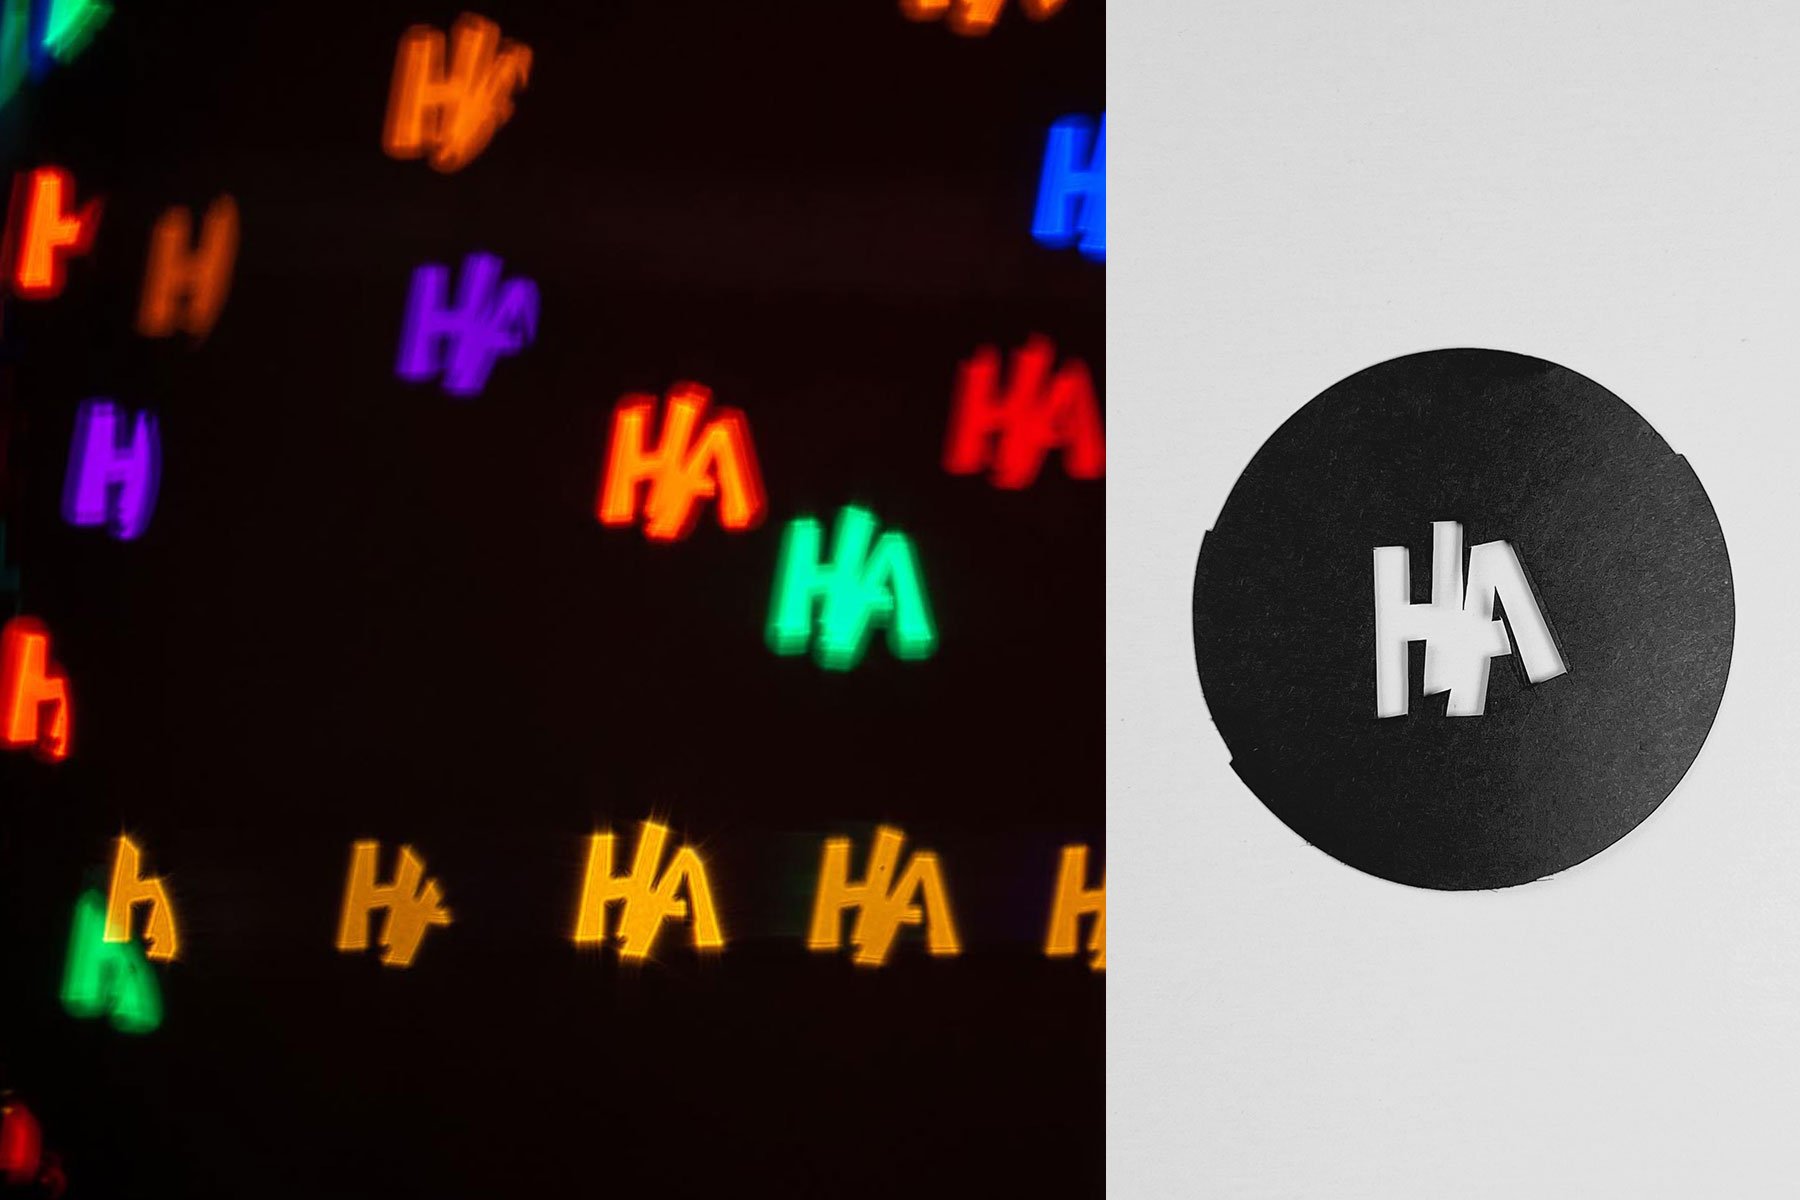
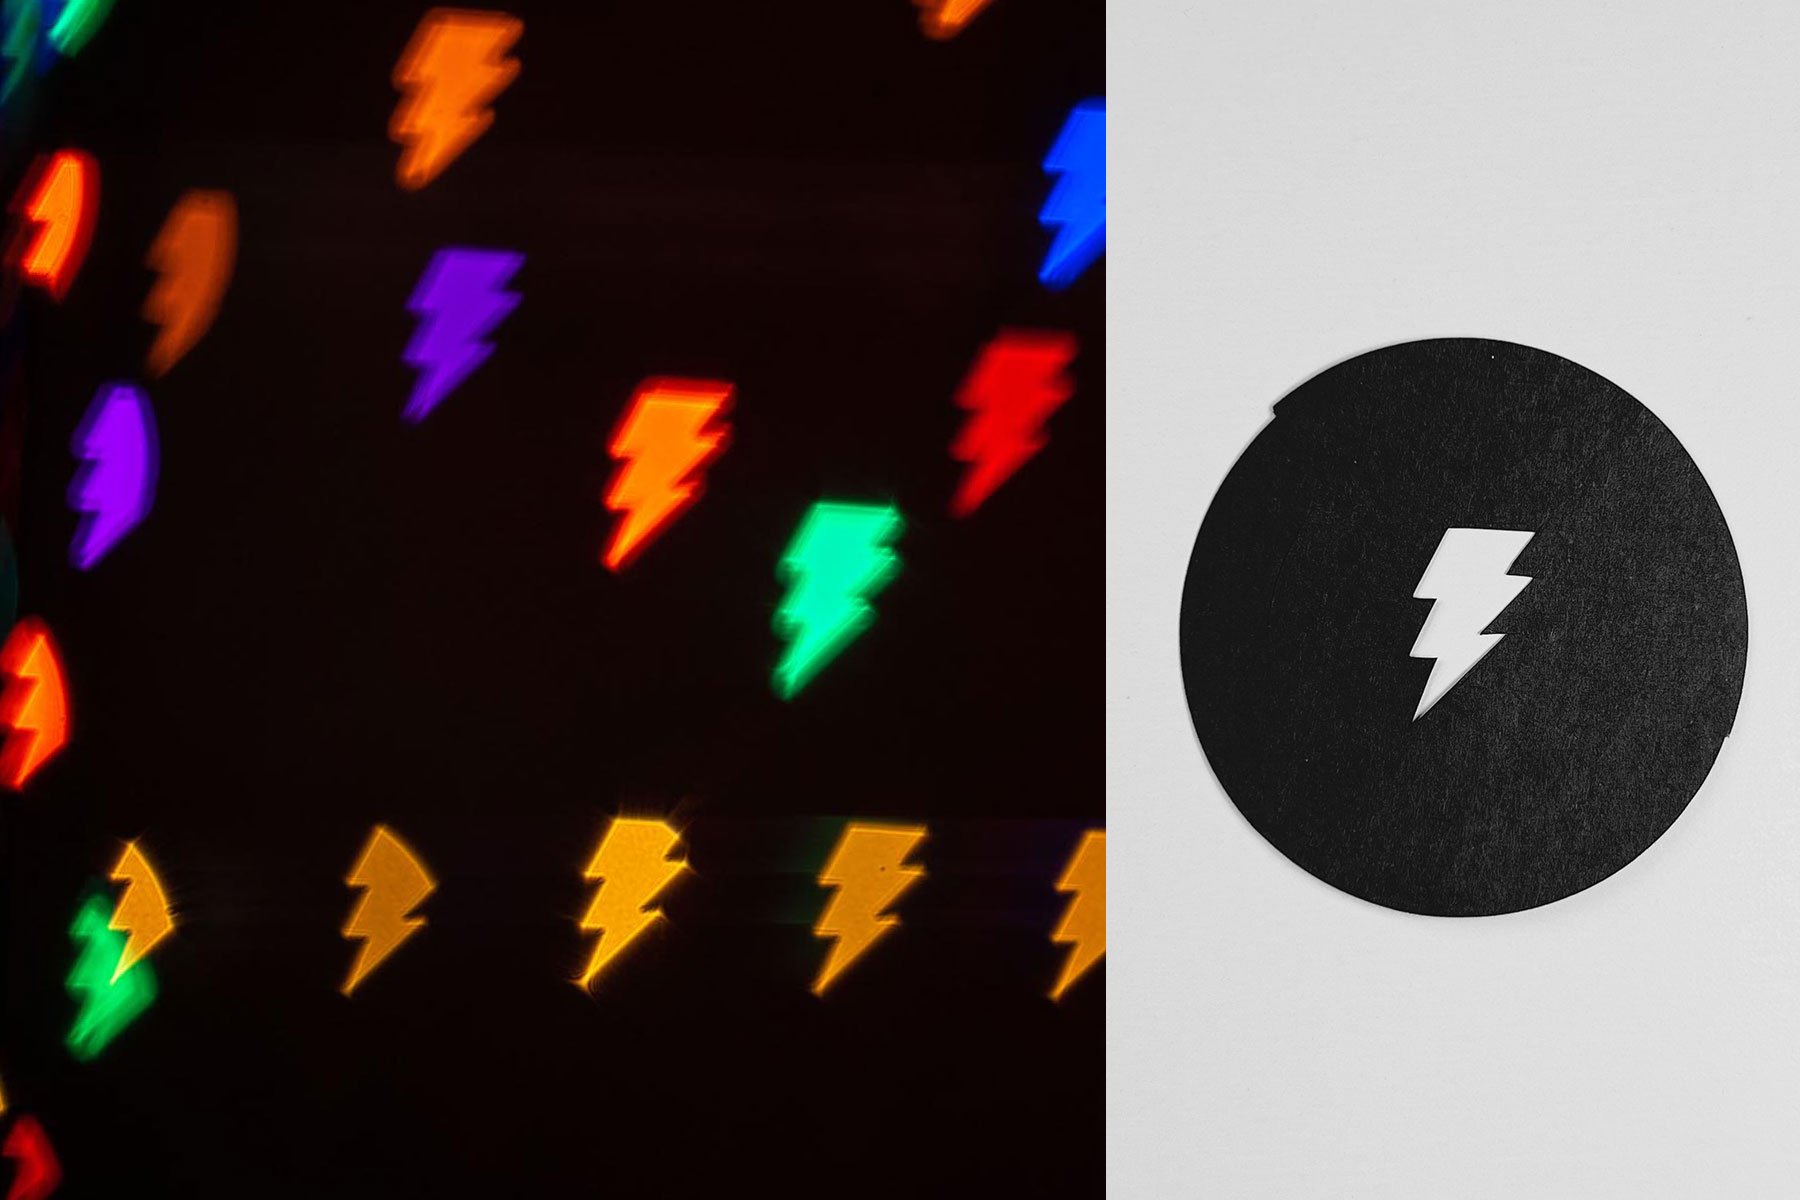
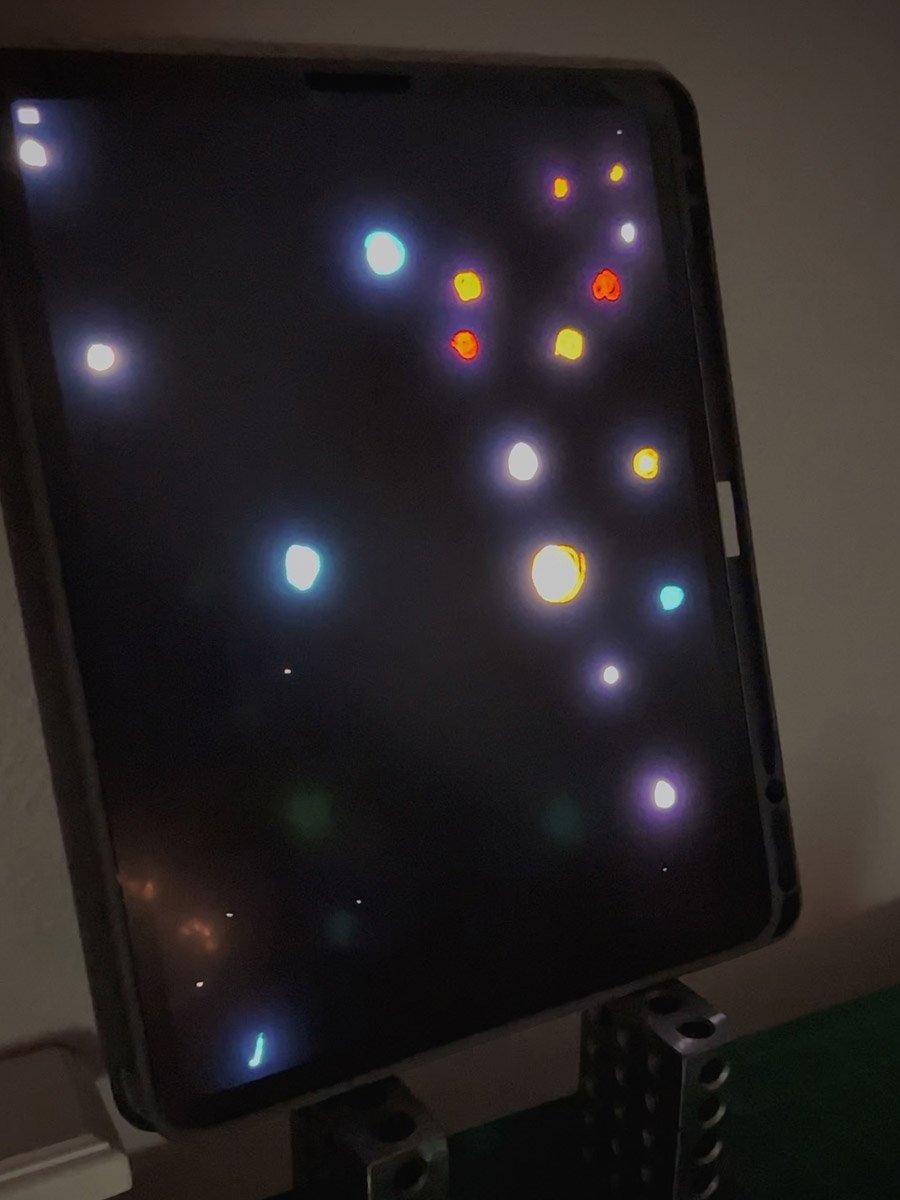
Creating your own custom shaped bokeh is extremely simple! All you have to do is cover the lens with a black piece of paper that has the desired shape cut out in the center. That cut out determines the shape of the bokeh, which allows for some creative results! Out of curiosity, I tested out a few shapes to see the results I would get using the same framing.


Test Results
Honestly, I was blown away by how much detail could be added while maintaining a relatively clean bokeh shape. I particularly was interested to see how using the word “MONDO” would turn out. Needless to say, it worked great!
As you can see, the results of the effect are fascinating! Through my various tests I ended up with varying results. Here are some important things I learned.
Lower the f-stop, better the bokeh f1.4-2.8
100mm Macro lens produced best results
Small, intense lights produce sharp bokeh
Larger lights produce soft-edged bokeh
Lights closer to frame edge have a higher chance of being cropped
Objects in front of the point of focus cause the bokeh shapes to flip upside down

PROOF OF CONCEPT
EXPLORATION & DISCOVERY
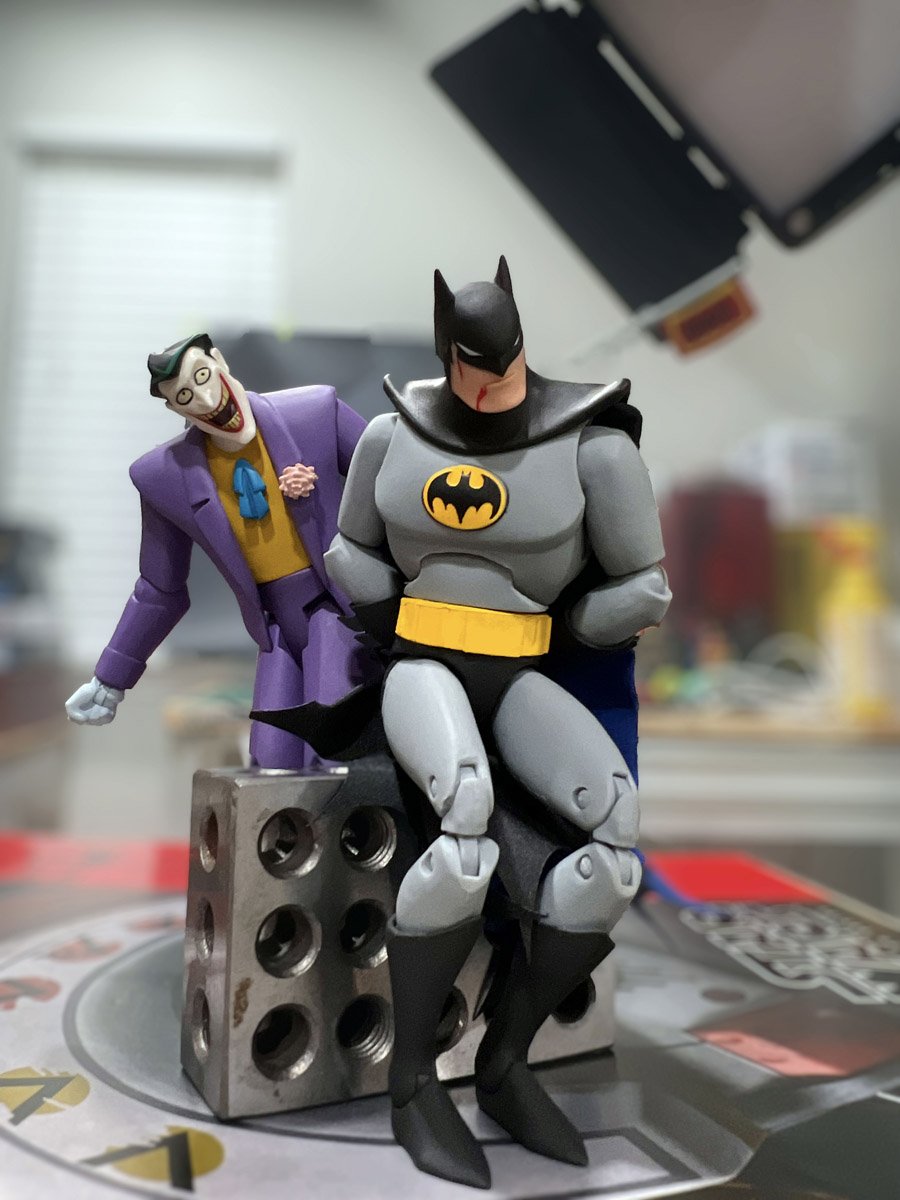
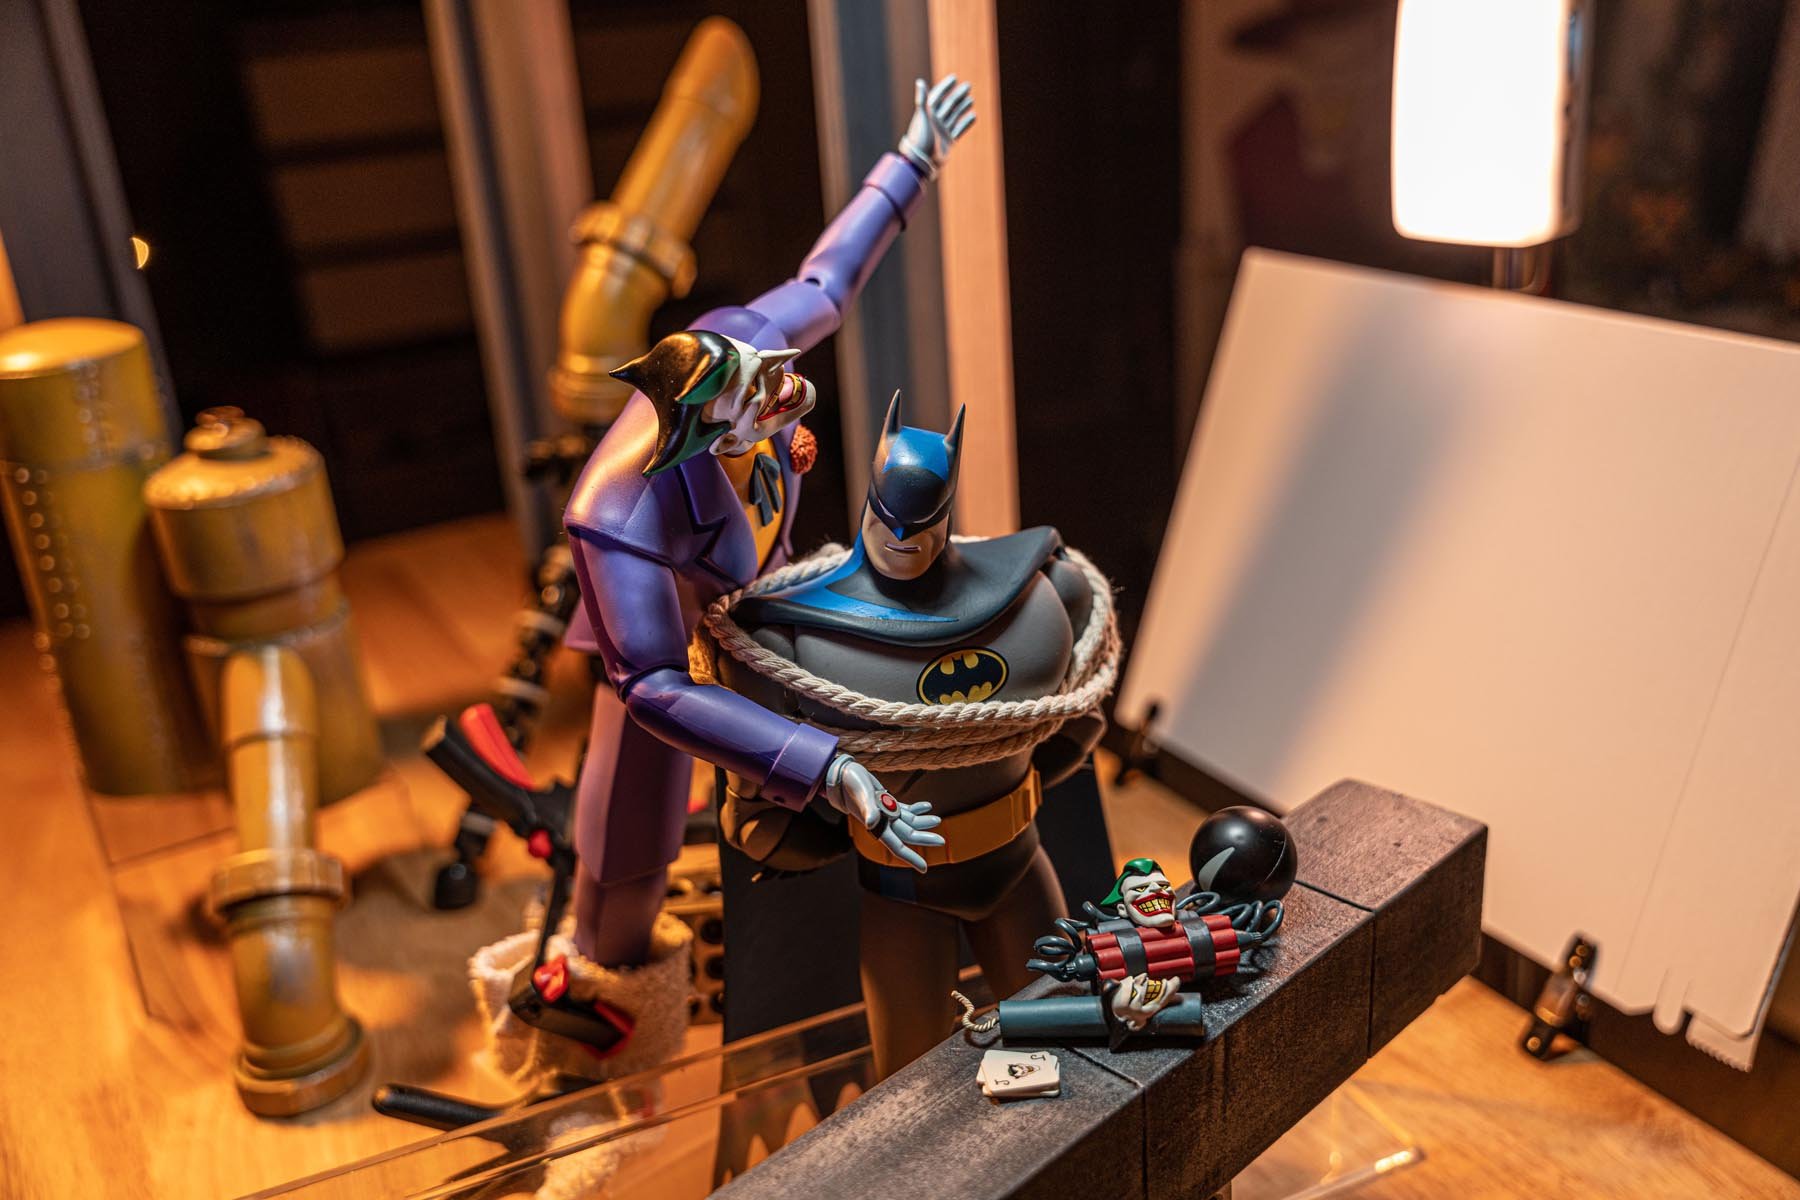
Using this Custom Bokeh technique for a toy photo allowed for a lot of creative freedom. The challenge was to decide on the concept which would help determine what figures I'd end up using. Sometimes I find it helpful to sketch out my thoughts to quickly sort through and find the ones have the most potential. From the 3-5 solid ideas I had, ultimately I chose to use the laughing Joker concept.


INITIAL SHOT TEST
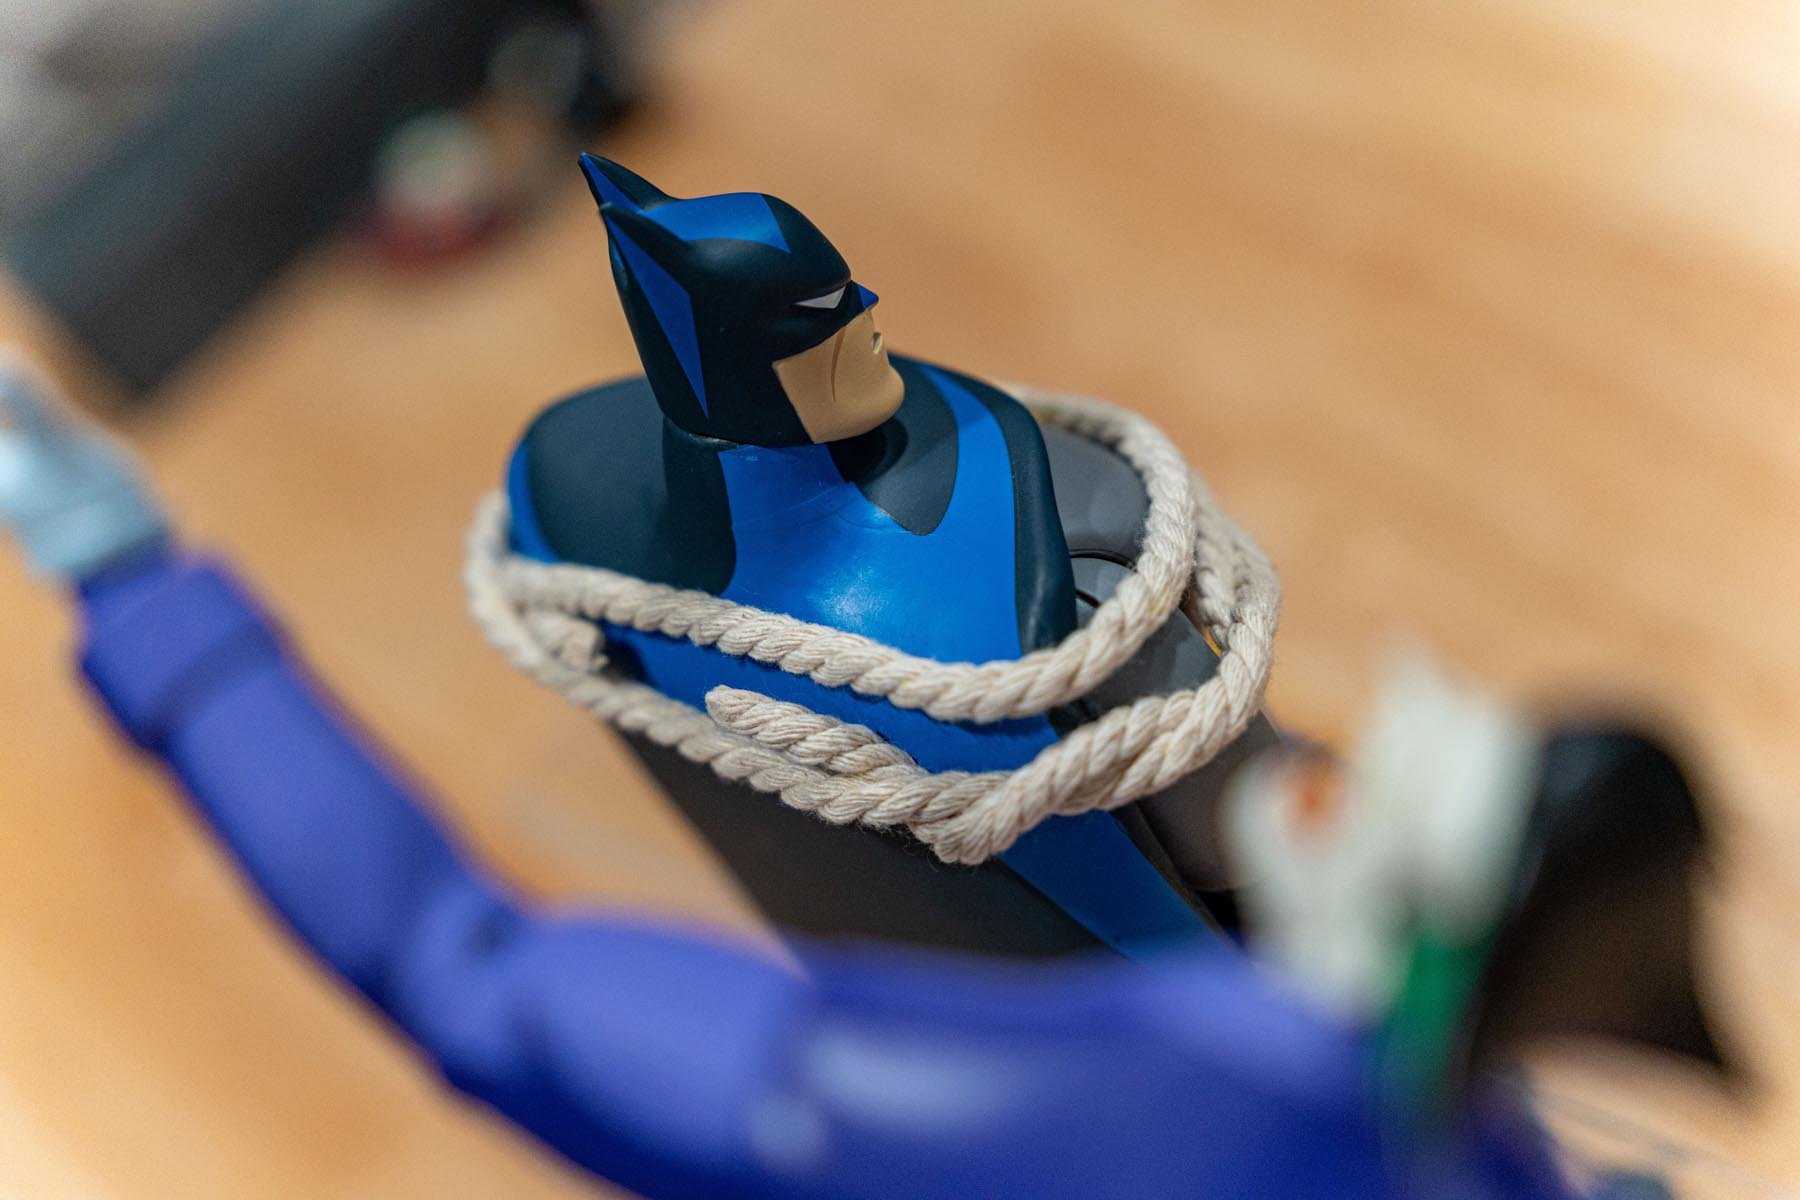
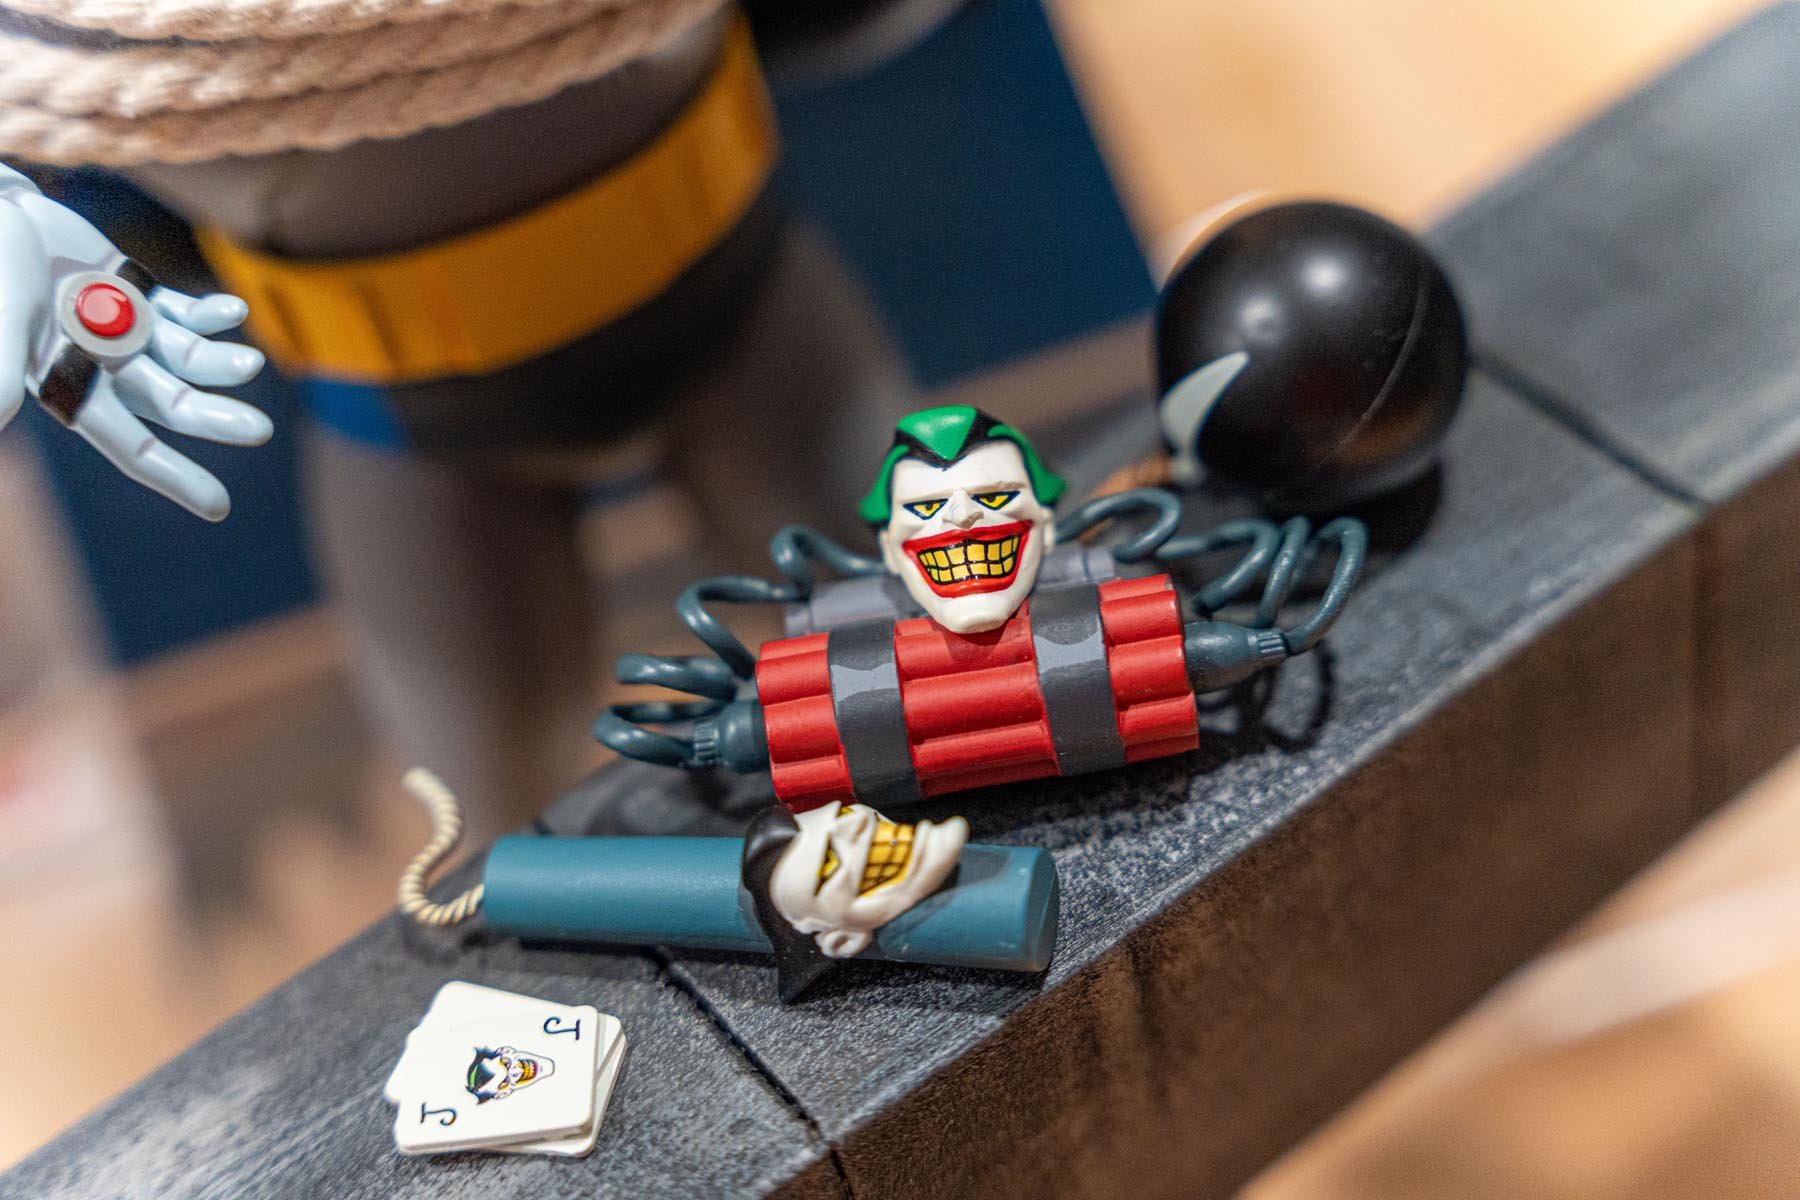
Batman the Animated Series was one of my favorite after-school tv shows to watch as a kid. Thirty years later, I'd argue that that it holds up and remains a favorite of mine today. The show's acclaim can largely be attributed to the amazing performances of the voice cast, namely Kevin Conroy as Batman and Mark Hamill as The Joker.
After choosing the characters, the next step was to get a rough proof of concept together. I set up my test shot using the 1:12 scale DC Direct figures, as you can see in the photos. The figures had several great expressions to choose from, however, there were some limitations when it came to articulation. Mondo’s 1:6 scale collectible figures were the perfect figures to use to capture my concept. Faithful to the tv show’s aesthetic, both Joker and Batman figures include multiple head sculpts and accessories that look fantastic and shine in the toy photography format.
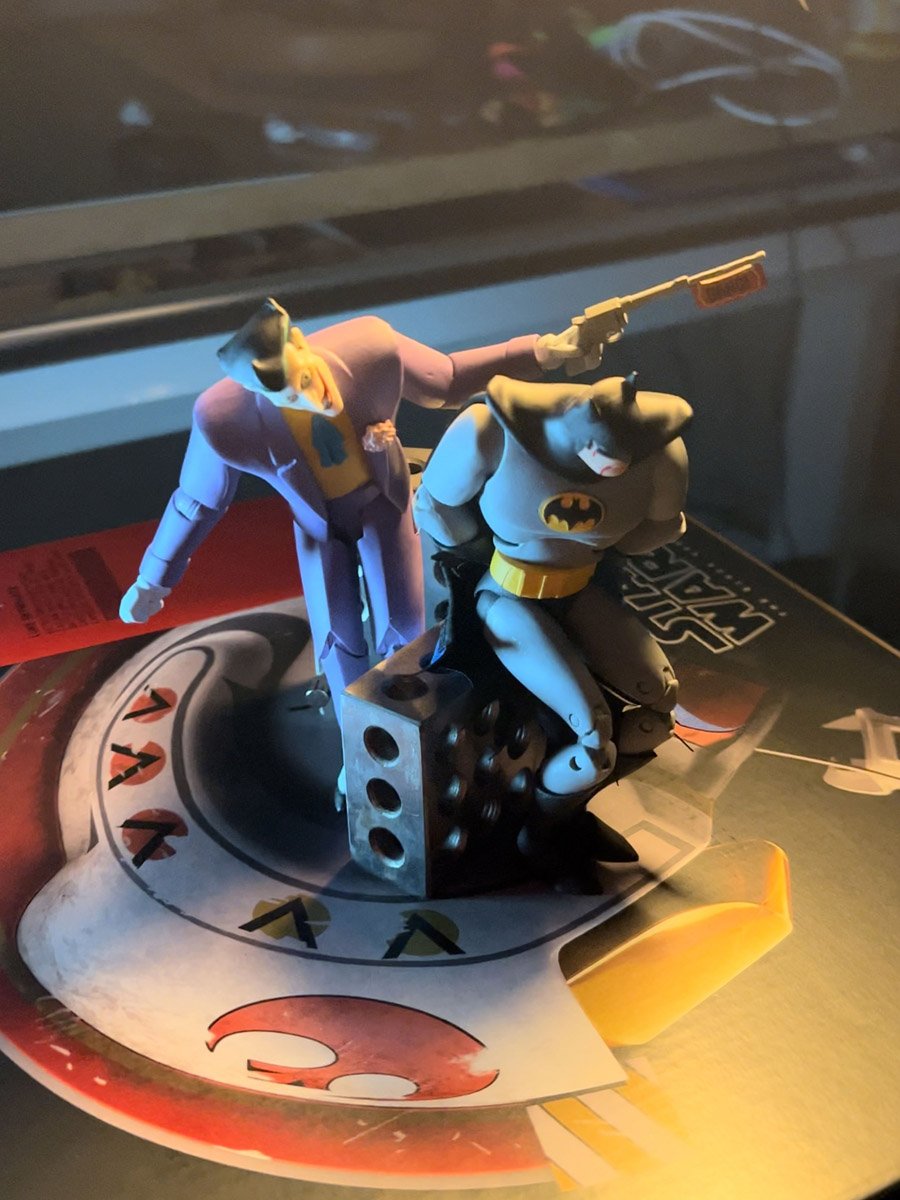
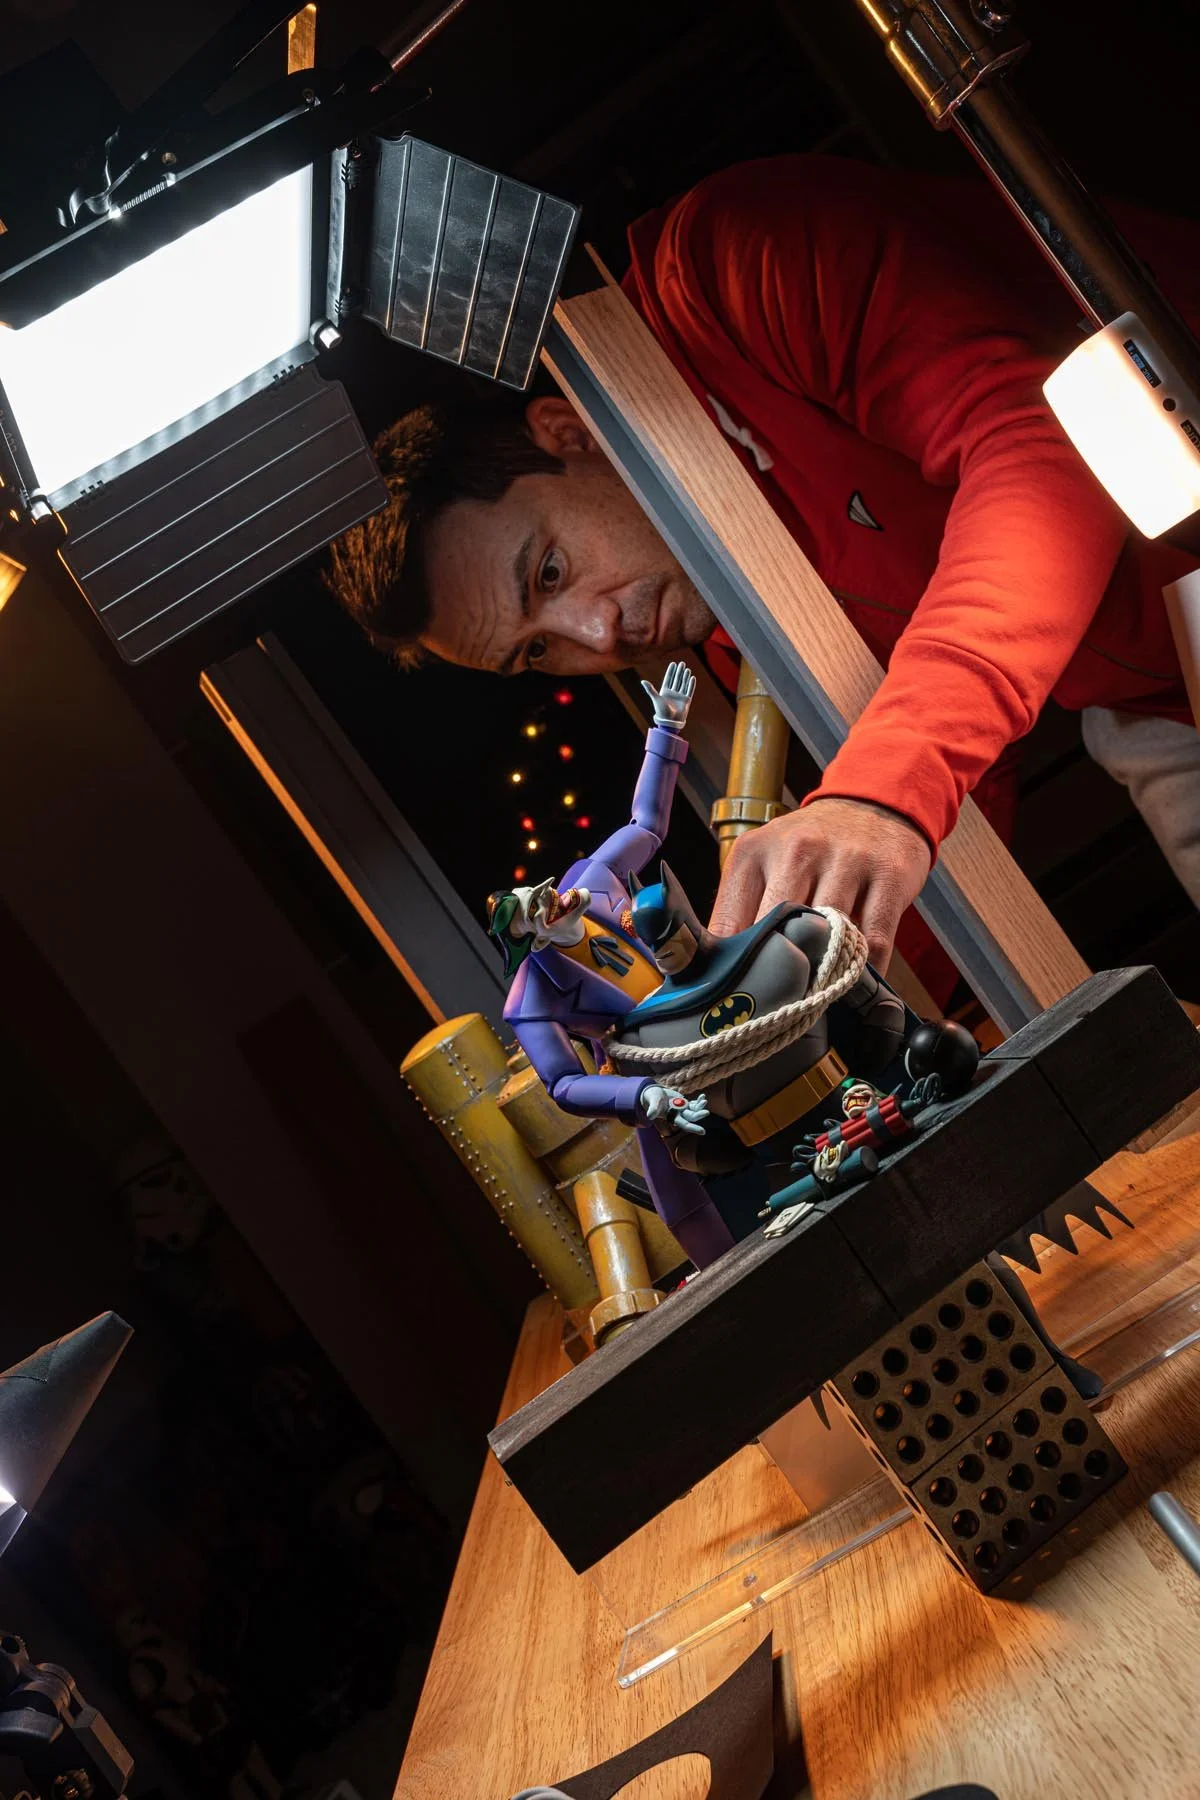
Knowing approximately where I wanted the “Ha” bokeh to appear, I set some initial lights approximately 8ft from the lens to provide enough depth to produce decent bokeh. I found that using small fairy lights worked best vs. a strand of Christmas lights. Of course results will vary depending on the setup, so feel free to explore if you try it out.


APPLying THE TECHNIQUE
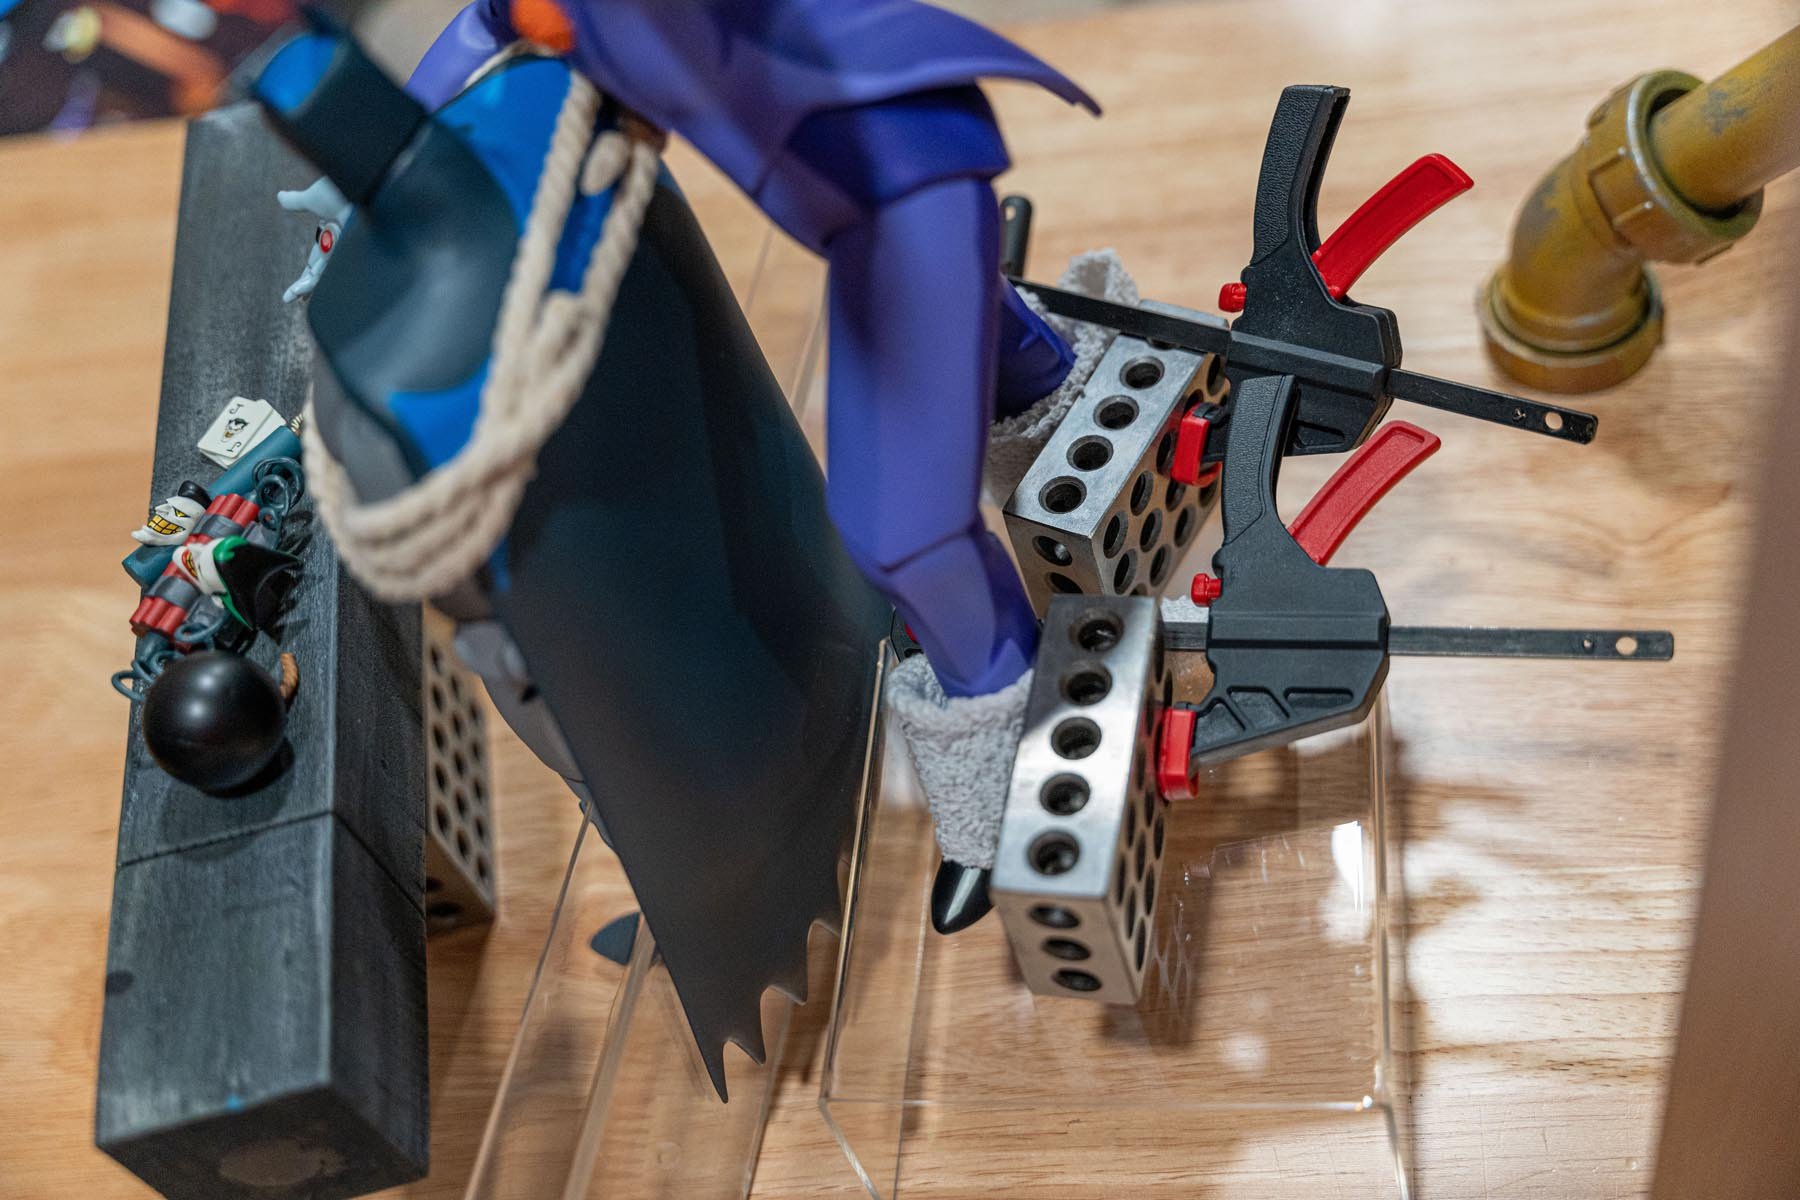
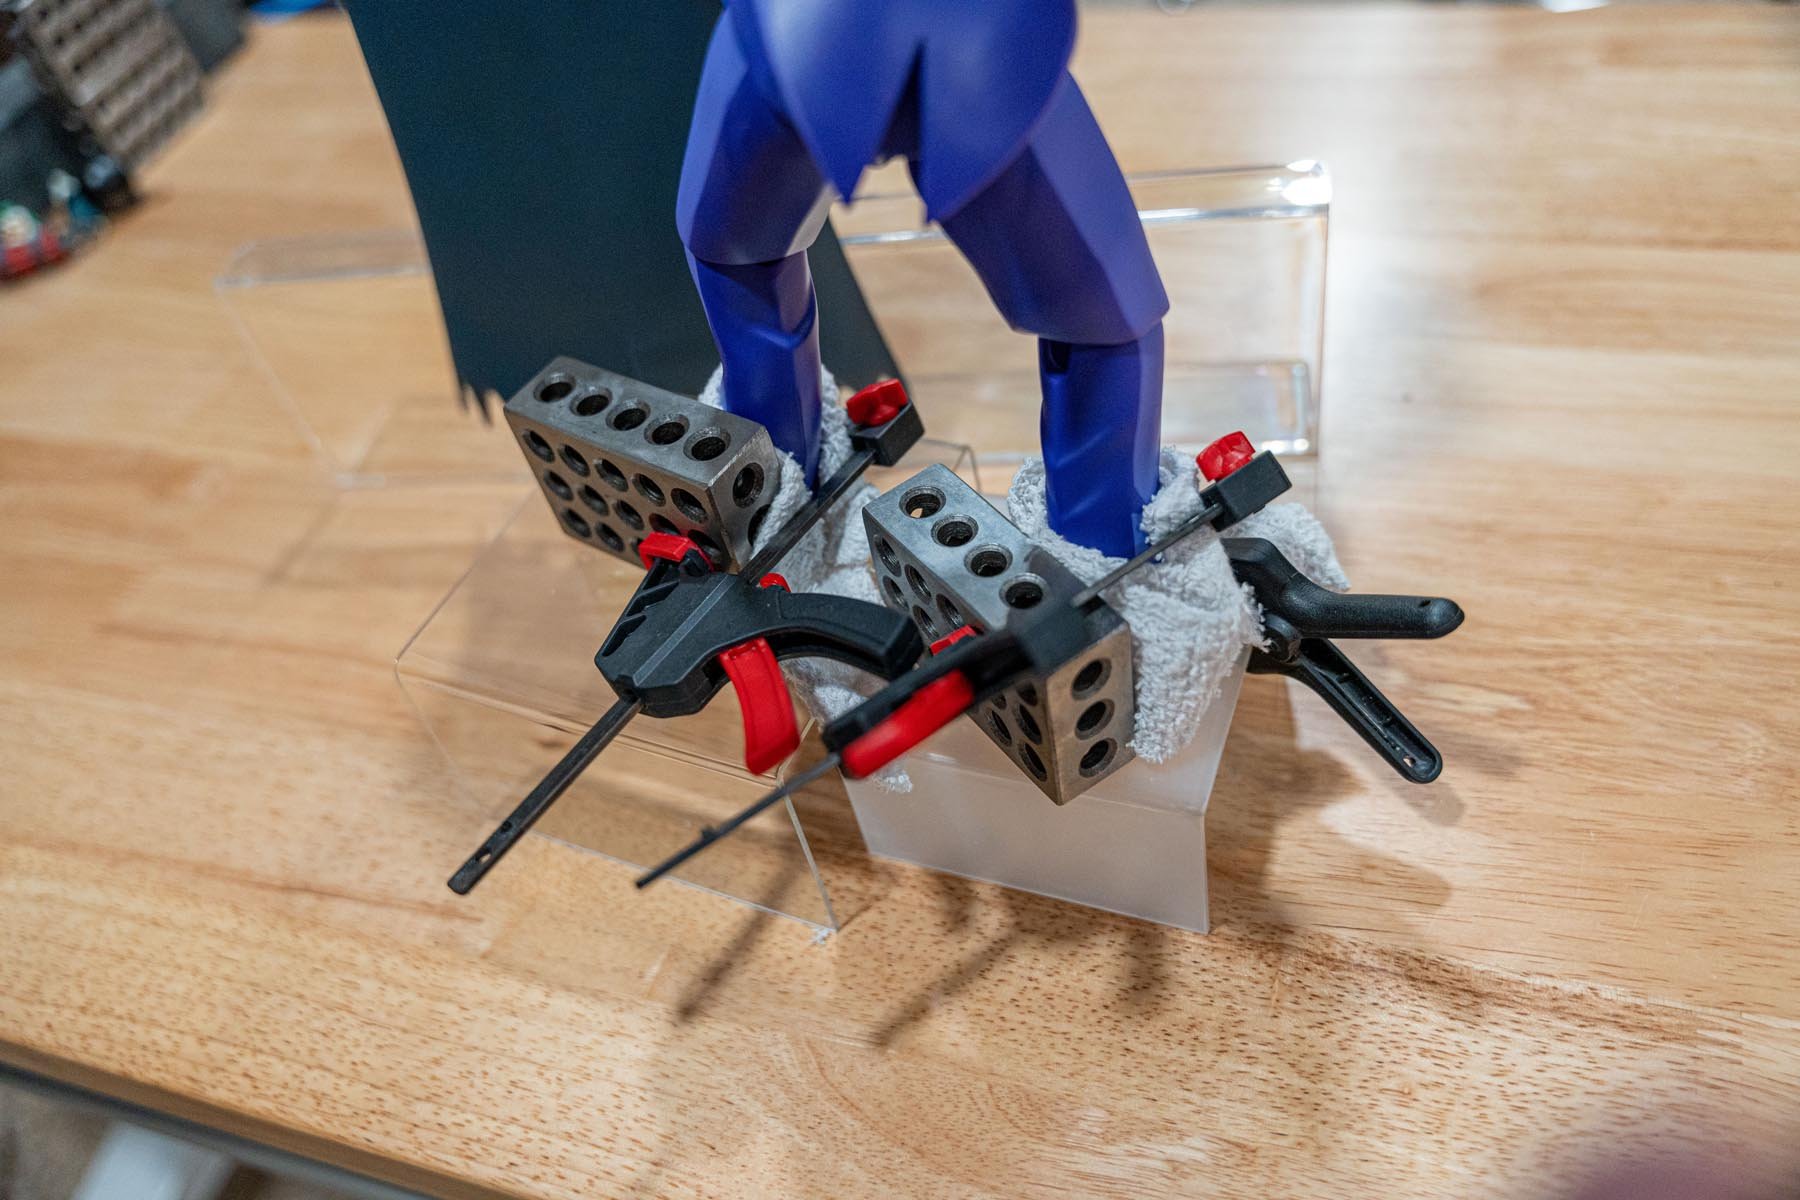
Once I was pleased with the pose and light placement, which took some time to get right, I added the supporting dio elements to fill out the scene and frame the bokeh. The yellow pipes and tanks were scratch built from my good friend Jordan Affonso, aka Oiler's Workshop. Please be sure to check out his content on youtube and prepared to be amazed! I created the pillars from strips of wood that I painted gray and taped together to make them appear as I-beams in the background.
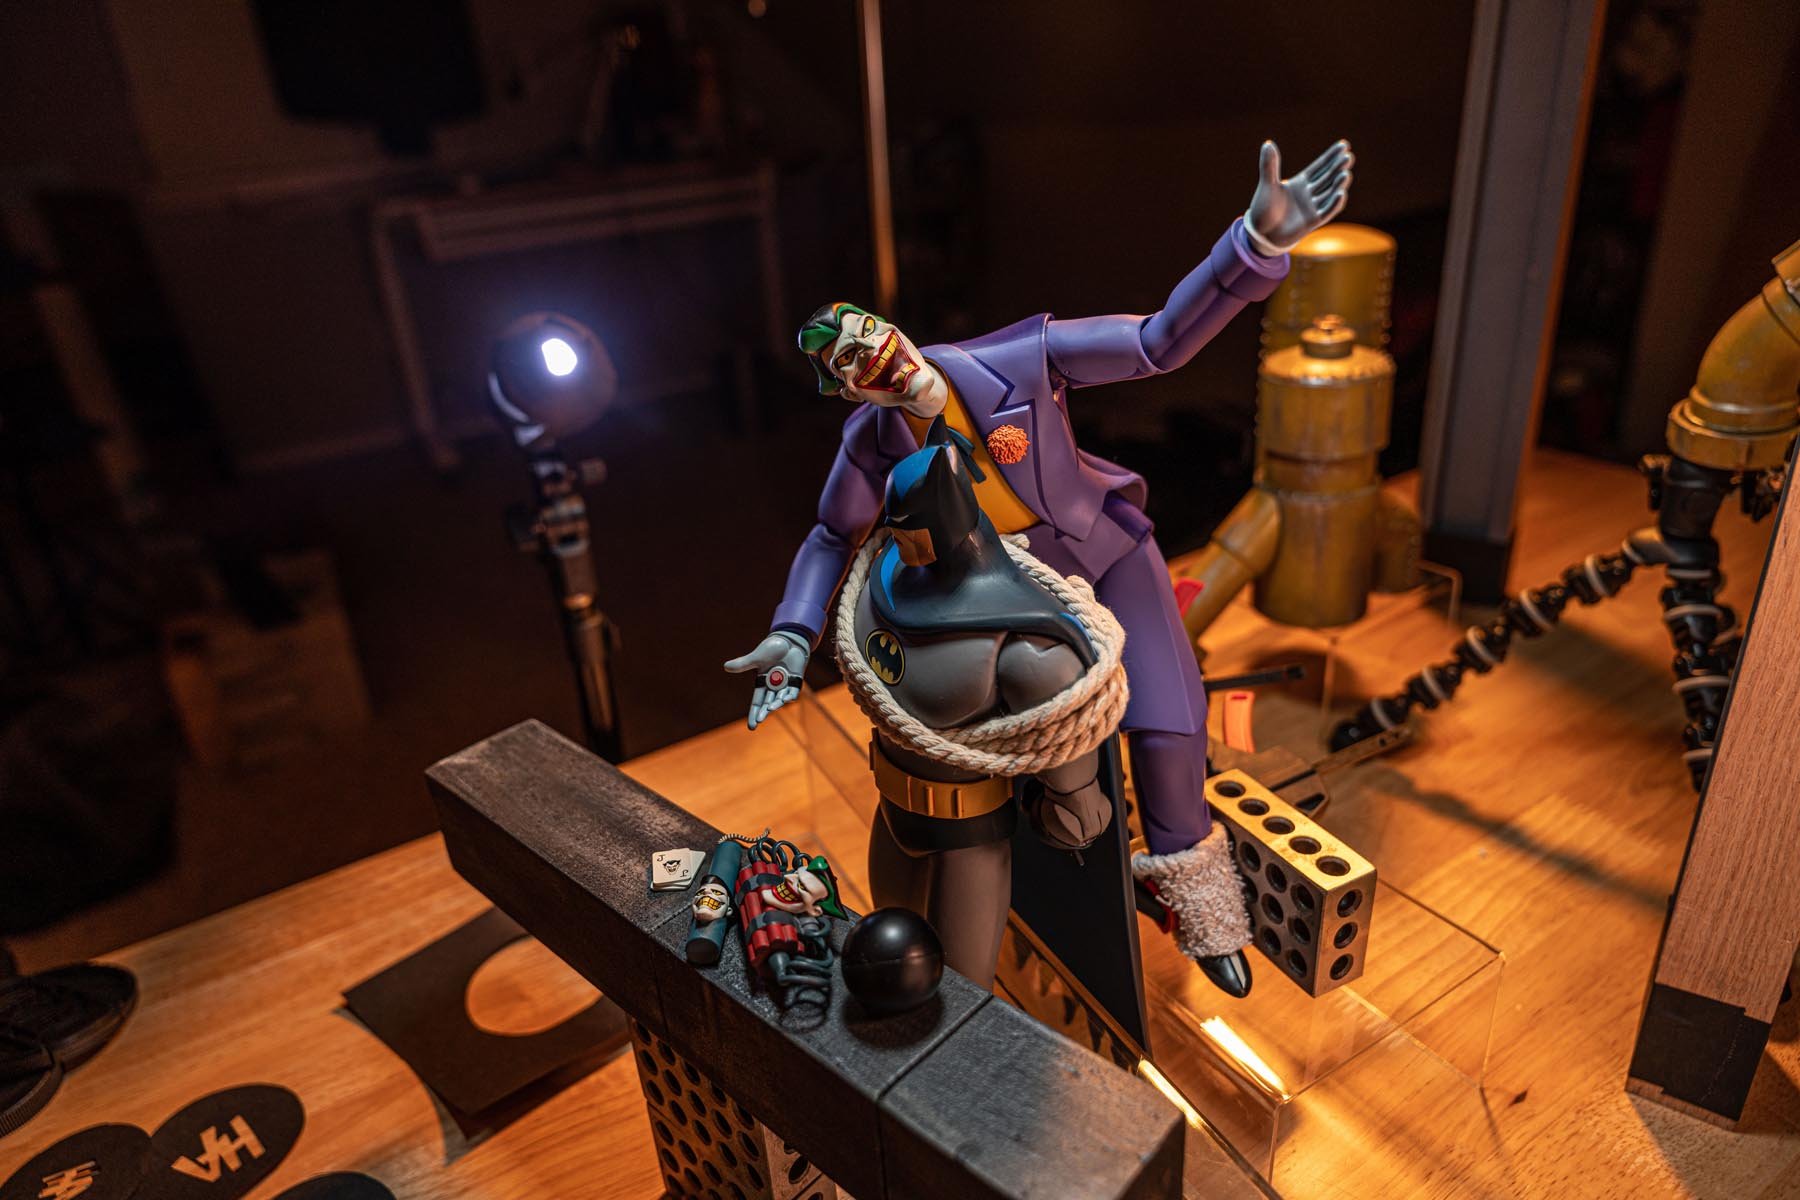
After all of the elements were in place, I lit the scene to achieve the desired tone for the shot. I used 2 GVM LED Panel Lights for overhead illumination, 1 Phillips Hue Color Bulb to fill in some shadows in Joker's face, and a super handy Aputure Mini LED Light to provide rim light on the subjects.


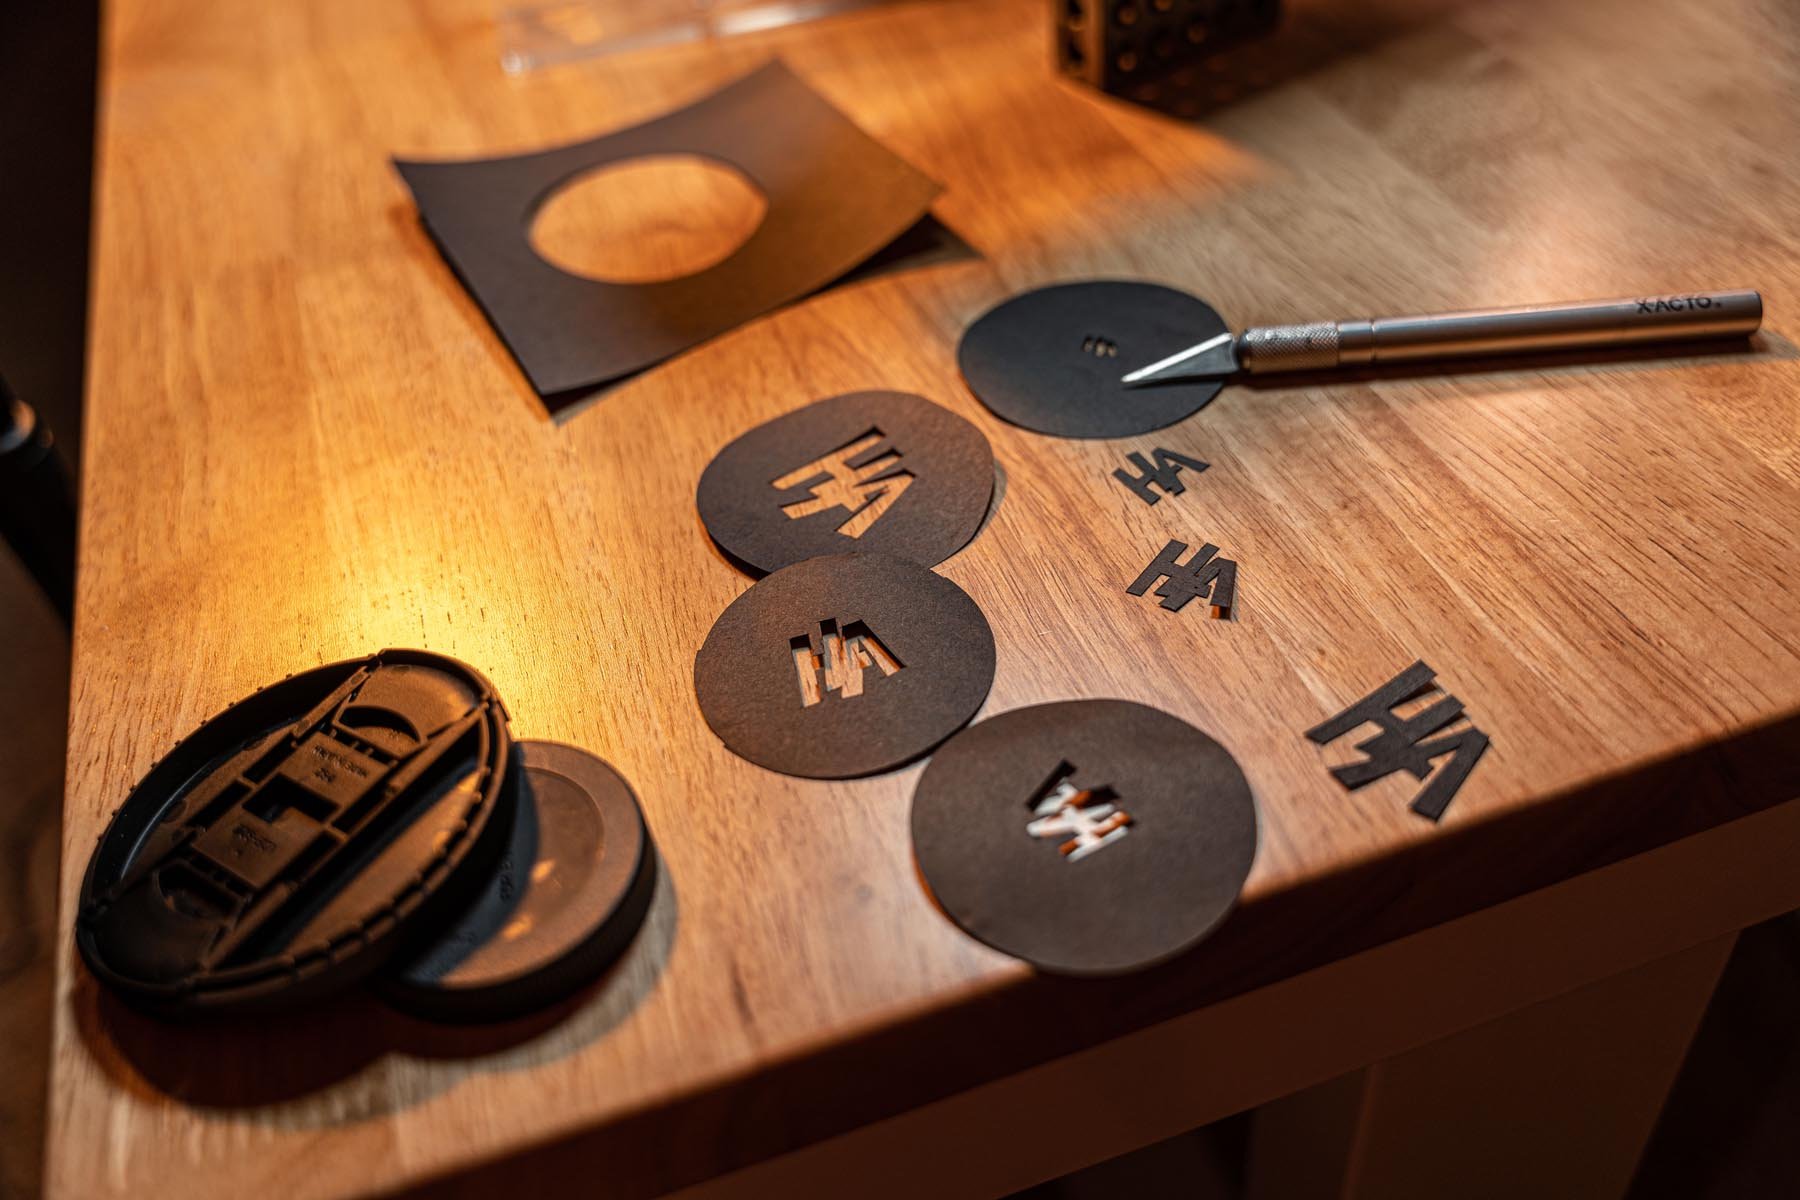
Taking the paper “Ha” cutout I created, I added it to the front of the camera, careful to avoid getting tape on the lens. Once the paper shape was in place, the “Ha” shapes immediately appeared! It really was that straightforward. As you can see in the final results, the effect is quite unique and honestly just cool. As a Adobe Photoshop pro, yes, I could add the text as I'm editing the photo, however, there is something fulfilling in achieving this all in-camera!


Custom Bokeh in action
THE FINAL RESULT
Have you created your own custom bokeh shapes before? Is this an entirely new discovery? Either way I encourage you to try it the next time you want to add a little extra flair in your shots. I personally want to continue to perfect and tweak the use of bokeh in my work, so keep an eye out!
If you have tried this technique in any of your work, tag me in your posts on instagram use the hashtag #wmolcustombokeh in your caption. I would love to see your take on using bokeh in your shots! Since this is an ongoing series, what other techniques should I explore?
Thanks for learning with me and hopefully this inspires you to get creative with your next project.
THE PRINT
As part of my series that explores techniques of visual effects, my exercise in creating custom bokeh shapes resulted in this concept called “Ha Ha Ha”.
“Ha Ha Ha” is an archival-grade print on Fuji Crystal luster photo paper and mounted on black styrene board for long-lasting durability. Please allow up to 2 weeks before your order arrives.
Currently available for US and Canada orders only. Please email info@invisibleelement.com if you would like a custom quote for shipping or have additional inquiries.


As part of my series that explores techniques of visual effects, my exploration of creating custom-shaped bokeh resulted in this concept called “Ha Ha Ha”.
“Ha Ha Ha” is an archival-grade print on Fuji Crystal luster photo paper and mounted on black styrene board for long-lasting durability. Please allow up to 2 weeks before your order arrives. Shipping included!
Currently available for US and Canada orders only. Please email info@invisibleelement.com if you would like a custom quote for shipping or have additional inquiries.