A Guide to Digirama : Part 03

We’ve finally made it towards the final part in our three part Digirama How-to series. In this part, we will dive into what goes into getting the shot once you’ve set it all up.
Shooting DSLR vs. Phone
This part assumes that you’ll be shooting with a Digital SLR or something a little more advanced than your phone’s camera. There is nothing wrong at all with using whatever you have, but having better equipment will undoubtedly provide better results. Also, I’ll skip the Photography 101 course as that is a whole other series on its own. Google it.
Gear
Everyone has their own preferences as it relates to camera gear. When I made the investment, I chose to go with Canon as many of my friends in production and photography had positive reviews. If you’re in the market to buy a Digital SLR, my recommendation is to do what I did and reach out to people you trust to give you their insights.
Here is a paired down list of the gear that I have use for just about every shoot.
Canon 6D
Canon 24-70mm f2.8 L-Series
Circular Polarizer
Canon 50mm f1.8
Amazon Basics backpack
Remote wireless shutter release
Manfrotto tripod
Simple cleaning kit

Shooting Basics
Do it RAW. Although I’m able to get great results straight out of my camera as-is, I always shoot using the RAW format. If you’re using a DSLR and not shooting RAW, then you’re certainly underutilizing the capabilities of your camera while limiting the amount of post processing you’ll be able to do.

Location
As far as the physical space is concerned, you can really make any thing work. My home office works perfectly since I already have my workspace set up, which consists of my computer, monitors, desk, and lamps. It can be a hassle to set up your equipment each time you want to shoot, so having everything mostly good to go will allow you to use that time to shoot vs. set up.

Low Light Conditions
I’ve found that having complete control of your light delivers the best results. Simply put, the only light you want in your scene is light you choose. Natural light leaking into your digirama set can cause some unwanted results. My preference is to shoot at night when you’re not having to fight natural lighting peering through windows. If you have to shoot during the day, I recommend finding a space with limited natural light.
Shooting in these low light conditions means you’ll need to lower your f-stop to allow more light through the lens. This is where having an f1.8 or f2.8 lens comes in handy. The higher your f-stop the longer your camera shutter will have to stay open for the proper exposure. This makes getting a sharp photo without a tripod nearly impossible!

Pulling The Trigger
Now you’re ready to start shooting! This is where the fun begins. I tend to overshoot, because I enjoy adjusting variables such as light position, camera exposures, and framing. Although it takes up more space on your card and hard drive, I’d rather have more options to choose from vs. not enough. There have been many times I’ve taken several photos and composited them together to create my final shot.

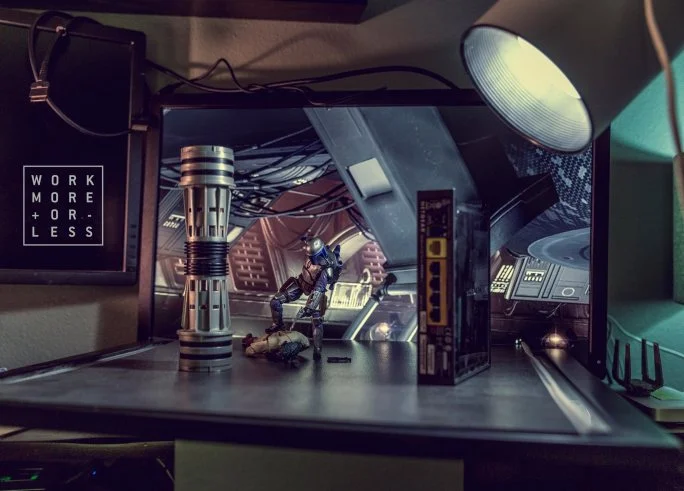
One of the most difficult challenges to overcome when using a monitor or screen to shoot is exposure. Sometimes the image foreground can be perfectly lit but the screen isn’t exposed correctly. Most of the time it means the background is too bright. I’ve found two ways to adjust for this. The first is to simply dim your screen to compensate. The second (more expensive alternative) is to invest in a circular polarizing filter. This has been one of the most helpful accessories I’ve purchased, hands down.

As you can see from the images above, the polarizer affects the brightness of the screen allowing you the ability to balance the screen intensity to your exposure settings. This has been of of the most helpful accessories to have for digirama shoots.
Post Adjustments
This is the moment of truth when you realize if your subject is in focus, or wish you would have given the scene a once over with the duster – I’ve yet to have a photo without defect, which probably means I need more practice. On the flip side, this too is the part where you can see all your hard work pay off! It’s magical when the whole shot comes together and you get to see it for the first time in full resolution.As I have mentioned before, I prefer to use Adobe Photoshop for finishing the shot. Upon opening your RAW files, Photoshop allows you to edit them to an extent. It’s perfect for my workflow, but there are other alternatives such as Lightroom or ON1 Photo Raw.

The last step before saving out the final photo includes adding effects and/or subtle color grading. Although not completely necessary, these layers can help add more depth and richness overall.

Examples
Here are a few behind the scenes photos from various digirama shoots from the past.


Conclusion
Since starting the series, I’ve heard from many who have put into practice some of the techniques and tips I outlined. It is always encouraging to see others having success with their own digirama setups. For me it’s been an incredibly fun way to realize almost anything you can imagine.