A Guide to Digirama : Part 01

One of the things I enjoy most about flipping through my instagram feed is the creativity behind the work posted by toy photographers. Everything from traditional dioramas, beautiful outdoor scenic setups, as well as the utilization of effects (both practical and digital) create diversity throughout the community. I have tried my hand at several of these techniques at one time or another, but the “Digirama” has become my go-to.
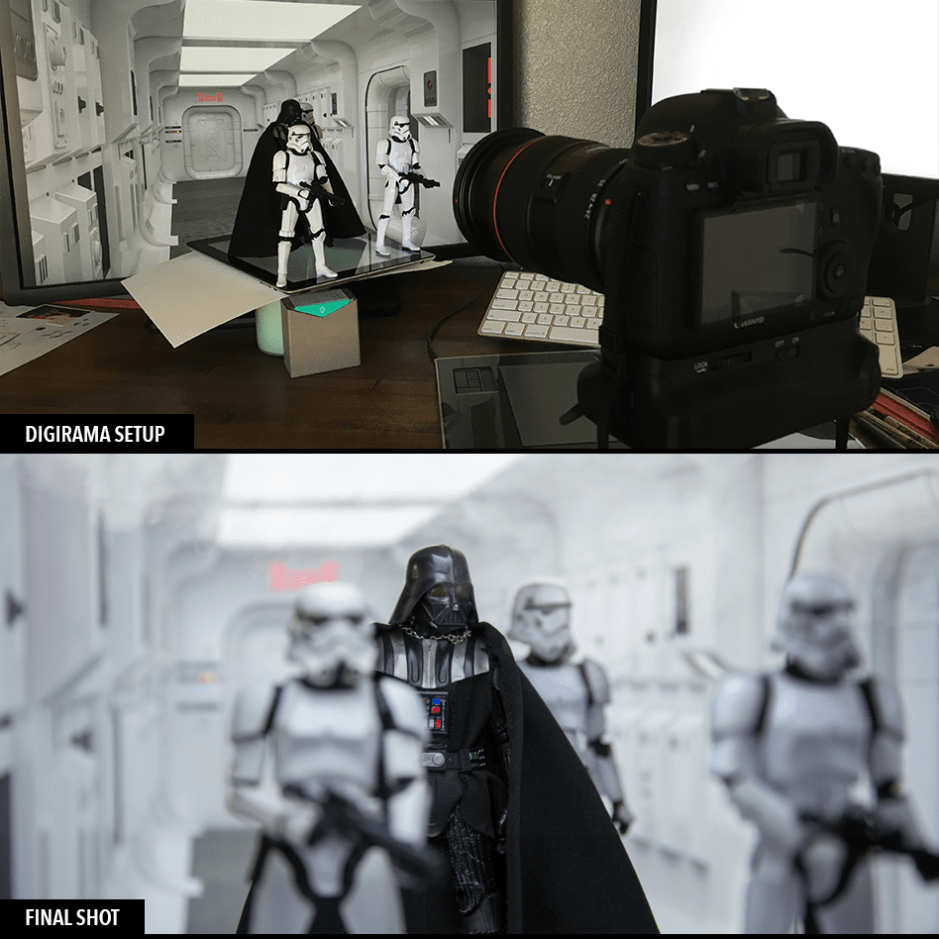
“Digi-what” you might say? Basically it’s what it sounds like. Digirama is using a screen to display an image that acts as your background image for your subject. In our case we’re using toys and action figures. A legitimate name for this technique may exist, but I like the way it sounds so let’s stick with it.
When I started experimenting with toy photography, I defaulted to what I knew best – compositing and digital manipulation. Having experience in the world of post production, it made sense to be able to ue a computer monitor to choose any background you want to help create the shot. If you too have tried this method before, I’m sure you’ve run into many of the same obstacles that make it challenging.
To help make your next digirama shoot more successful, I’ve put together a few pointers that I wanted to share. I realized that it was turning into a long, exhausting article so I’ve decided to break it into 3 parts – Background, Lighting, and Shooting.
PART 01 – BACKGROUND
The first and most crucial aspects of the digirama technique is choosing the right image for your backdrop. I am pretty particular when it comes to sourcing images for my shoots, so sometimes I can easily spend half my time finding or creating the right one.
Screenshot
If I am planning to recreate a specific scene from a film, I’ll start at square one with good old screen grabs from the source. Occasionally I get lucky with finding wide establishing shots that might have little to no foreground elements, like people. In most cases you can crop your image to remove any unwanted elements, but if all else fails, photoshop can help out.

Photo Manipulation Software
Photoshop is your friend. Okay, okay, I guess GIMP can be your friend too, but I’m not going to talk about it since I use the Adobe Creative Suite day in and day out. Anyway, using a photo manipulation app is a great way to create your own backgrounds. They can be as simple or complicated as your skills will allow. However even the most simple approaches can make an impact.
Take Wolvie for example. All I used for this was a well placed 2-color gradient and voila! The great thing is that ultimately you can create whatever you want, unless your abilities are less than super. In that case, just continue reading…

Image Search
There’s nothing wrong with googling. In fact, finding the right image is simple when you use the right keywords. Be sure to filter your search by size or pixel dimension. You’d be surprised much high resolution imagery you can find. Keep refining and reducing the size if nothing is showing up in you results. The higher the resolution, the better it will look on your screen.

Once you start down the rabbit hole of hunting for pictures, you’ll inevitably come across great resource sites like unsplash.com that offer “free (do whatever you want) high resolutions photos”. One more important thing to note – make it a practice to credit the artist when you’re not using your own photo. Give respect, get respect.
Match The Angle
One of the most important things to consider once you have your image is the perspective. In other words, how was the camera positioned in the background image? Eye level, low angle, birds eye view? If the camera you shoot with doesn’t compliment the perspective then the whole illusion won’t be successful. The key is to match that perspective! This unfortunately becomes a bit of trial and error as you shoot. What you think looks correct may not through the eye of the lens. With enough tweaking, you’ll eventually get it.
Infinite Possibilities
One of the benefits to shooting with this technique is the ability to instantly change the tone of the shot just by swapping out background images. In the example below, you can see that all three shots are from the exact same camera angle. With swapping out the background image (and lighting adjustments) the mood in each shot can be dramatically changed with relative ease.

I hope this will help get you off on the right foot as you dive into the world of digirama photography. In Part 02 we will take a look at how lighting plays a crucial role in selling the shot.